- Camping Tips
- Hiking Tips
- RV Camping
- Destinations
- Blog
- Gear Reviews
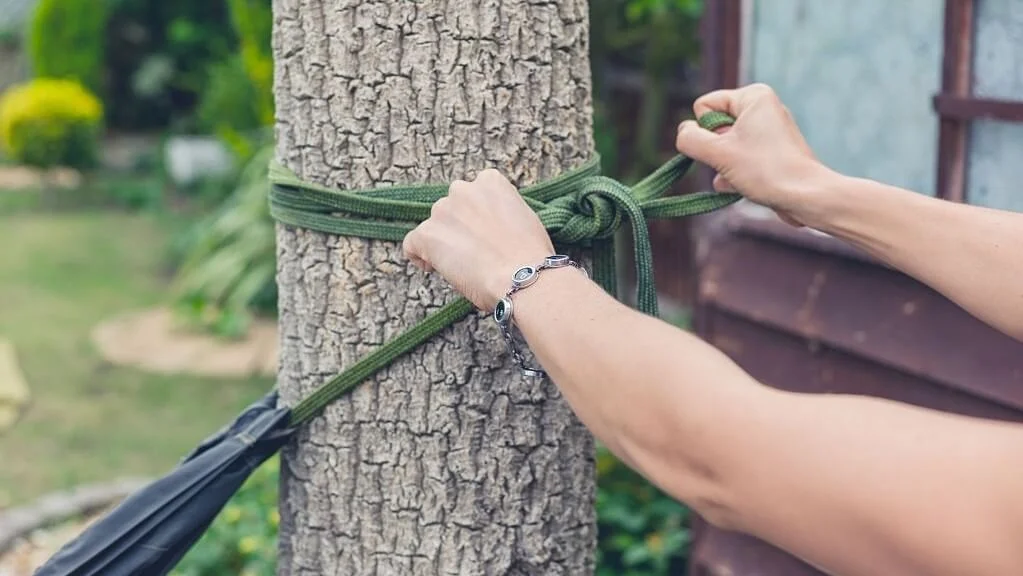
Tying knots is perhaps one of the most underrated camping skills. This simple exercise of winding and contorting a section of a rope or a string has proved useful to many since the beginning of time.
For outdoor lovers, being able to tie knots easily equates to incredible savings on time and ultimately a more worthwhile outdoor experience. Furthermore, a well-done knot can help keep your shelter secured in place, make carrying large loads much easier, and at times save lives by tying emergency tourniquets.
We have shared below what we believe to be some of the most useful camping knots to learn before plunging into the outdoors lifestyle.
But first, let’s dispel a few misconceptions and bring you up to speed on some of the common terms used in knotting.
By definition, a knot is simply an interlacement of parts of any type of cordage for decorative or practical reasons.
In camping, knots come in handy for connecting a rope to a tent pole, securing a hammock shelter to a tree, attaching and cinching a guyline to a tent, and connecting a line to a tent peg. Knots also prove useful for fixing up clotheslines and hanging lanterns at the campsite.
Additionally, some knotting styles can be used to temporarily fix snapped tent poles or even put together specific tools such as a tripod or stand for your dishwashing station.
Your knots are as good as the integrity of the given rope material. Whether for camping purposes or not, you will most likely be working with either natural fiber ropes or synthetic variants. The latter is preferred for its longevity, strength, customization, and feathery weights.
Nylon, polypropylene, polyester, and manila are some of the most popular artificial types of ropes.
The only downside you might face with artificial cordage is that they melt when exposed to heat or even a little bit of friction. Additionally, they tend to be very smooth, which can lead to the knots slipping or coming undone.
Aside from the material, ropes come in two main types namely twisted or laid ropes and braided ropes.
Twisted or laid ropes typically have three or four fiber strands twisted together to form the entirety of the rope’s length. On the other hand, braided ropes have an inner core made of plaited, twisted, or parallel fibers that are then surrounded by an outer sheath comprising braided fiber strands.
Braided ropes are slightly stronger and more flexible than twisted ropes. Additionally, the braiding usually makes the ropes easier and more comfortable to handle.
Other variations to the basic twisted and braided rope types include Hollow braid ropes, Kernmantle ropes, and Diamond braided ropes, etc.
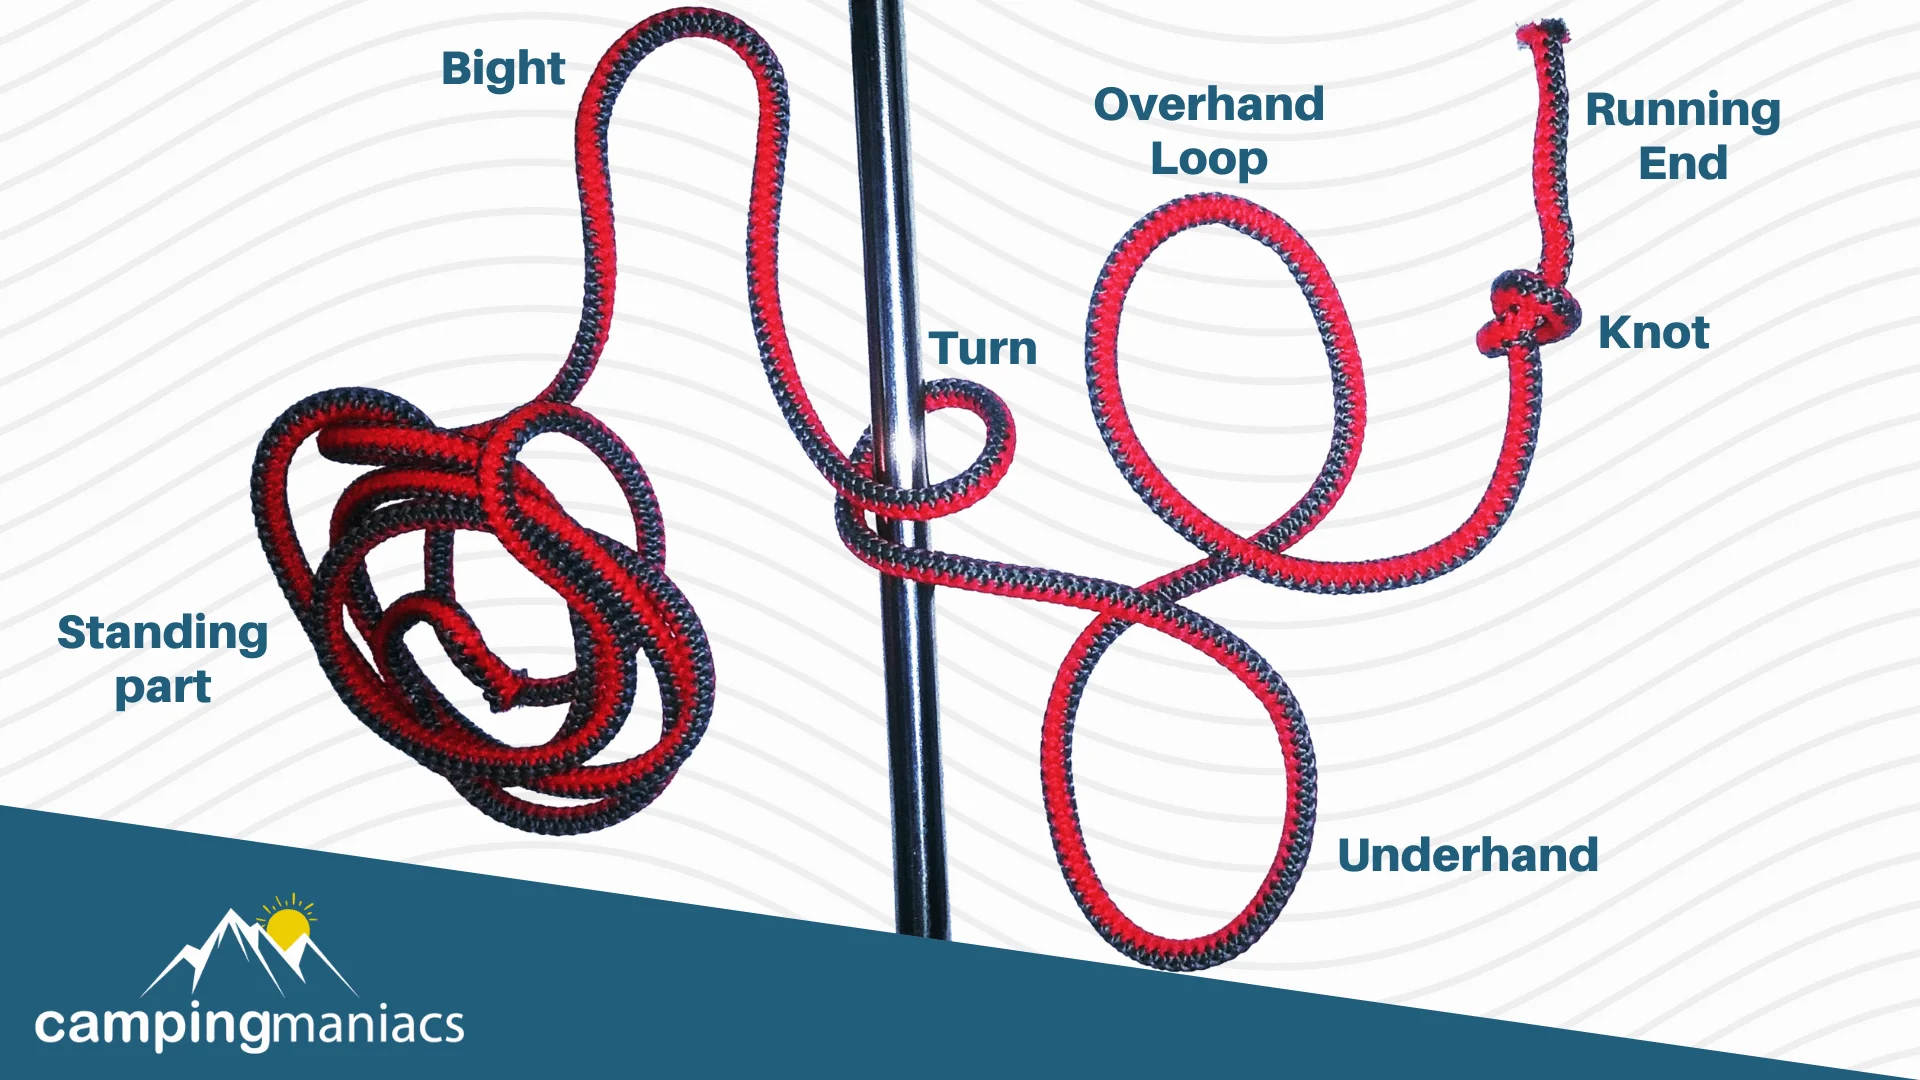
We might drop a few specific terms while describing some of the types of knots. So, it’s best to get acquainted with at least a few of them before getting started with your knot tying journey.
Other terms that might come up in the knot tying craft include dressing, slipping, jamming, and setting among others.
Firstly, setting refers to the important process of tensioning a knot to remove any slack in the line. Slipping occurs when the working end passes into the given knot and it unravels or comes undone. Usually, you want to use a stopper knot to prevent a knot from slipping or failing.
Jamming is also another characteristic of a knot, which simply means that a knot is very hard to untie.
Loading a knot refers to applying a force to the knot or rope. It could be a quick tug or directly stressing the rope with a suitably heavy object. However, you must dress the knot before you carry out any loading tests.
To dress a knot means to arrange it in a way that improves its performance. Tidy up the knot and make sure it’s set well without any twists before the loading phase. Properly dressed knots are easier to identify, quick and easy to untie, and stronger than the opposite.
Lastly, capsizing, spilling, or rolling of knots results in a deformed or weakened structure of the given knot. It is mostly caused by improper usage of a knot or incorrect tying. When tying your knots always ensure the length of the tail is a bit longer than you think you might need to minimize possible malfunctions.
While the terms “knot” and “hitch” are often used interchangeably, they technically mean different things. Knots are generally divided into various categories such as:
The categorization often suggests which outdoor pursuit or purpose a given type of knot would be most suitable for. A hitch, for instance, is used to connect a line to another object like another rope or a carabiner. A bend joins two ropes together while a lashing knot is used to hold two poles together.
Ideally, your go-to camping knots should be easy to tie or untie, easy to adjust, strong enough to secure a load, and serve a given purpose. Since there are too many types of knots in the various categories, we have chosen to only focus on the most useful ones.
Beyond their decorative purposes, stopper knots are used to bind the end of a length of rope to prevent knot failure. This type of knot features a fixed thicker point at the end of the rope or around the standing part.
The knot helps stop fraying at the rope ends, adds weight to the line, and prevents the rope from slipping through a hole or carabiner. Some good examples of stopper knots include overhand knot, Figure-eight knot, Ashley’s stopper knot, and Monkey’s Fist knot. The latter is perhaps the most excessive of the four.
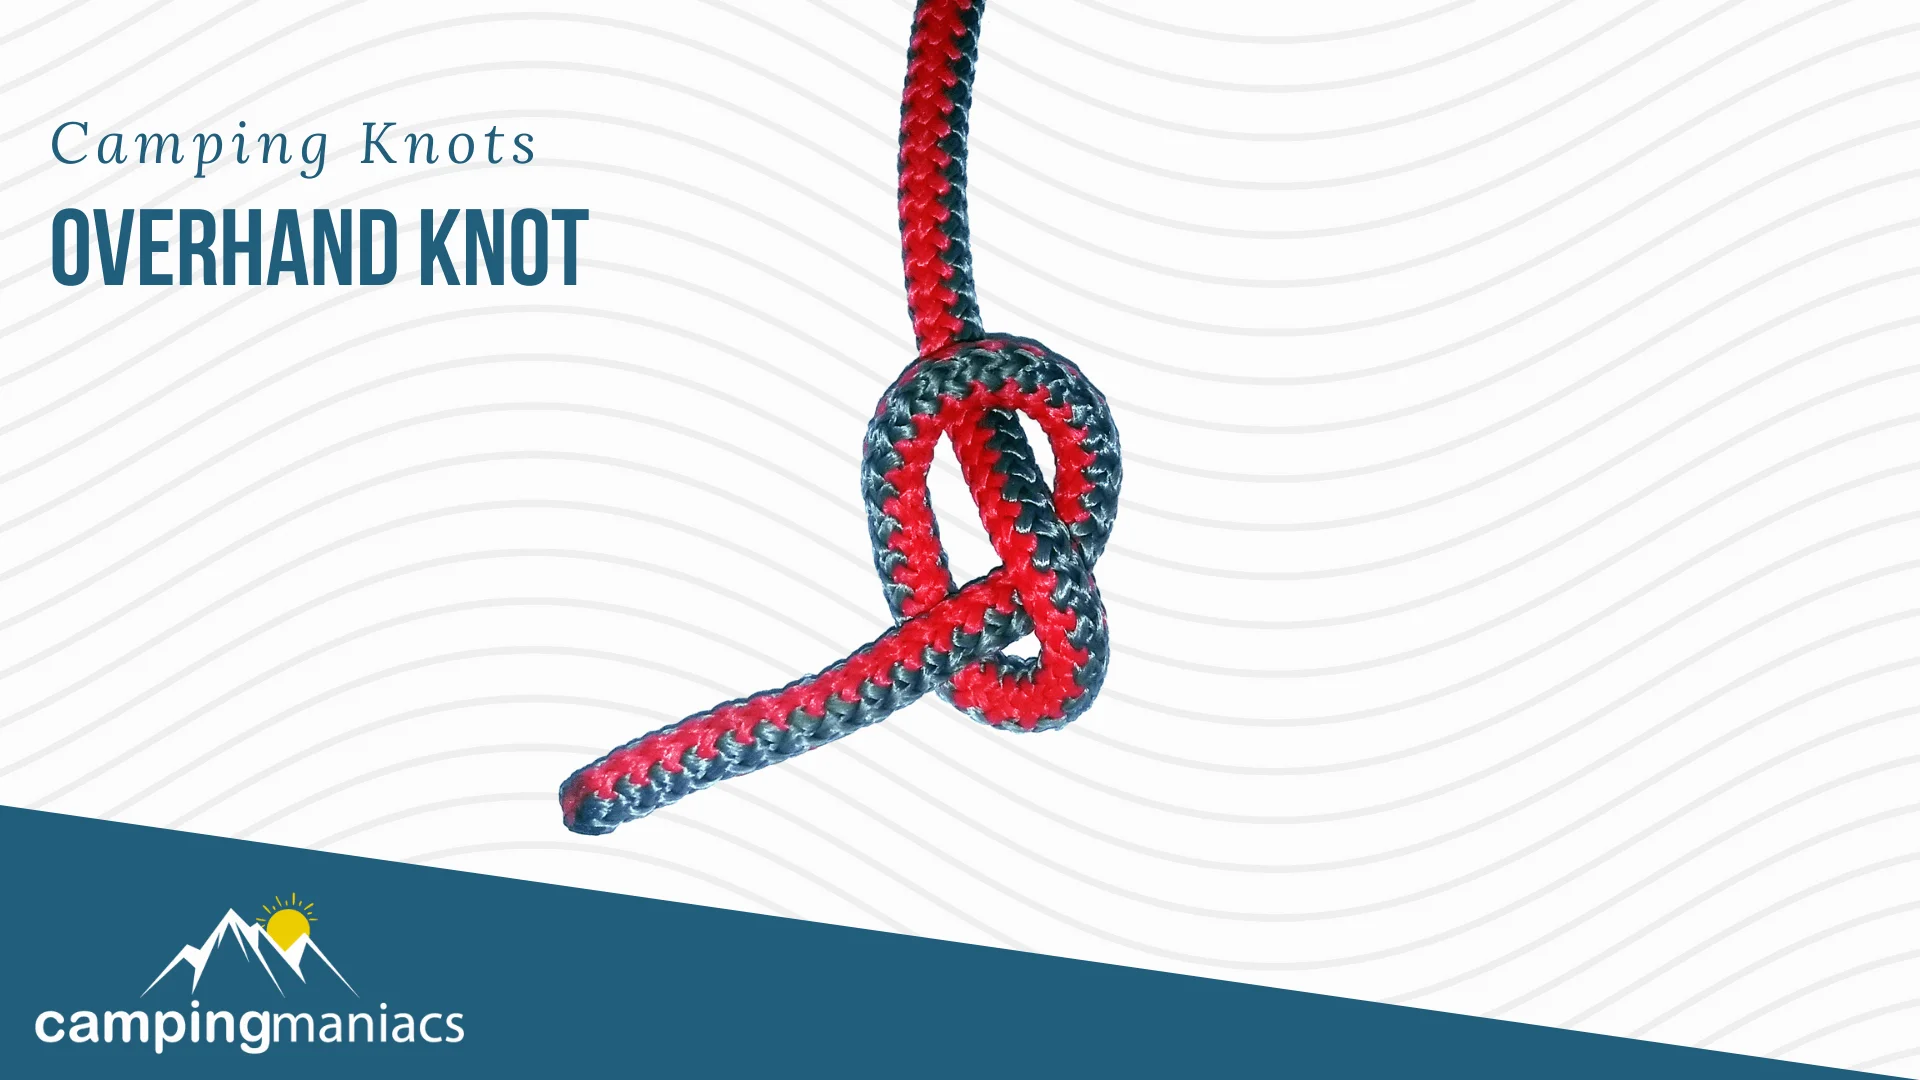
The overhand knot is one of the simplest single-strand stopper knots you can tie. It is widely used across various fields and further forms the basis of many other knot types such as the square knot and fisherman’s knot.
It functions as an easy-to-do stopper knot that can be used to prevent fraying and slippage of the line through a hole or loop. Several overhand knots may be tied along a rope to make it easier to hold. Additionally, you can use this knot type as a stopper in a thread when patching a hole in your backpack or tent.
Overhand knots are secure and permanent but they are often prone to jamming under strain and can be difficult to untie. They also significantly reduce the strength of the yarn.
Multiple overhand knots such as the double overhand knot and triple overhand knot might serve for decorative purposes or more practical reasons. They can be used to add weight to the rope ends or for more effective prevention of fraying or slipping.
Multiple overhand knots can be tied by passing the working end through the loop several times then finalizing by pulling both ends.
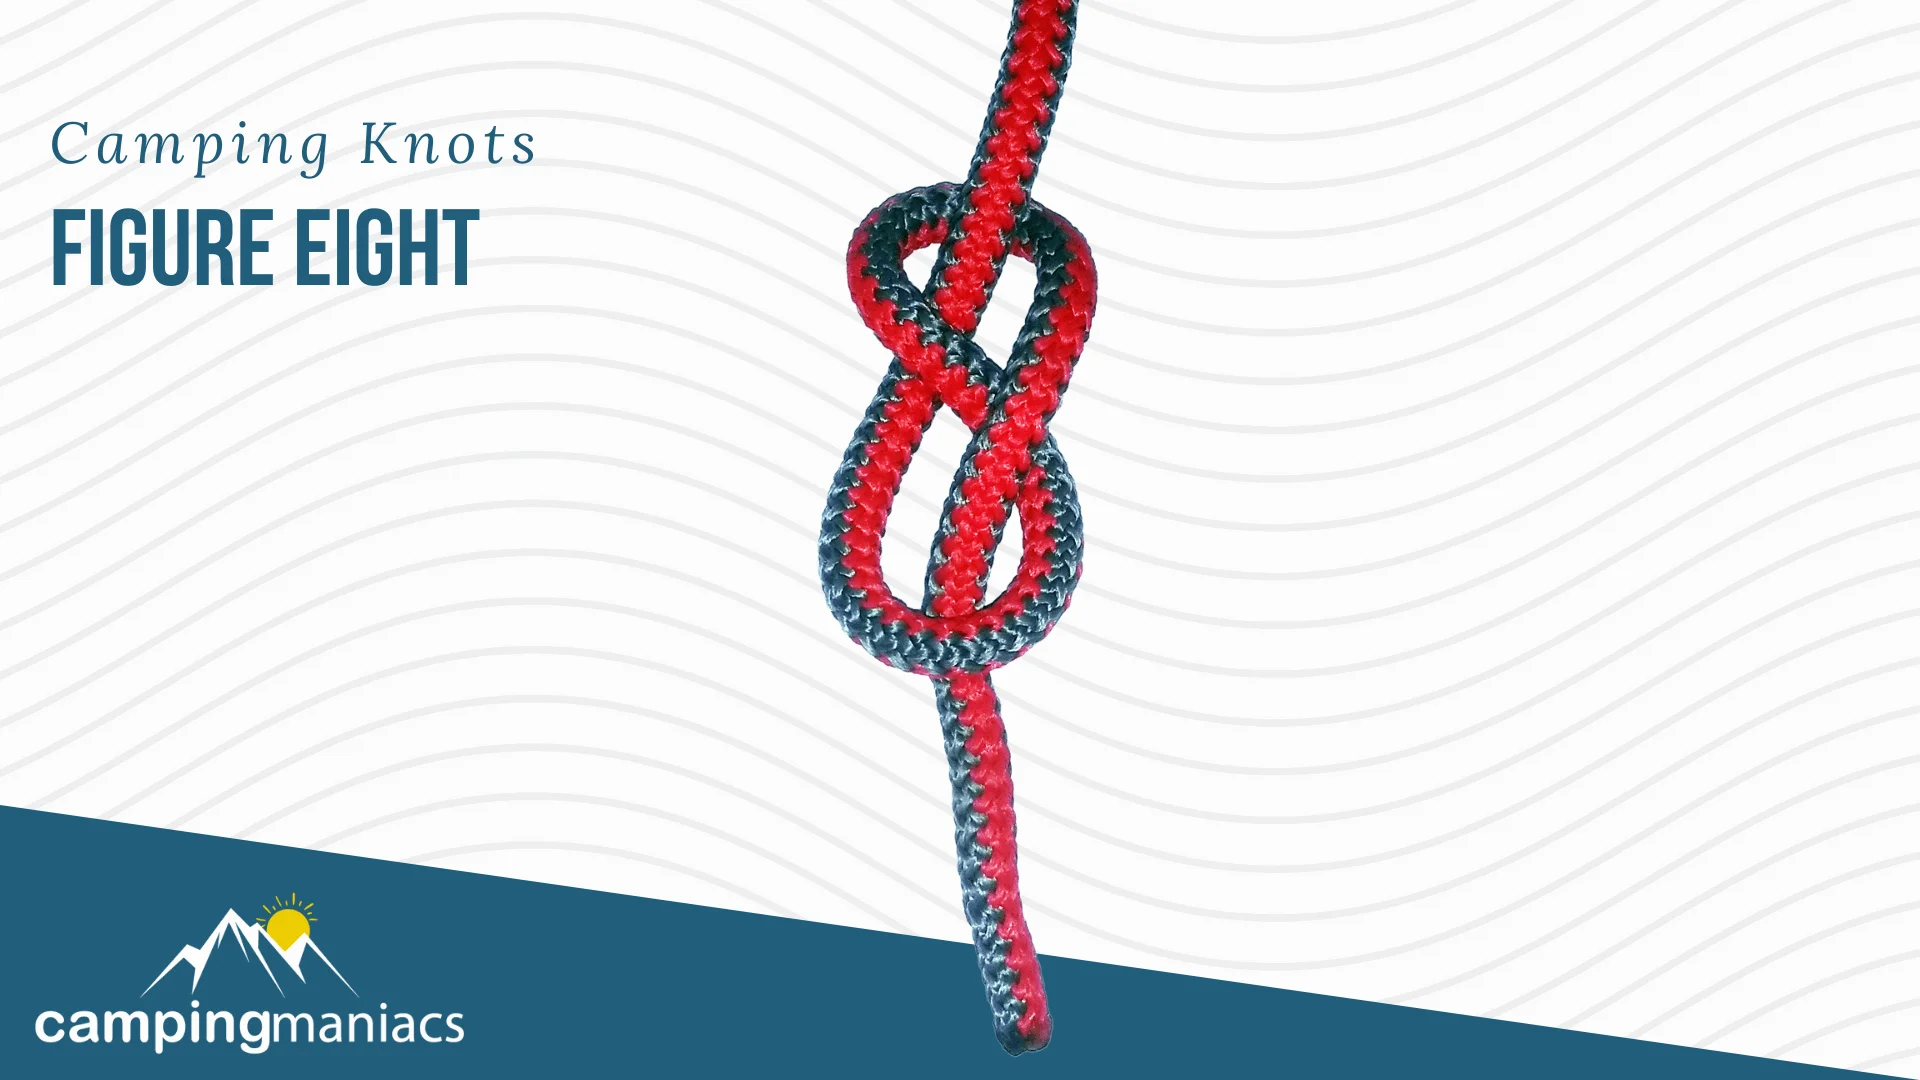
Also known as the double stopper, Savoy knot, or Flemish knot, the Figure-Eight knot is mostly used in sailing and climbing activities but might suffice as a solid stopper knot for camping. The knot is easy to do and undo but might still be prone to jamming.
Although not as strong as other options, the Figure-Eight knot is less likely to fail and is far much easier to execute. You could use it as a base for more complex knots such as the double figure-eight knot, figure-eight follow-through knot, or figure-eight on a bight knot.
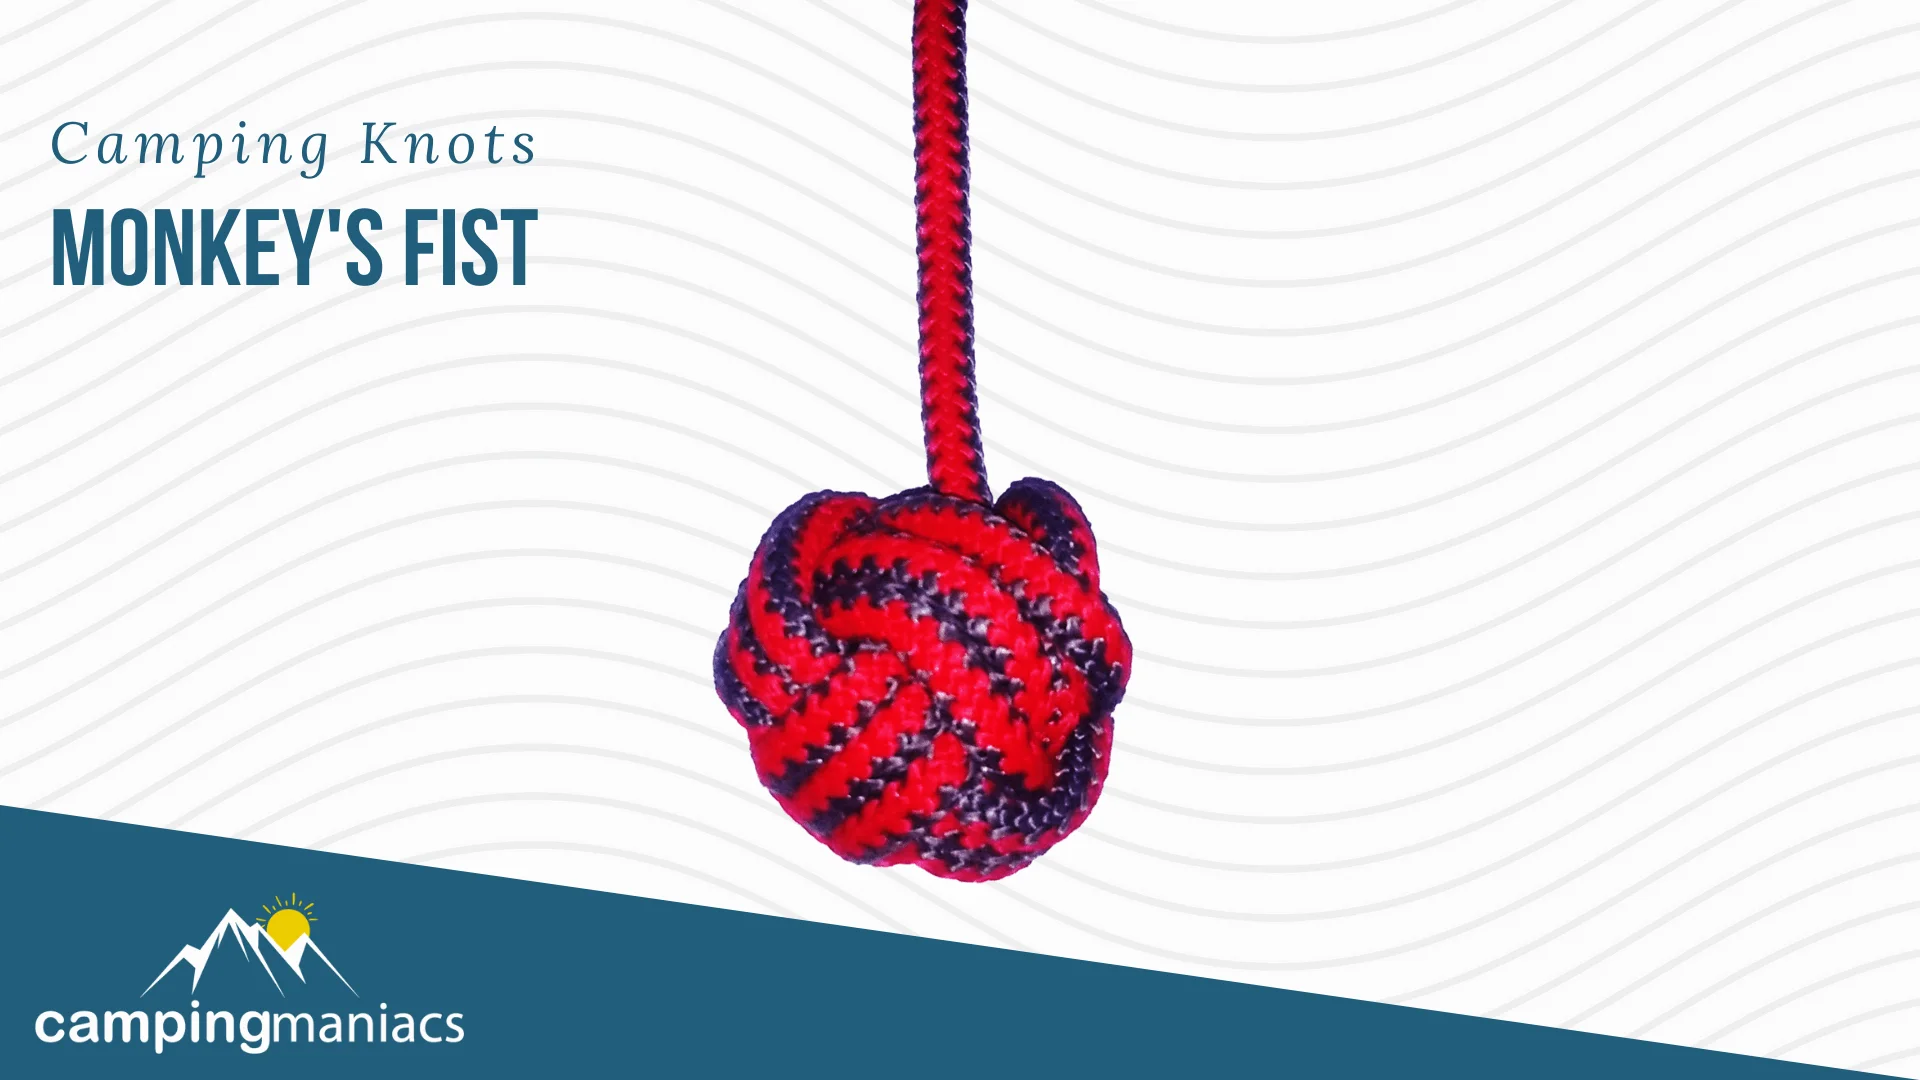
The monkey’s fist knot or monkey paw is mostly used for decorative purposes. Other than that, it is by far the most effective way to add weight to a line with only a knot. The extra weight makes it super easy to throw a line over a given object or distance.
The knot is aptly named for its resemblance to a clenched fist or paw. Further, it may be used for self-defense, anchorage in rock climbing, boating, bushcraft, and decorative applications such as in key chains, buttons, and door knockers, etc.
Since the knot requires a core to hold its near-spherical shape, you will need to decide on whether to use a ball or a knot for the core. For the ball core approach, you will need to insert it after making a few cross-sectional turns while the knotting method requires that you start with tying the knot first.
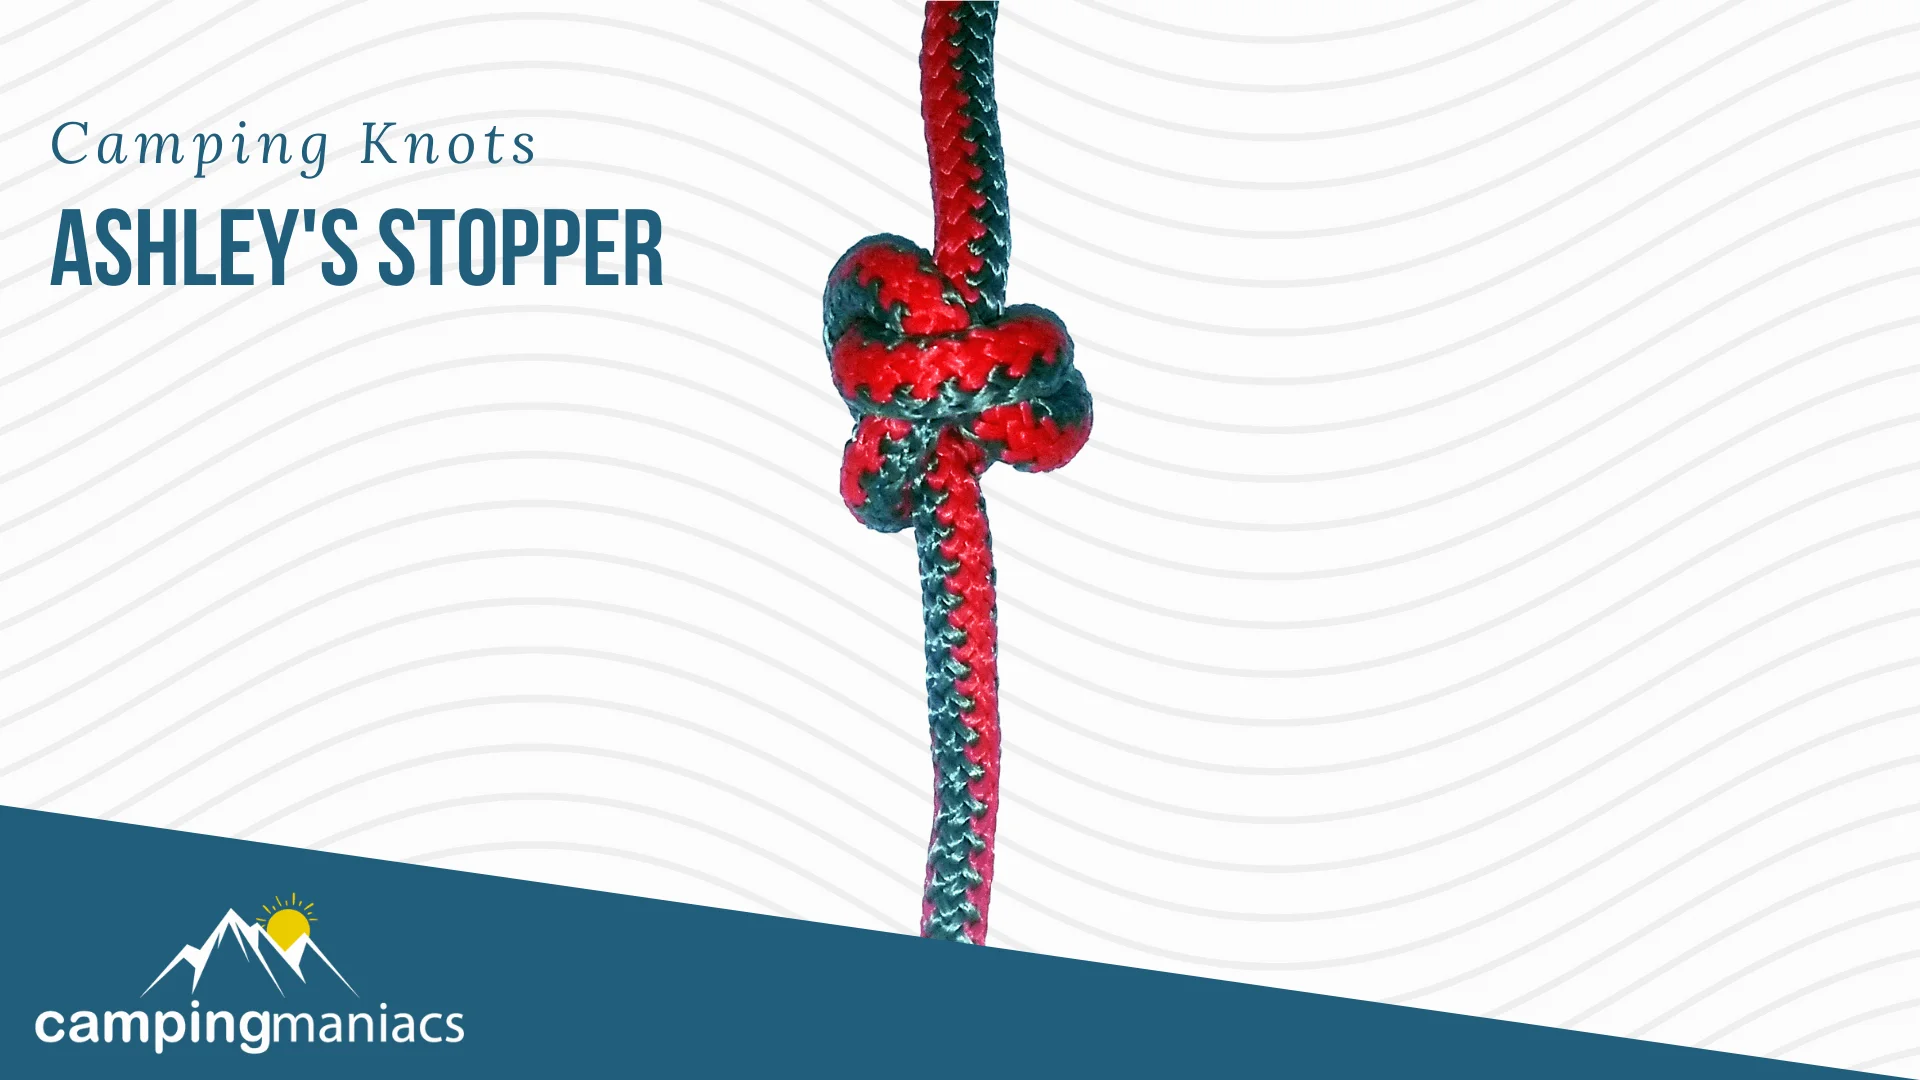
Also known as the Oysterman's stopper, Ashley’s stopper knot is a nicely-balanced three-lobed stopper that’s bulky, secure, and easy to tie. It has greater resistance to pulling than most stopper knots. The Ashely’s stopper knot is a solid replacement for the Monkey’s Fist Knot only with a less complicated procedure.
The knot is useful in climbing, gear repairs, decorations, and making DIY zipper pulls. Its only downside is that it can be a little frustrating to tie or tighten correctly.
As earlier mentioned, hitches are used to fasten a line to an object. The object could be a tent pole, ring, carabiner, log, tree trunk, or another rope. Hitches are mostly very easy to tie and secure.
Common applications of hitches include tying guylines, tethering a bear-proof bag to a tree, installing a rainfly, securing stakes, and hanging a clothesline.
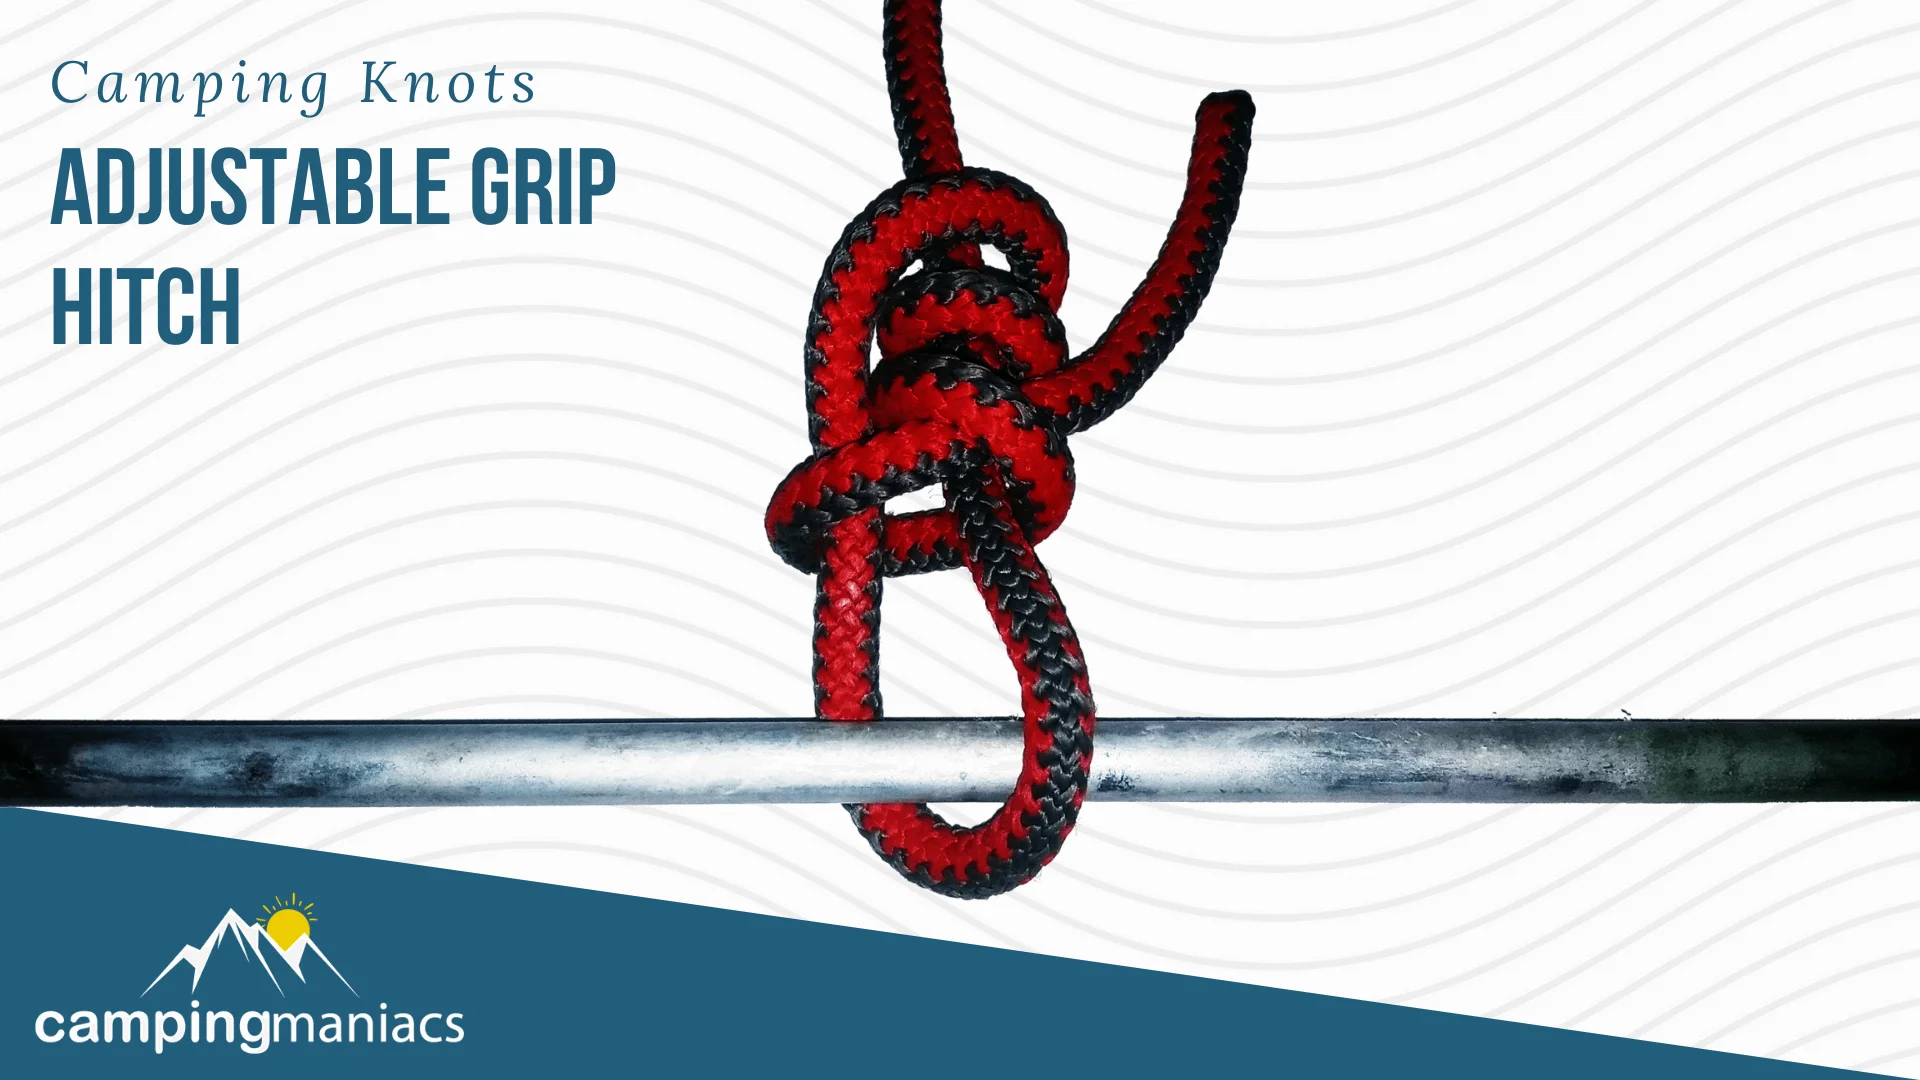
Essentially a friction hitch, the adjustable grip hitch forms a loop knot that can be easily adjusted using its slide and grip mechanism. The hitch is very easy to dress and set as compared to other slide-and-grip knots such as the Tarbuck knot and Taut-line hitch.
The hitch is also known as the Cawley Hitch and can be used for adjusting tent guy-lines, setting up hammocks, and affixing tarps at the campsite. However, the hitch is not suitable for applications such as climbing since it is prone to slippage when shock-loaded.
If you prefer having a quick-release functionality in your knots, be sure to form a loop with the working end in the previous step then feed it through the last wrap.
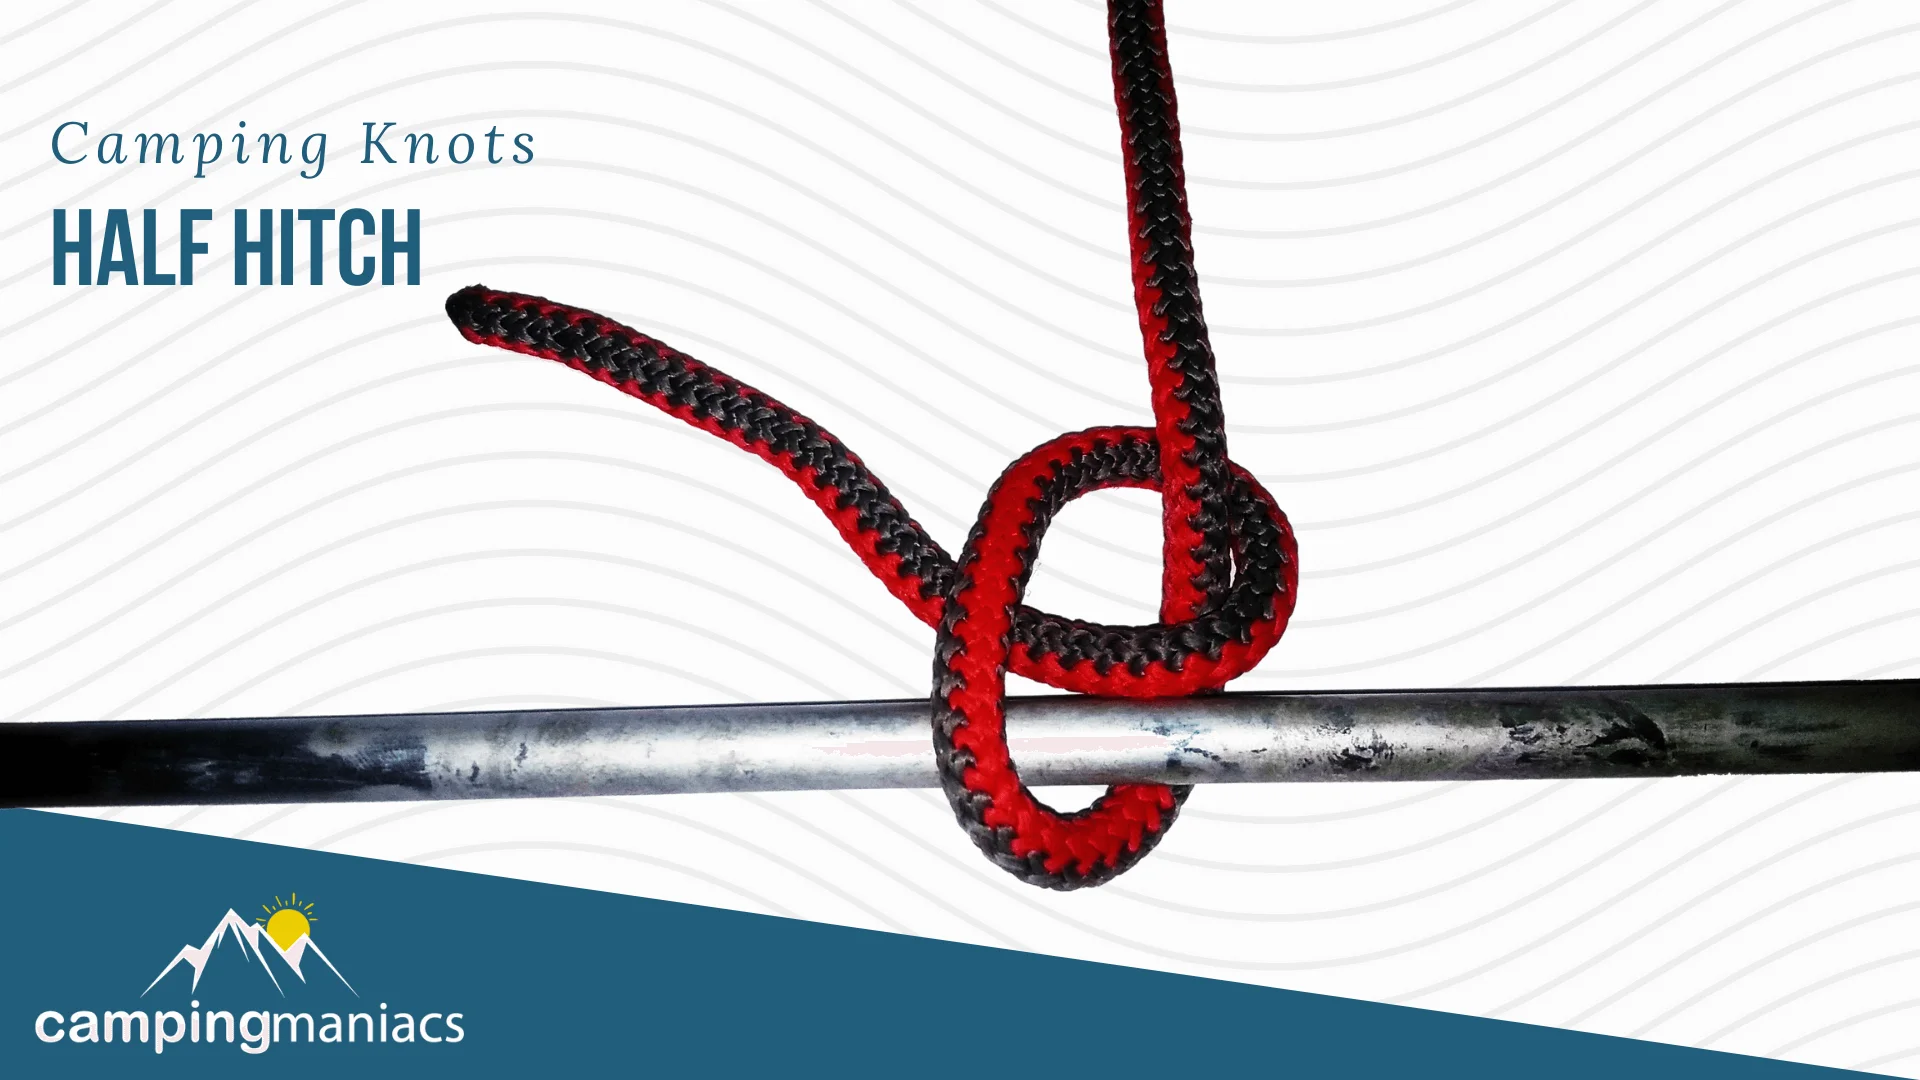
The Half hitch is a simple overhand knot that’s used to complete or strengthen other types of knots. It differs from the overhand knot by being attached to something such as a tent pole or another rope. The “half” in its name means that you need an extra half hitch to handle any load.
That said, a half hitch knot can be used as temporary tethering of given objects or animals. It is easy to tie and untie making for a great introductory option.
The two half hitches knot and slipped half hitch are slightly improved versions of the single half hitch. The latter is made by adding a quick-release loop to the single half hitch. The two half hitches knot is completed by adding one more turn around the standing part.
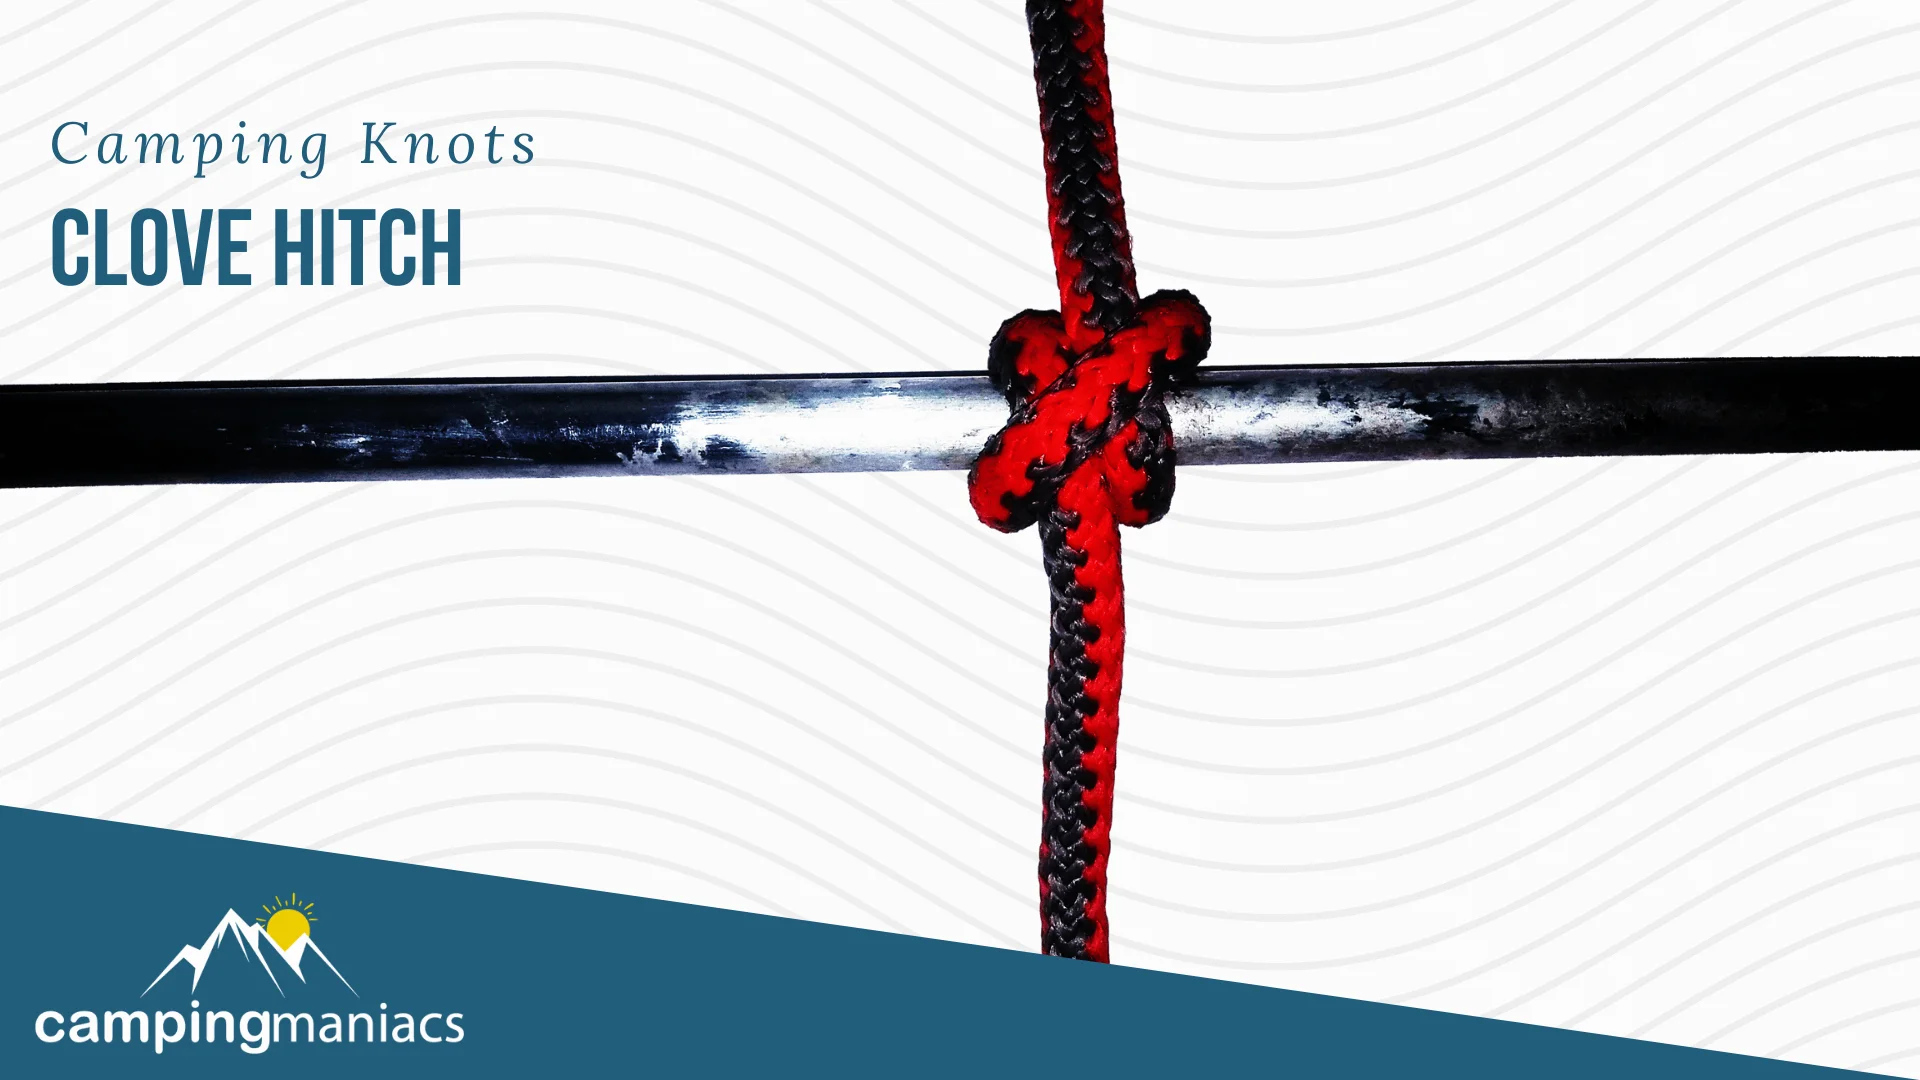
The Clove hitch is perhaps one of the easiest to learn and most useful knots. While it might not be the most secure, it works just fine for fastening a line to a tent pole or D-ring. You may use a stopper knot on the standing part of the line to prevent it from slipping or coming undone.
Additionally, the clove hitch is a great complement for finishing all types of lashings. The hitch can be done one-handed with enough practice and with enough luck it can be tied in the middle of a line.
However, wet conditions might cause it to slip and it needs constant tension on either end for maximum effectiveness. The hitch can be a bit challenging to untie when heavily loaded.
When tying a clove hitch, think of it as tying two successive half-hitches around a pole or anchor object. Other variations to this hitch include the double clove hitch and another with a slip clove hitch or slip knot.
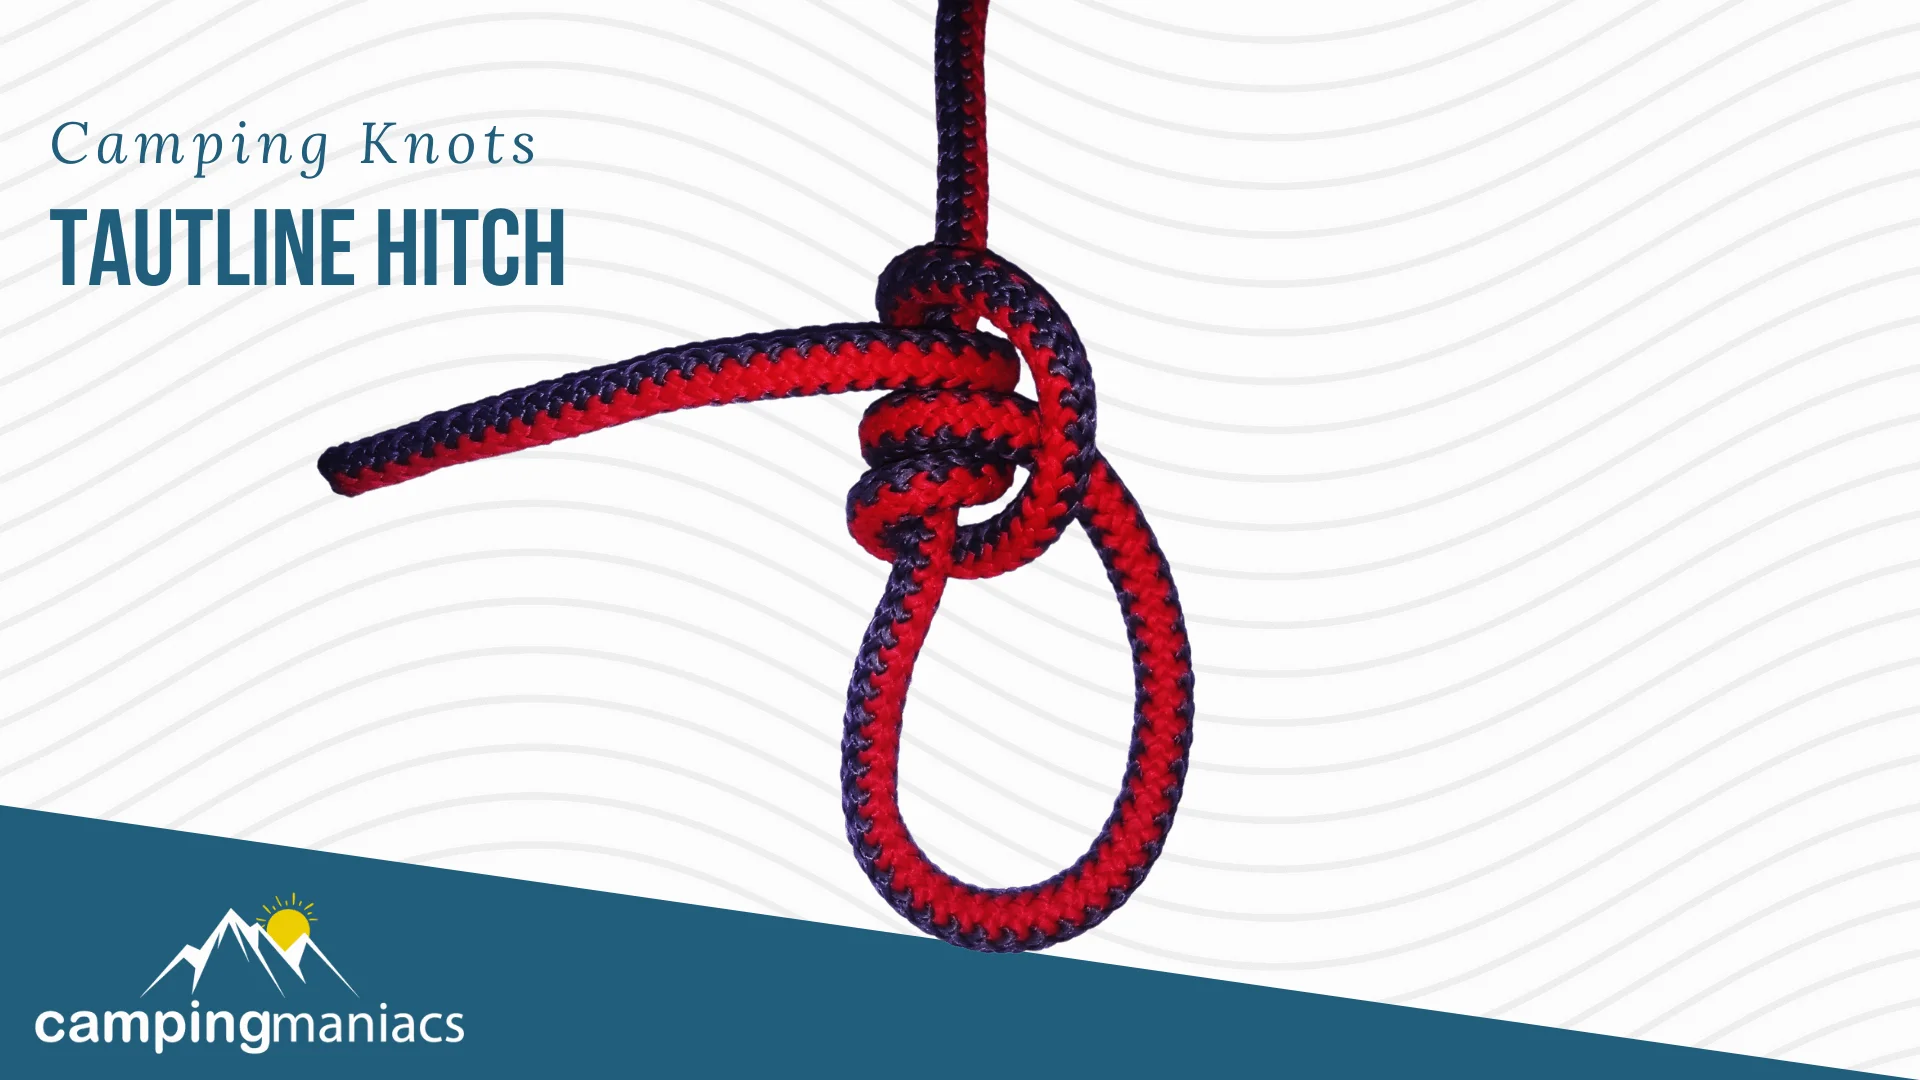
This is a non-slip, adjustable friction knot that’s also referred to as the Midshipman's Hitch or Rigger's Hitch. It is the preferred option for when you want a knot that’s adjustable even under tension. The knot can be slid up or down to adjust the loop size resulting in a change of length on the standing part of the line.
The taut-line hitch is easy to tie or untie and very useful for attaching tent or tarp lines to stakes, installing hammocks, and securing cargo on truck beds. However, the hitch doesn’t play nice if there is a substantial strain on the line which might result in slippages. Some ropes such as polypropylene might be unsuitable for use with taut-line hitches due to their slippery nature.
Only consider using the knot with ropes that can hold bends and turns more effectively.
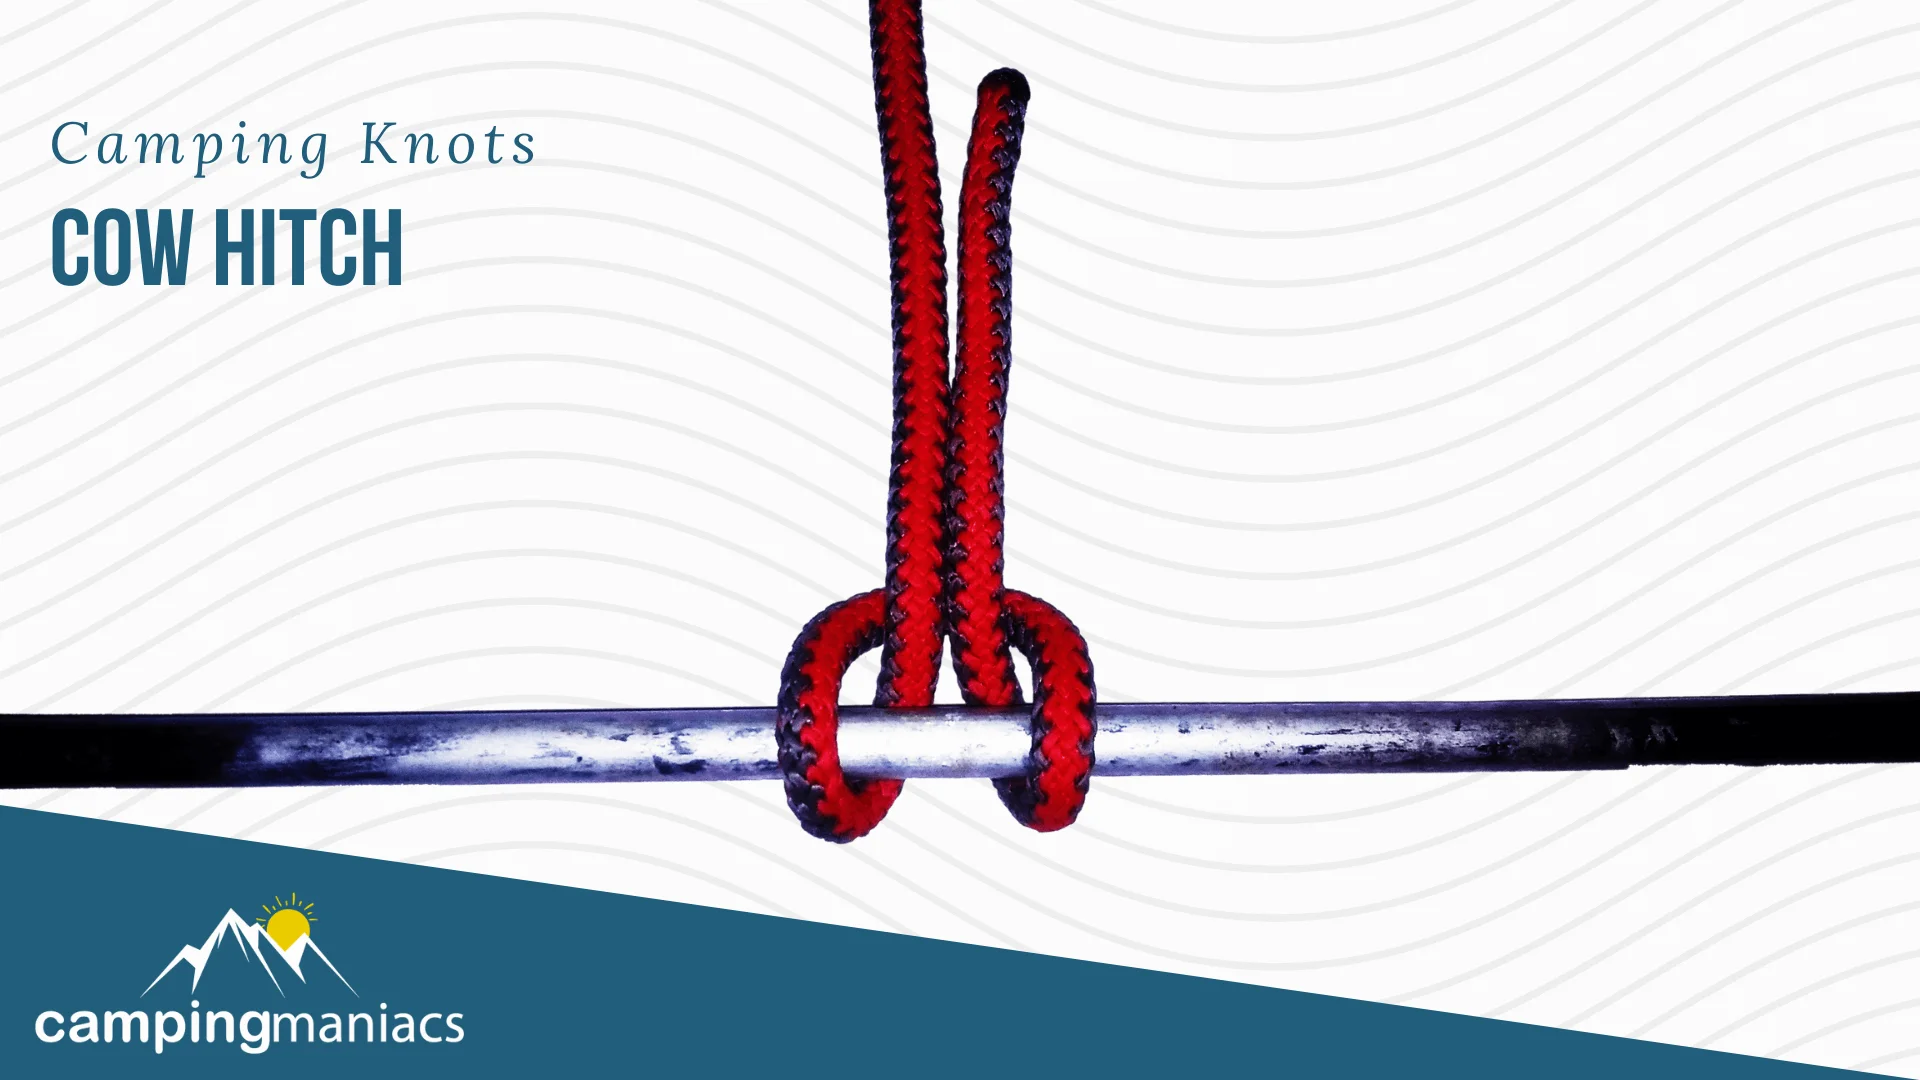
Popularly tied around a ring, the cow hitch is a quick and easy knot to learn that’s meant for temporarily securing light loads or tethering animals. Other names used to refer to this type of hitch include the Girth hitch, Lark’s head, Lanyard hitch, Tag knot, and Running eye among others.
The hitch looks just like the clove hitch but with the last hitch done in the opposite direction. It can be tied with a bight or at the end of the rope. Besides securing an animal to a pole, cow hitches may be used in climbing, archery, fishing, and securing lanyards.
Despite its simplicity and flexibility, the cow hitch is mostly unreliable for heavy loads as it can easily slip or come undone. Adding an extra knot or forgoing the cow hitch altogether is usually the way to go for high-load scenarios.
Some of the most notable variations of this hitch include the bale sling hitch, pedigree cow hitch, double-ended cow hitch, and double-ended hitch. However, either variation will still underperform in high-load situations.
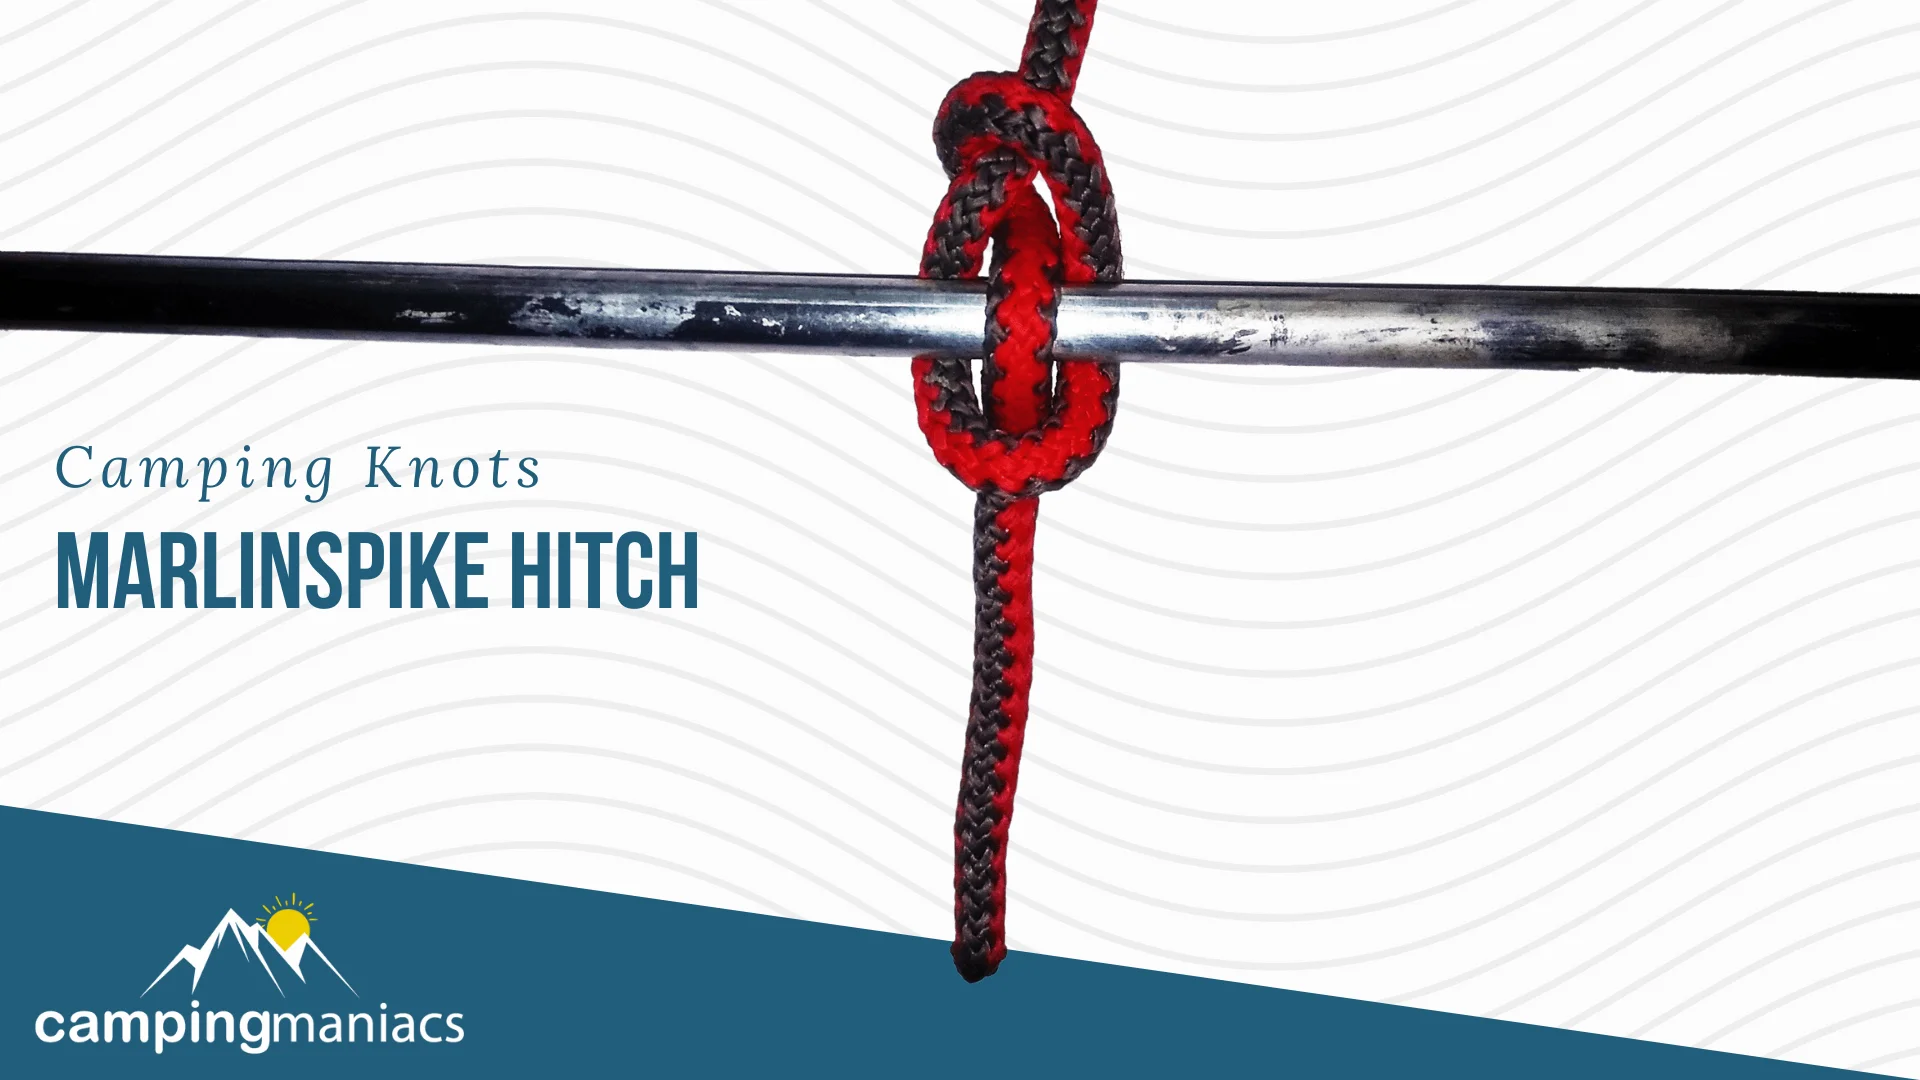
Primarily a temporary hitch, the Marlinspike hitch is an easy-to-tie, non-jamming, easy-to-release knot that is used to attach a rod to a rope. It is best used on a rope that is already attached to an object for better gripping and tightening. The marlinespike – stick, rod, tool handle, or any suitable object – is inserted into the knot and used for handling the rope.
The Marlinspike hitch is commonly used in setting up hammock whoopie slings and other suspension systems. It is used to attach the slings to webbing straps, which are used to attach hammocks to trees. The hitch may also work for use with carabiners or tightening other knots.
Beyond this, you may use it to make a makeshift ladder with knots tied in a series of parallel-facing knots on two side-by-side ropes. The rods need to be attached to both knots in your set to make a functional DIY ladder.
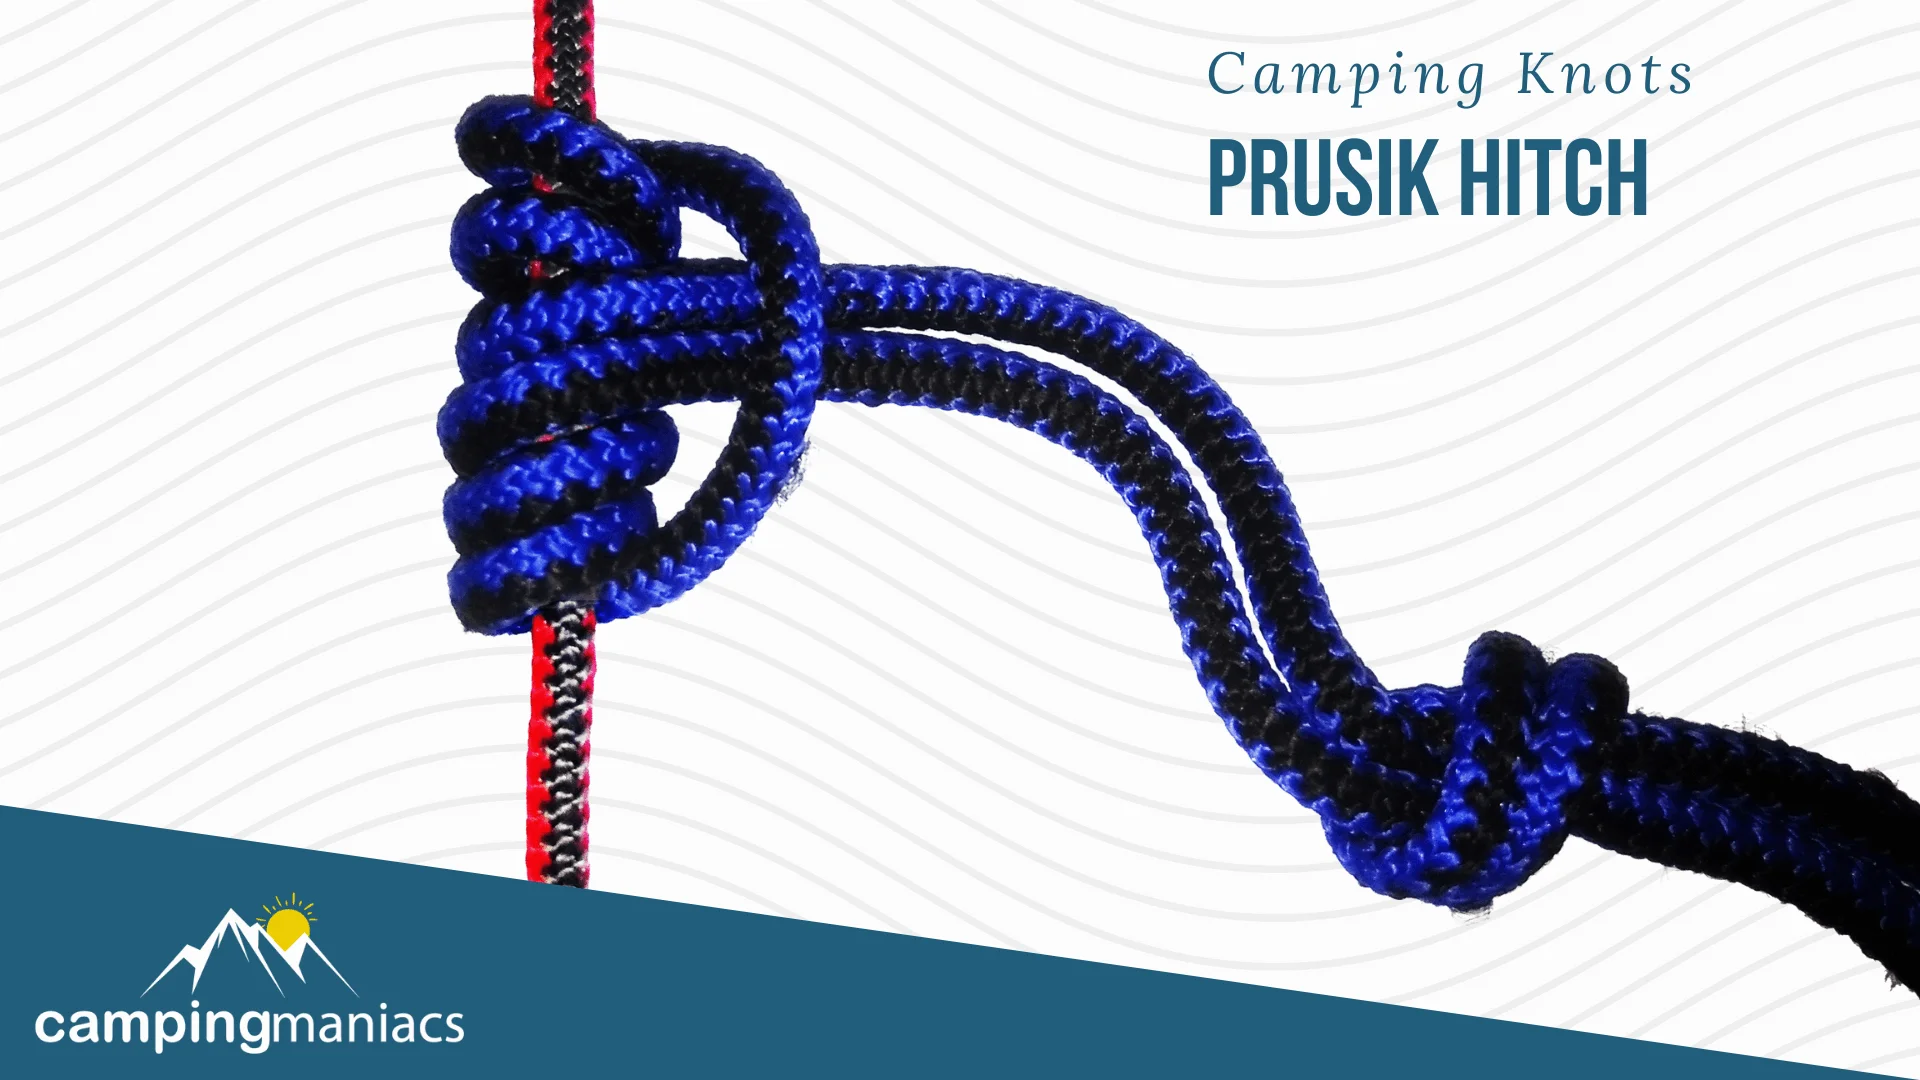
First devised by Dr. Carl Prusik back in 1931, the Prusik knot is used to connect a looped line to another rope while maintaining easy adjustability.
This friction hitch is popularly used by climbers and mountaineers for ascents. Other than that, it is a worthy option for securing lights, water bottles, and other essentials on a hammock’s ridgeline. Additionally, hanging a tarp and making a rappel can be easily done with the Prusik knot.
The knot is often ineffective when using slippery or wet ropes and it can be difficult to undo when tightly loaded. Other closely related knots you may use include the Klemheist (Machard), Bachmann, and Valdotain Tresse knots.
For tying the classic Prusik knot, you are going to need two ropes that include the main line and a cord for the initial loop. Most climbers swear by maintaining the diameter of the looping cord half of that of the main rope for the best results.
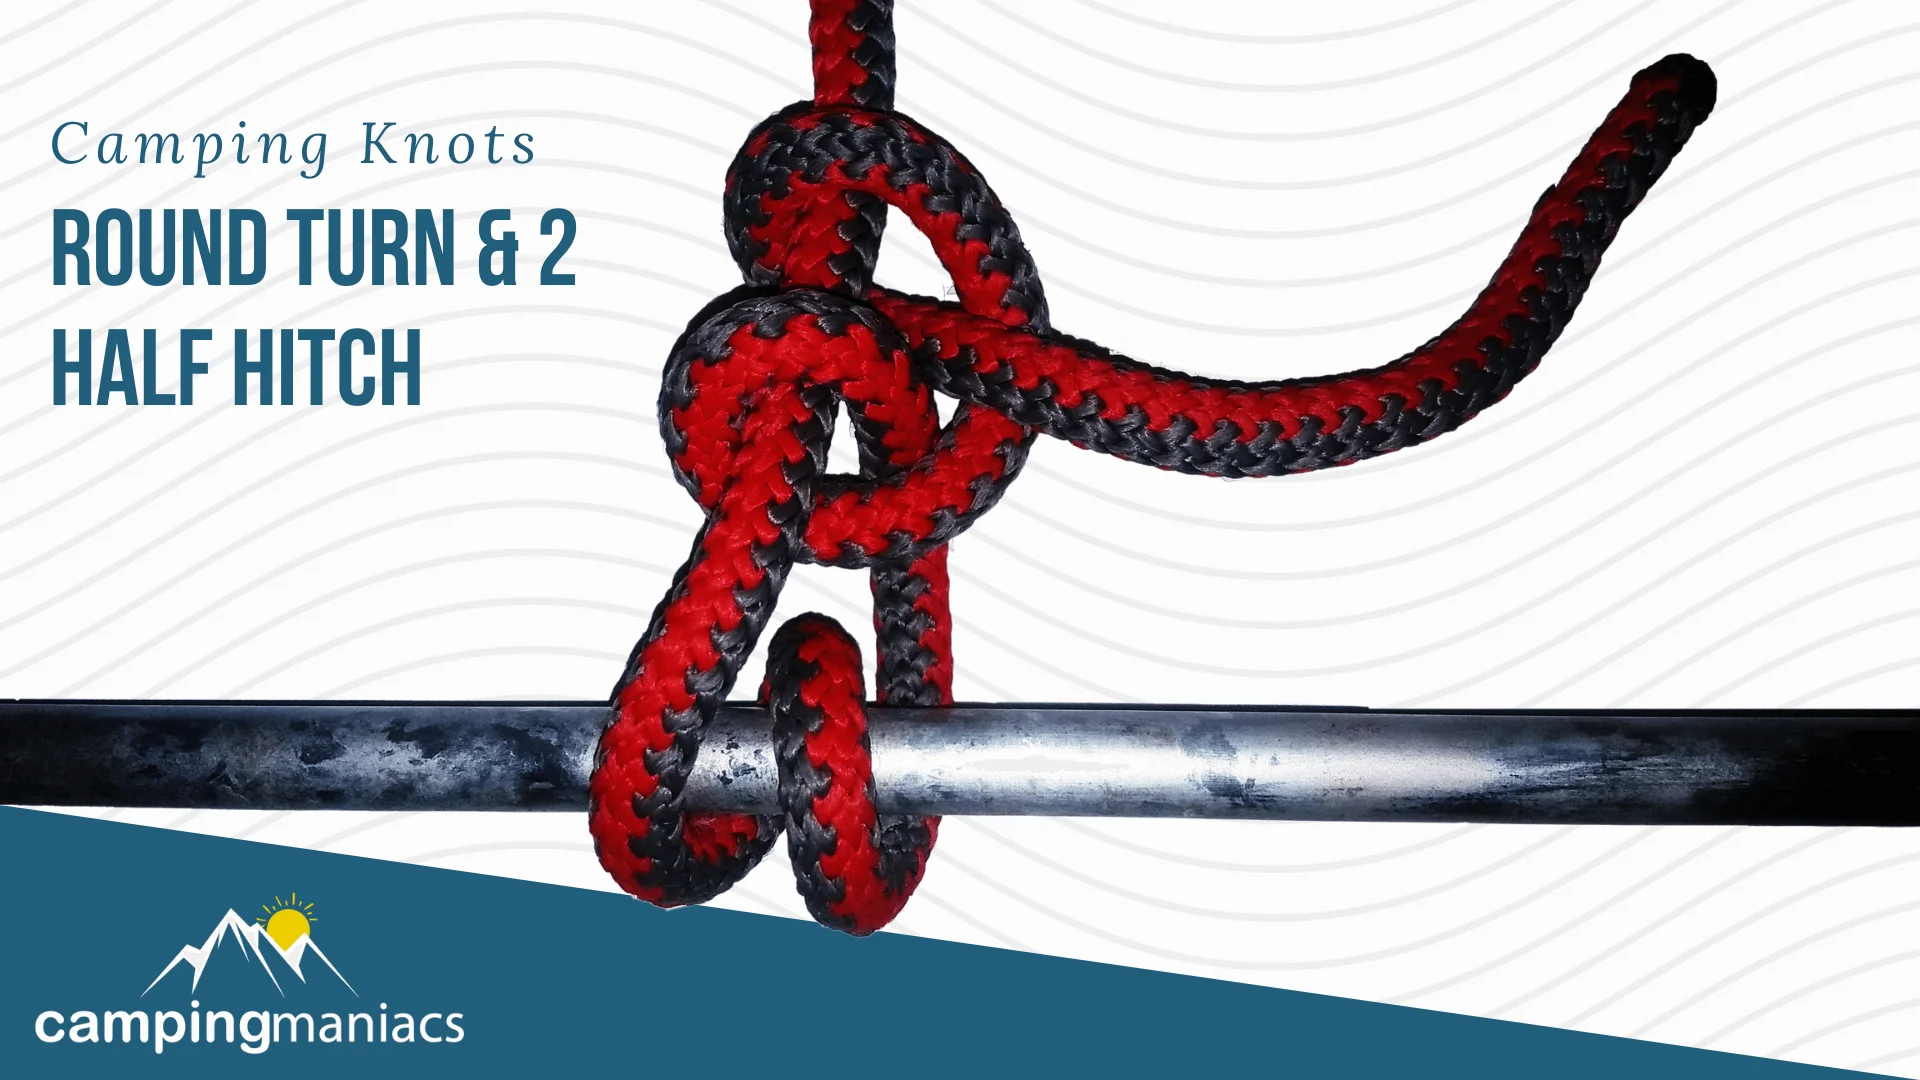
This is a strong, reliable knot that can be used to tie a rope to a wide array of objects including poles, posts, rings, stakes, trees, or handles. It will come in handy for hanging a clothesline, attaching a tarp line or hammock to a tree or post, finishing lashing, bushcraft, boating and so much more.
The structure of the knot is characterized by two passes around an object and a clove hitch around the standing part of the rope.
The knot can handle lots of strain and is very easy to untie, jam-free, versatile, quick, and easy to learn. However, the round turn and two hitches knot may come loose when subjected to short intermittent bursts of strain. You can extra half hitches and/or turns to make it a bit more secure.
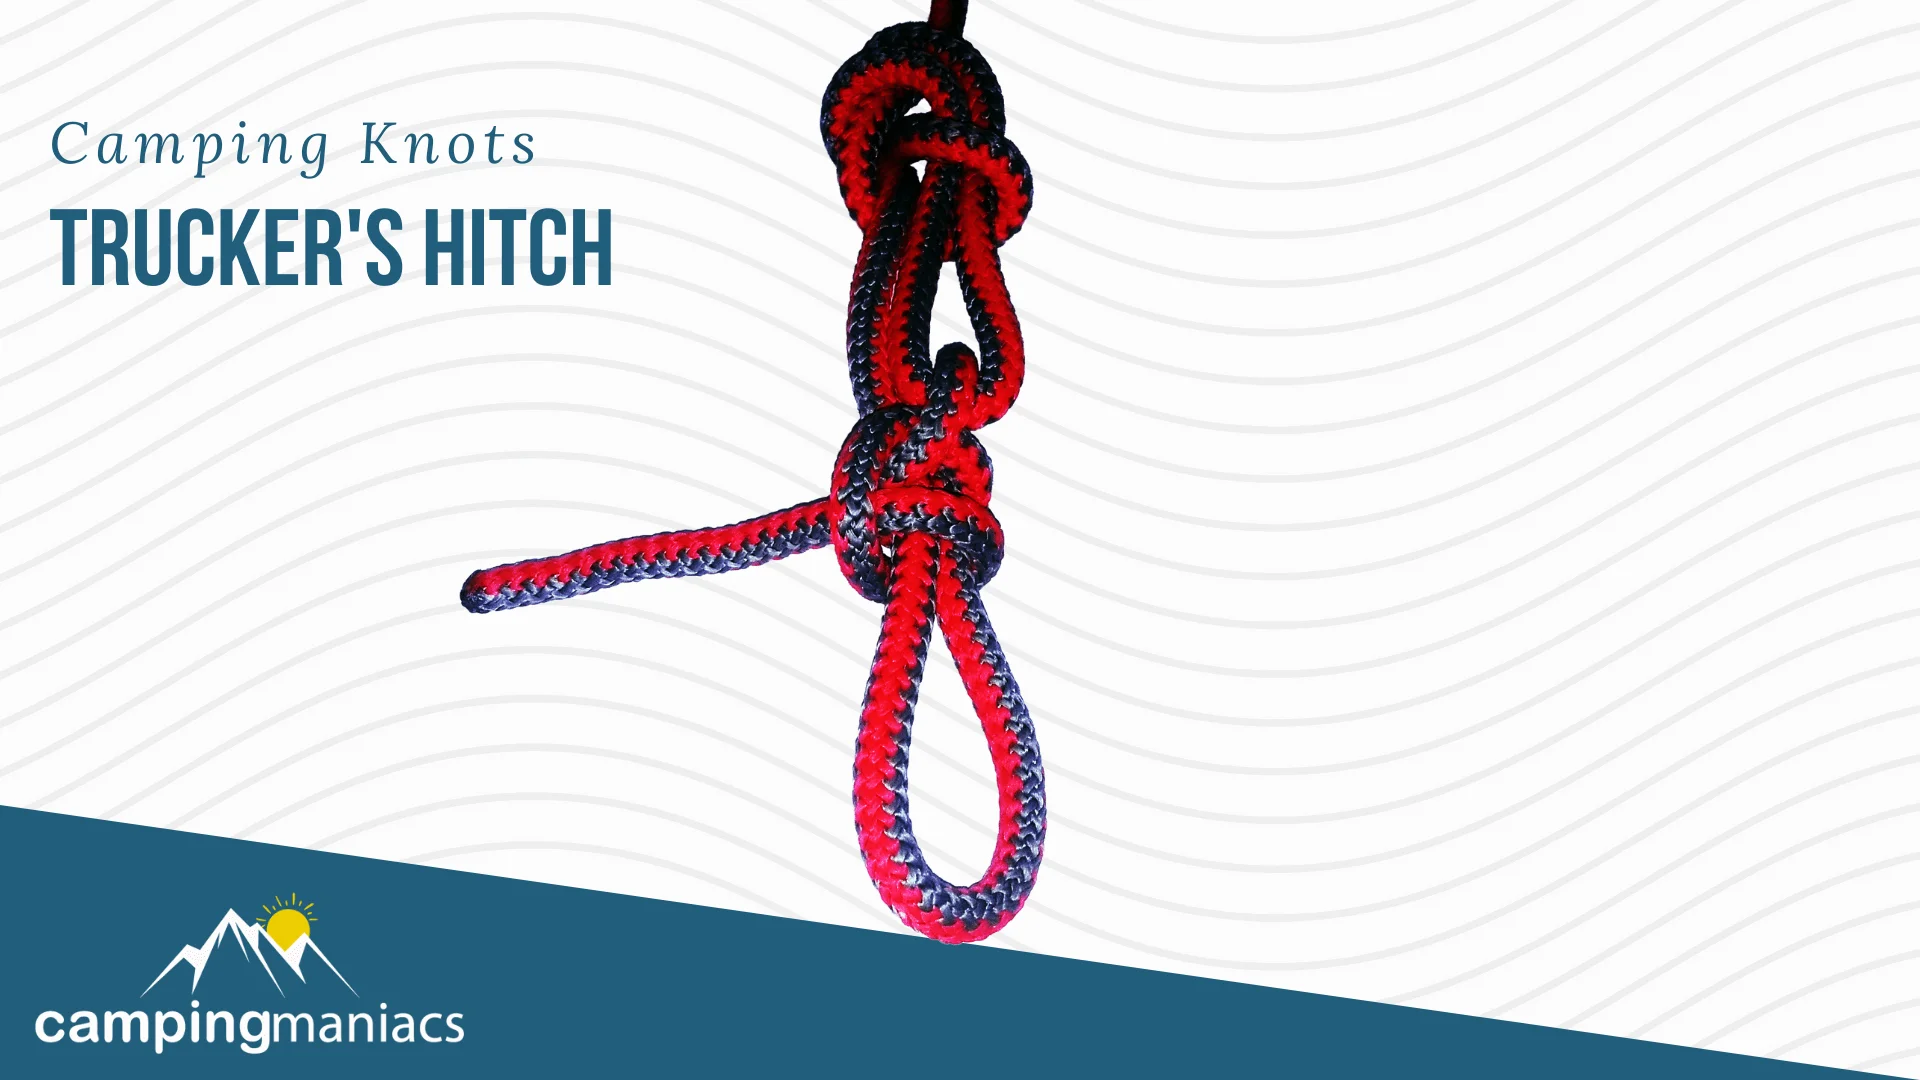
Suitable for cinching down loads or tarps, the Trucker’s hitch or power cinch is a practical knot that can be easily adjusted even after having been tensioned. It has a lever-like structure that offers the much-needed mechanical advantage to allow for easier operation. The trucker’s hitch is further secured with a couple of half hitches.
The trucker’s hitch is simply a rope version of a block and tackle system. It will work for your boat/canoe loading situations as well as more critical activities such as climbing.
However, you don’t want to pull on the lines too forcefully as that might damage whatever you’re trying to secure. The hitch might also cause considerable wear on the line as it relies on friction to work.
Don’t let its sophisticated appearance fool you, tying the trucker’s hitch is rather simple to do. Ideally, you want to make a dangling loop, pass the end of the line through that loop, and finally secure everything with two half hitches.
That said, you can create the hitch in several methods including the classic friction loop, slipped overhand loop, fixed loop, and sheepshank style loop. The major difference between either option is how the lever-like loop is made.
We will focus on the simpler friction style loop, whose steps are outlined below.
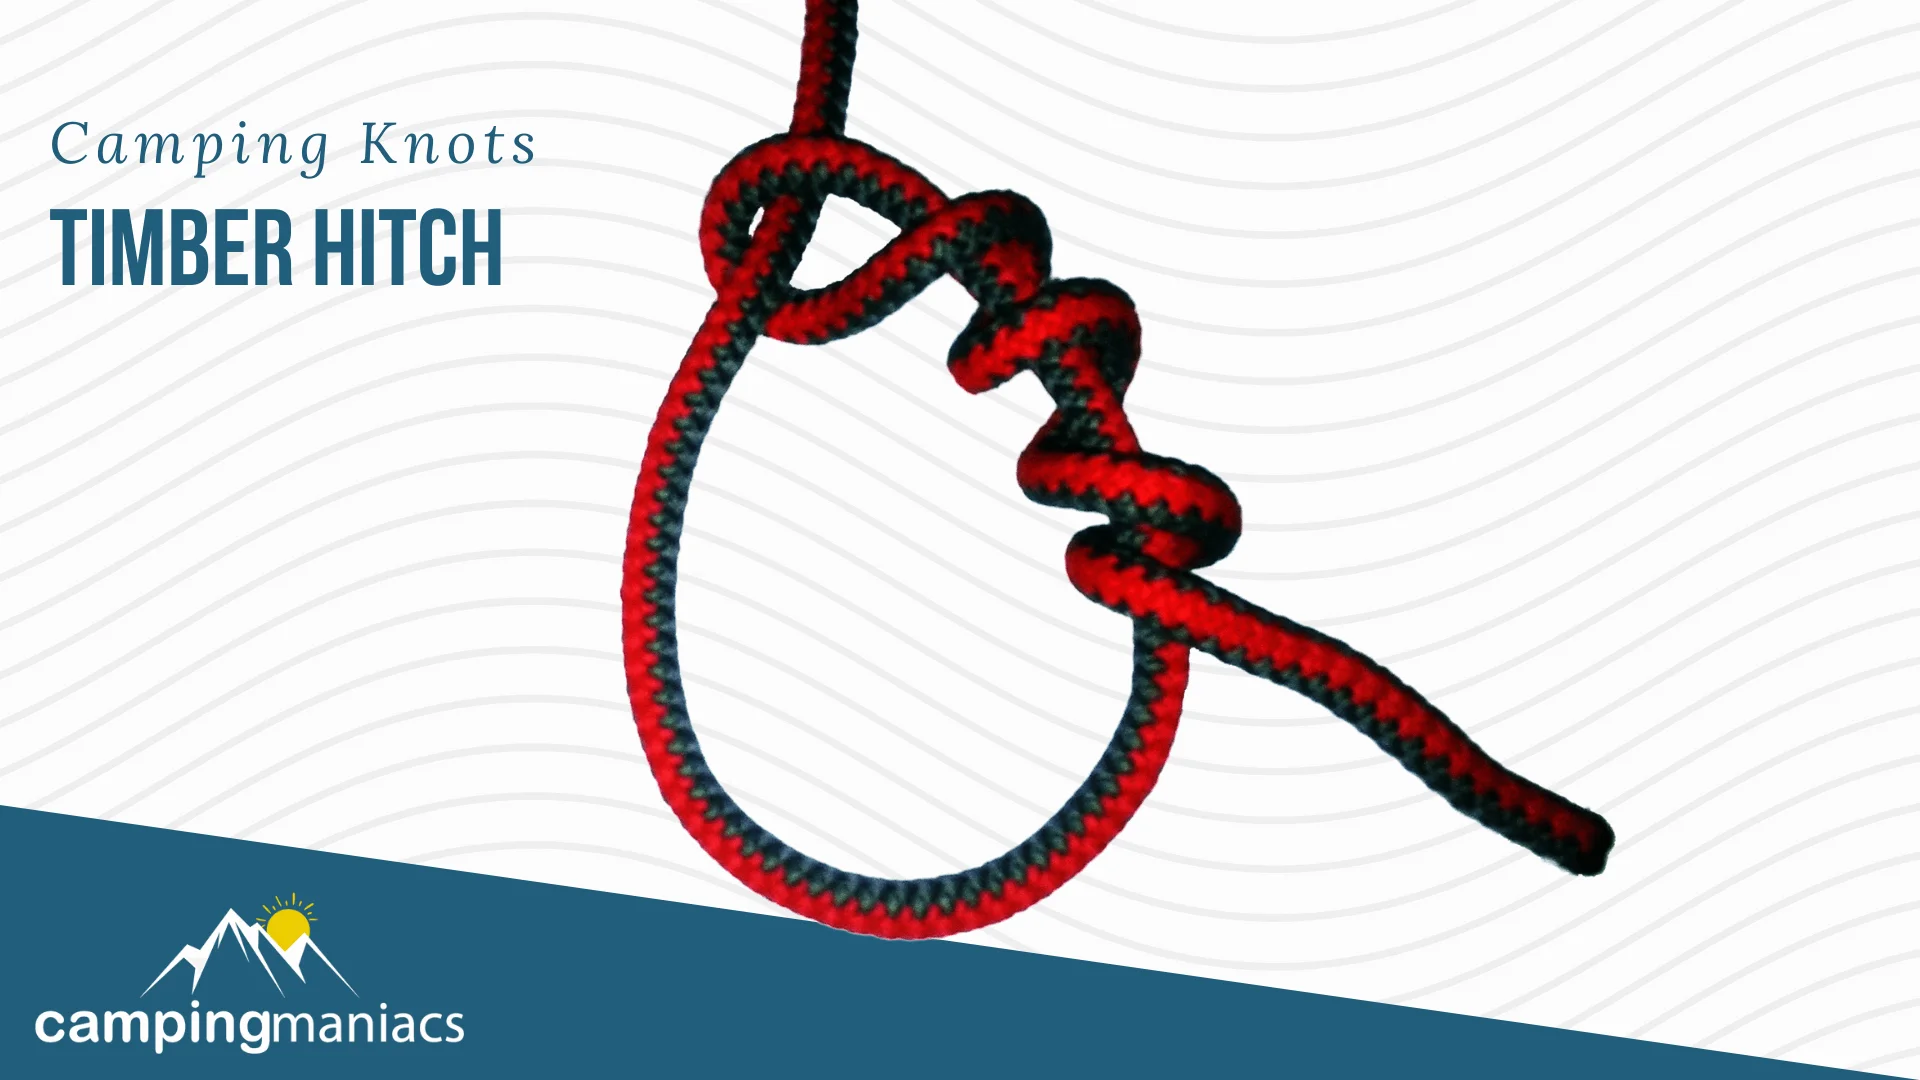
This is a temporary noose used around objects such as planks, tree trunks, and poles for easier towing or hoisting. The timber hitch grips tighter when more strain is exerted on the line, which also means that it is only secure when under load.
Its other saving graces include the fact that it is non-jamming and easy to tie or untie. In addition, the timber hitch can be used to secure a horizontal ridgeline for clotheslines, mosquito netting, tents, and tarps.
A combination of a single hitch and a timber hitch to one end of the load transforms the knot into a Killick Hitch. A knot that’s very useful for anchoring outdoor shelters and dragging bundles of logs across open terrains.
At least three loops should suffice for securing most loads but you can always add more if working with heavier loads or objects with smoother surfaces.
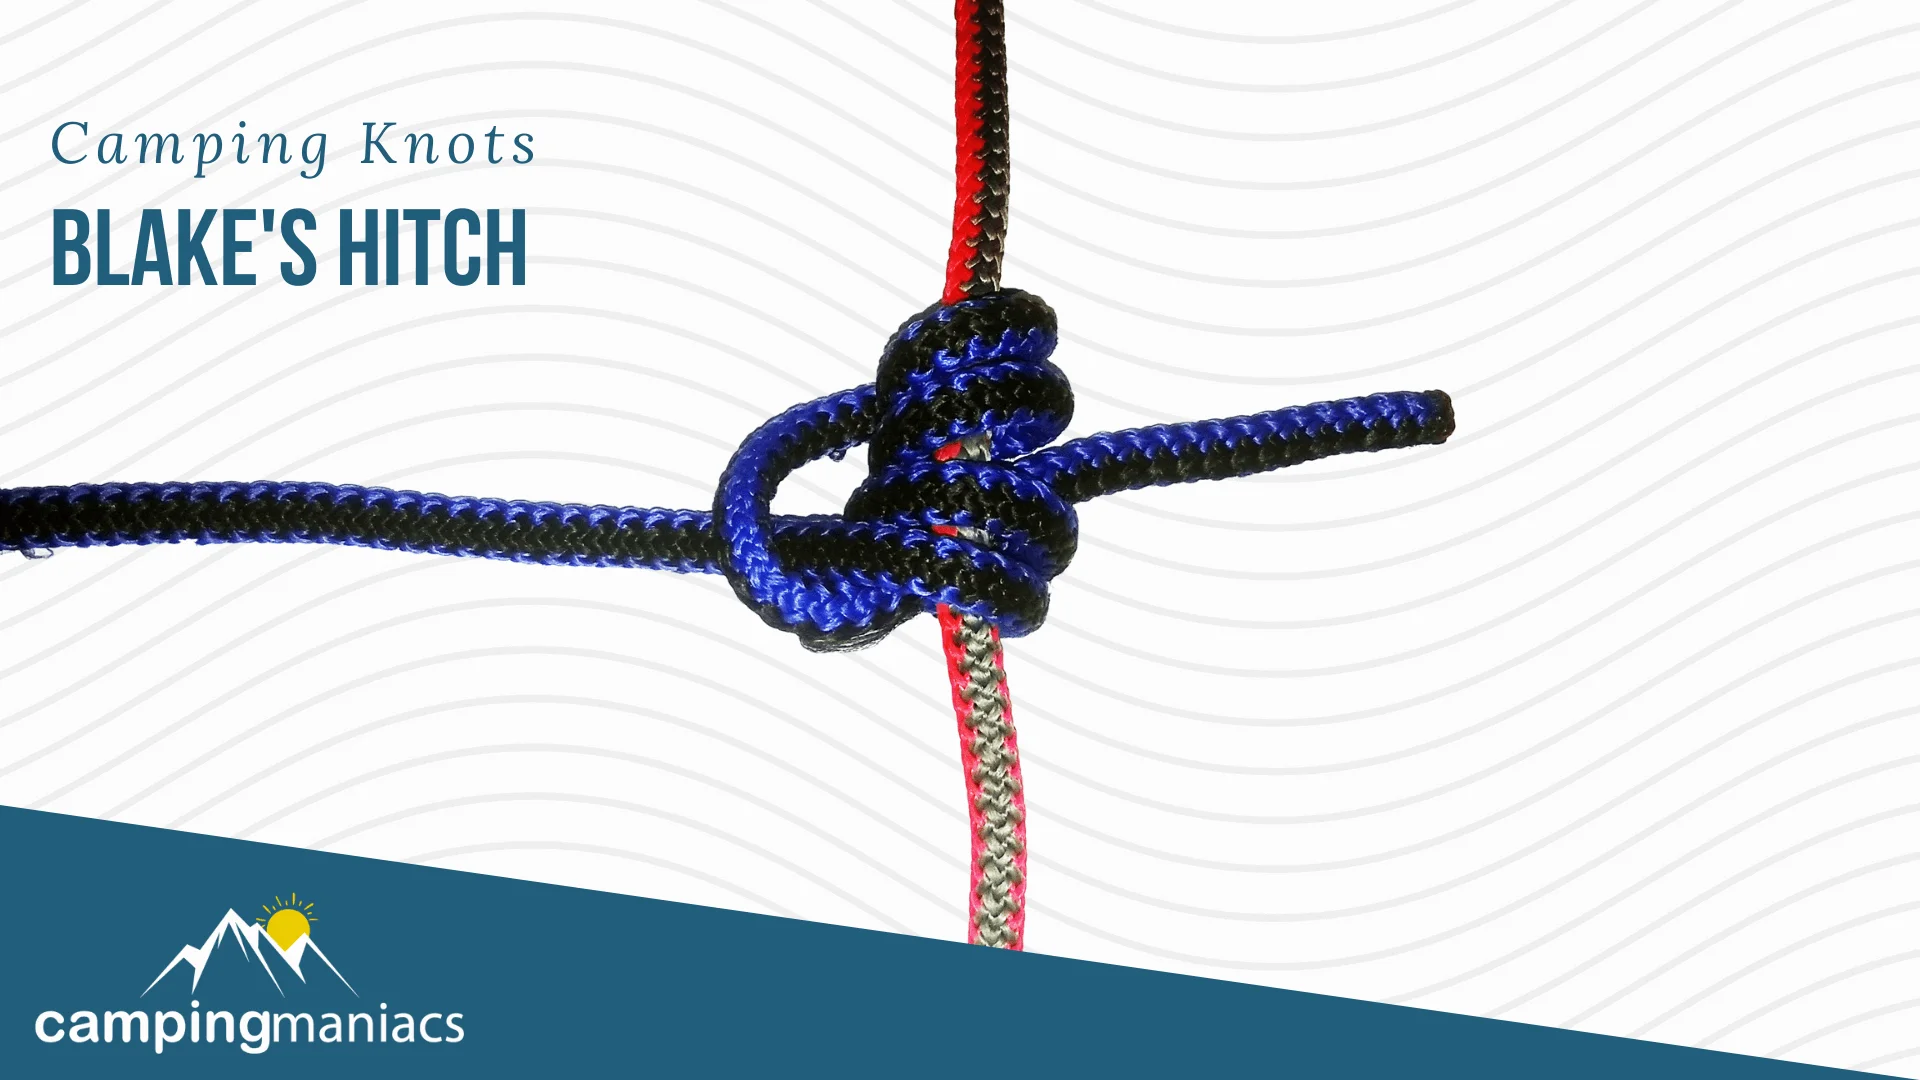
A hit among arborists, Blake’s hitch is a friction knot that can also be used for tightening tarpaulins and guylines. Like a barrel hitch, this knot might not fit the campsite scene but might prove useful in some very specific situations.
The hitch is preferred for its secure, adjustable, and movable qualities making it ideal for making tarps and clotheslines taut. For tree climbing, Blake’s hitch is suitable for ascents as well as descents. It is far much easier to tie and operate as compared to the Prusik knot.
Essentially, this slide-and-grip knot should be tied with a small rope around a bigger one for the best results.
You may vary the number of wraps for different performances. A four/two variation means four wraps around the bigger rope with the tail through two of the wraps. A five/three arrangement is slightly more secure and features five turns with the running end through three of them.
Most importantly, remember to use a stopper knot in the running end to prevent the hitch from coming undone.
A bend knot is the best option for joining two lengths of rope by their ends. The best way to ensure the bend knot won’t slip or fail is to use similar ropes with the same diameters. Bend knots can be used to create a bandage, repair a guyline, or even lengthen a line for hanging your bear-proof food bags.
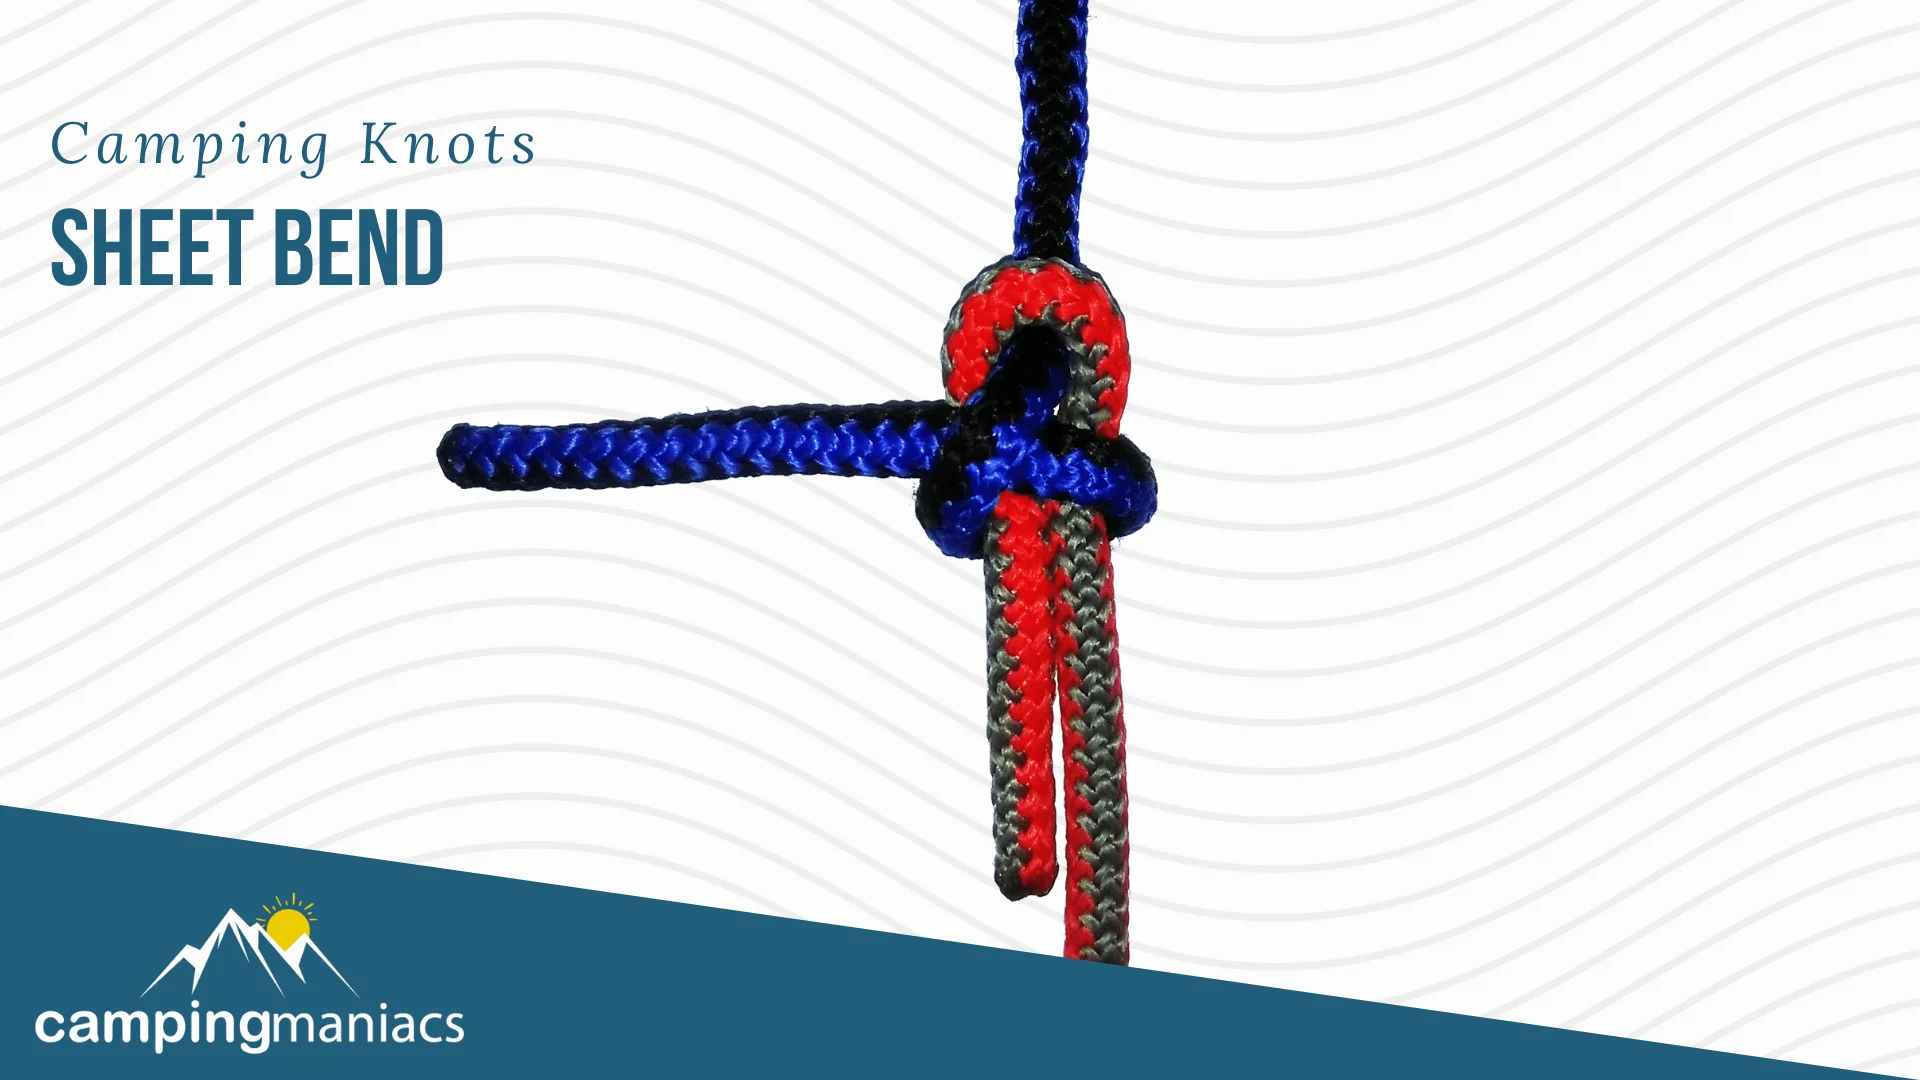
A sheet bend knot is a good option for when you need to connect two lines. It is particularly very useful for joining ropes with varying diameters and materials. It is a practical solution for stringing a tarp, securing a bundle of firewood, hanging hammocks, making a guide rope for river crossings, and hanging food high up in trees.
Also known as a becket bend or weaver’s knot, this bend is very easy to learn, non-jamming, and easy to tie or untie unlike its more complicated counterparts such as the Carrick and Butterfly bends.
Notably, this bend has an increased risk of slipping out under tension especially when working with slick ropes or thin and large lines. Using its variations with suitable stopper knots at the line ends should help counter this problem.
Instead of the single-turn Sheet Bend, you may add another wrap in the smaller end to improve security resulting in a Double Sheet Bend. Triple or Quadruple Sheet Bends may also be improvised similarly for even more security.
If you want to join two ropes with large diameters then you may want to go with the Carrick Bend.
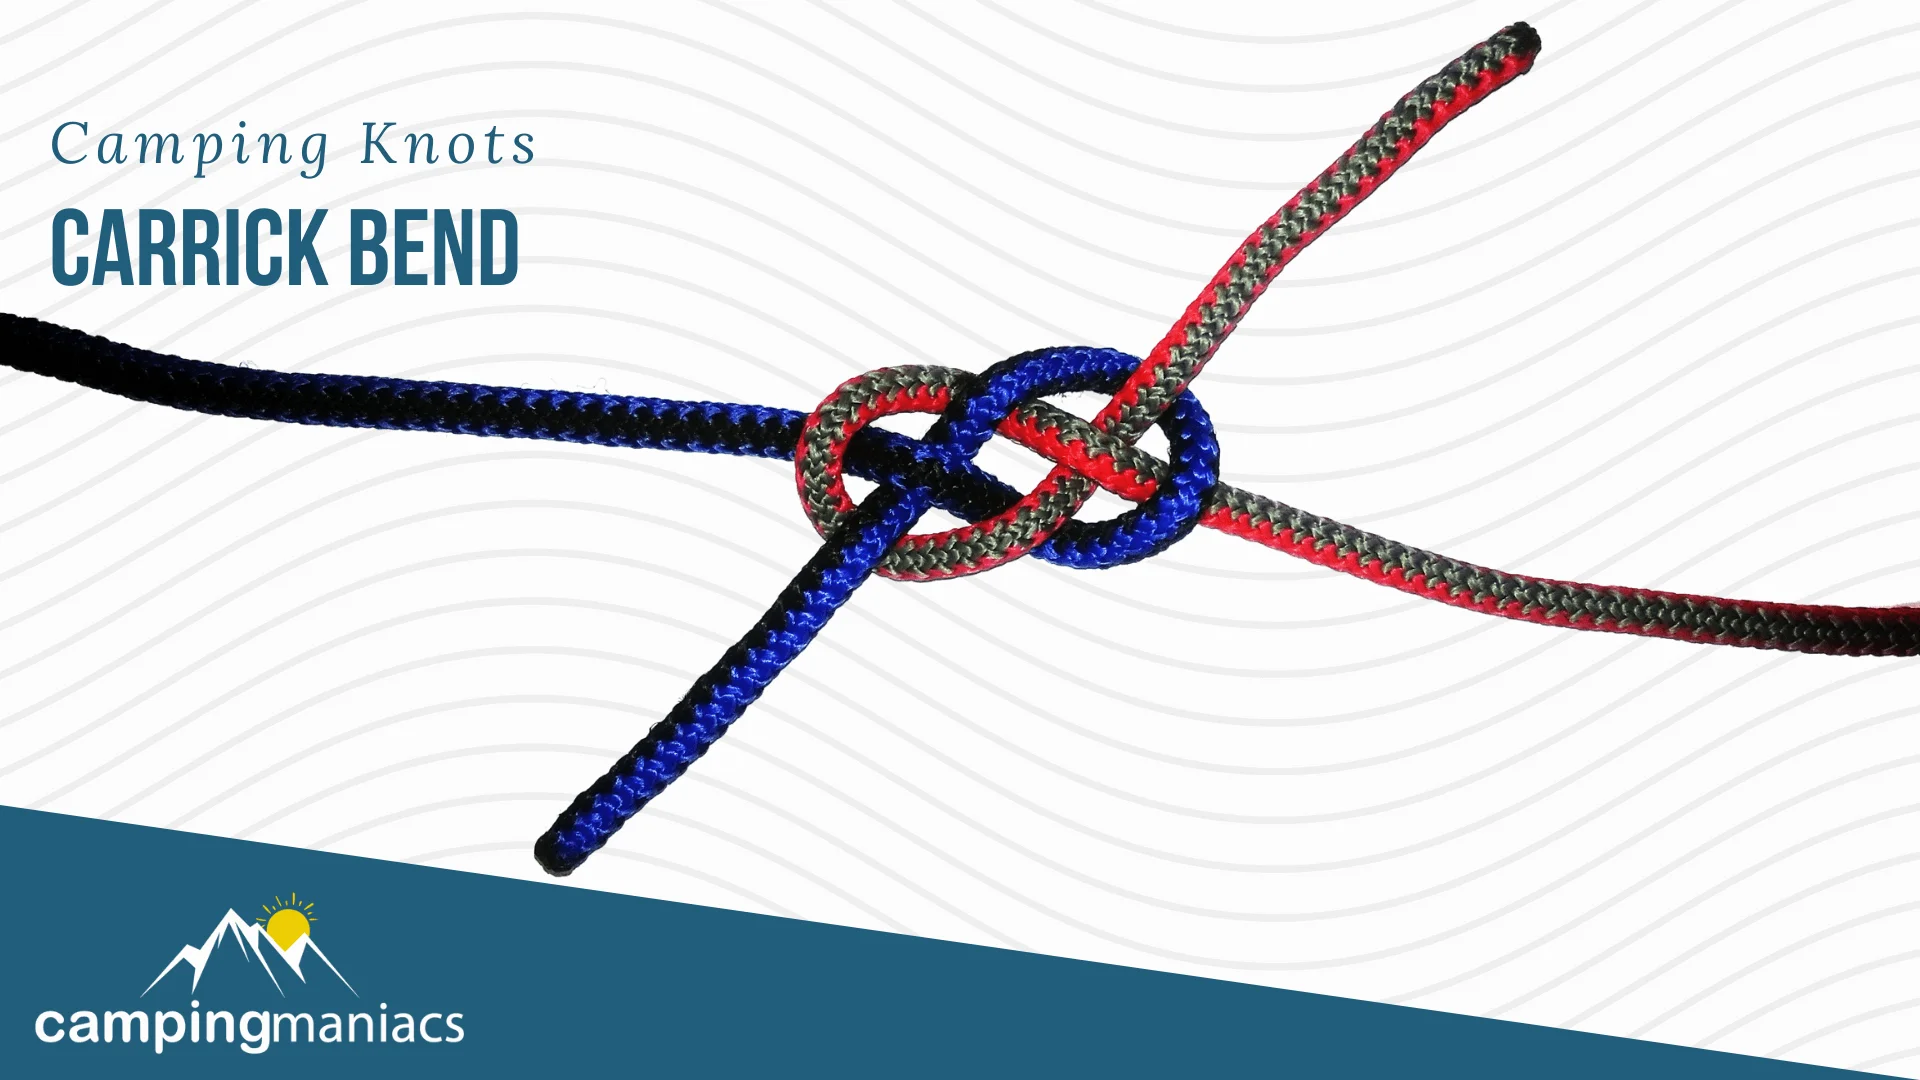
The Carrick Bend is also referred to as the Anchor bend or Sailor’s knot. It is a non-jamming, easy-to-tie, and reliable knot suitable for joining larger diameter lines. The knot doesn’t slip or jam even when wet or put under immense strain.
In addition, you may use it to make climbing nets for your campground pastime activities.
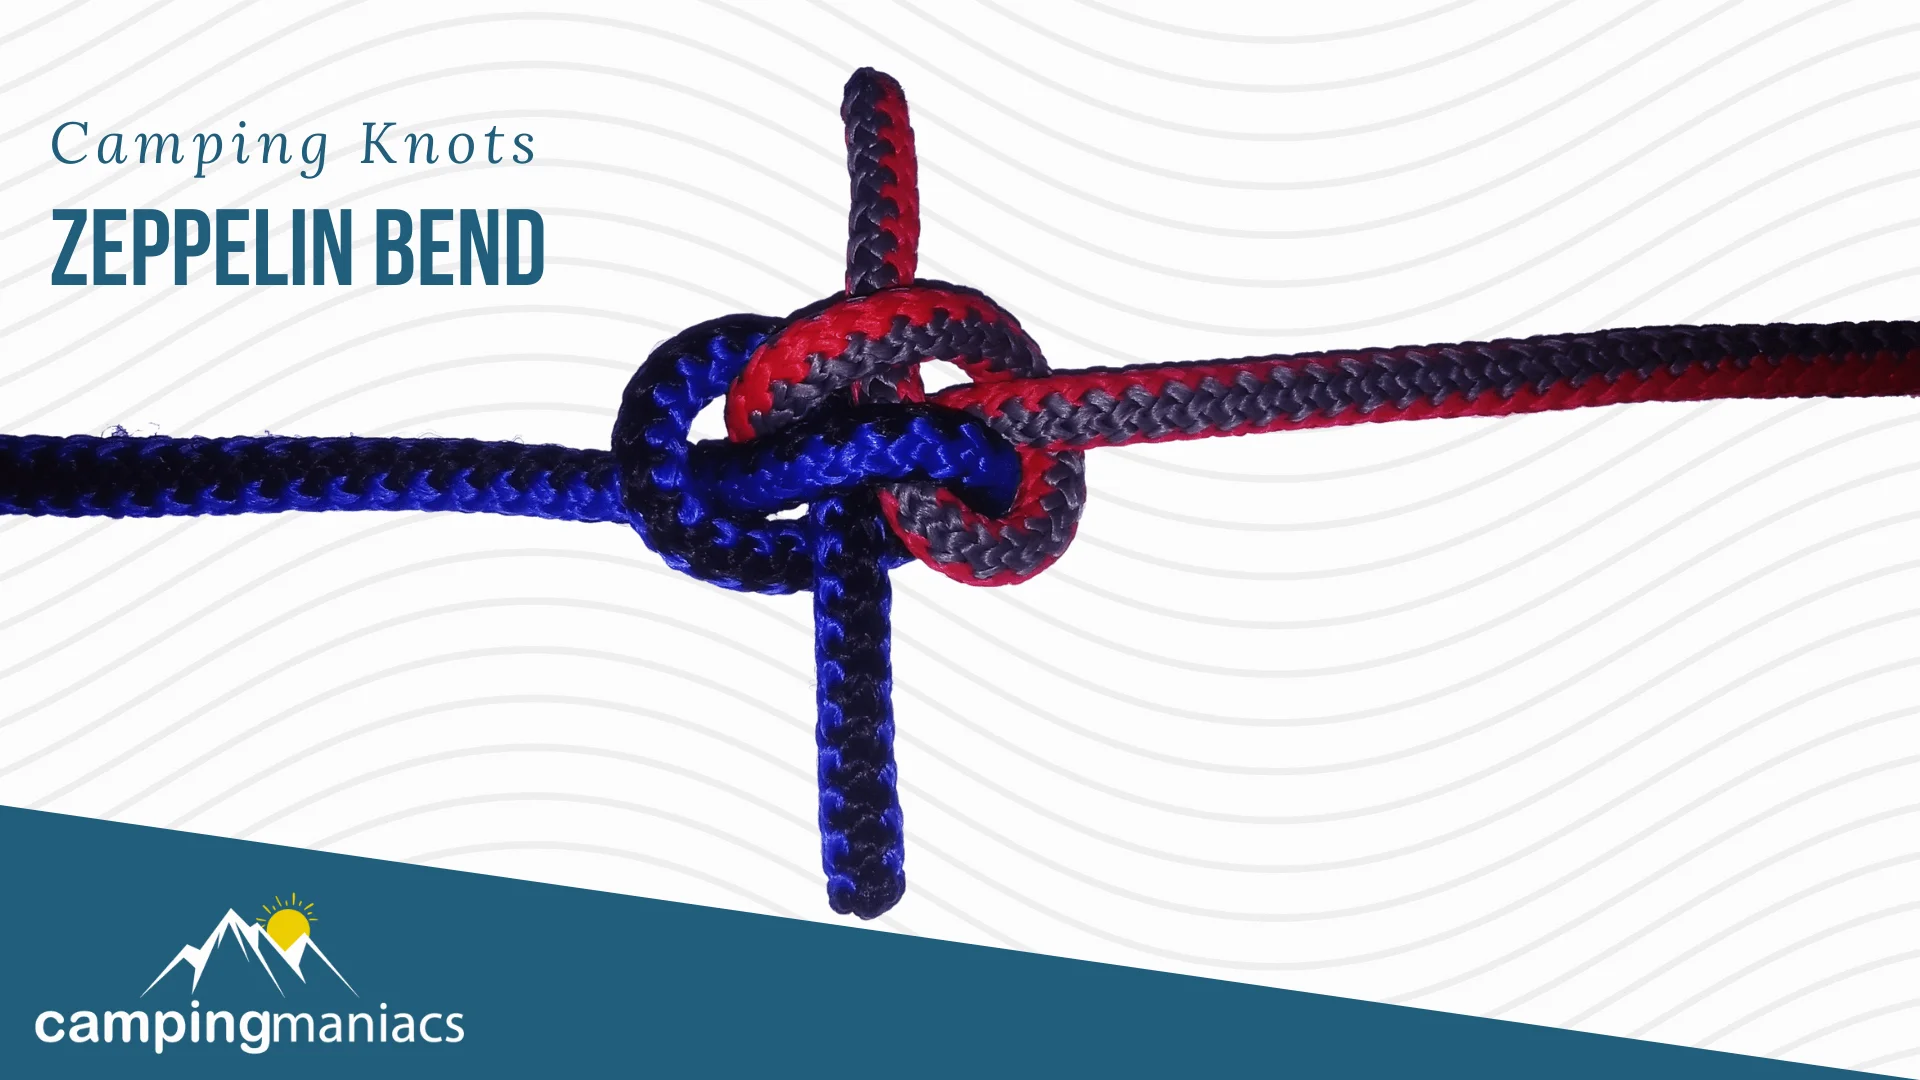
The Zeppelin bend, also known as Rosendahl Bend, is a secure, stable, versatile, and easy to untie knot used for joining all sizes and types of ropes or cords. It comprises two interlocked overhand knots and is closely related to the Rigger’s Bend or Hunter’s Bend.
The knot is very resistant to jamming as well as the effects of cyclic loading and slack shaking. Its resistance to jamming makes it a good alternative to the more popular Double Fisherman’s knot. Further, the Zeppelin bend is far less likely to bind or slip.
Its most notable flaw, however, is that it can be slightly harder to tie correctly. The knot will prove useful for bushcraft, sailing, and rock climbing among other outdoor recreational activities.
A Double Zeppelin Bend may be created by having more turns around both loops with working ends of the two ropes.

Like most bends, this knot joins two ropes end-to-end by using interlocking overhand knots. It is particularly very similar to the Zeppelin bend. The Ashley’s Bend forms a secure non-slipping knot that holds up against a great deal of motion and strain.
It can be used to form the center of a four-way tie-down. The bend works very well with thinner ropes such as guylines and any other camping cordage.
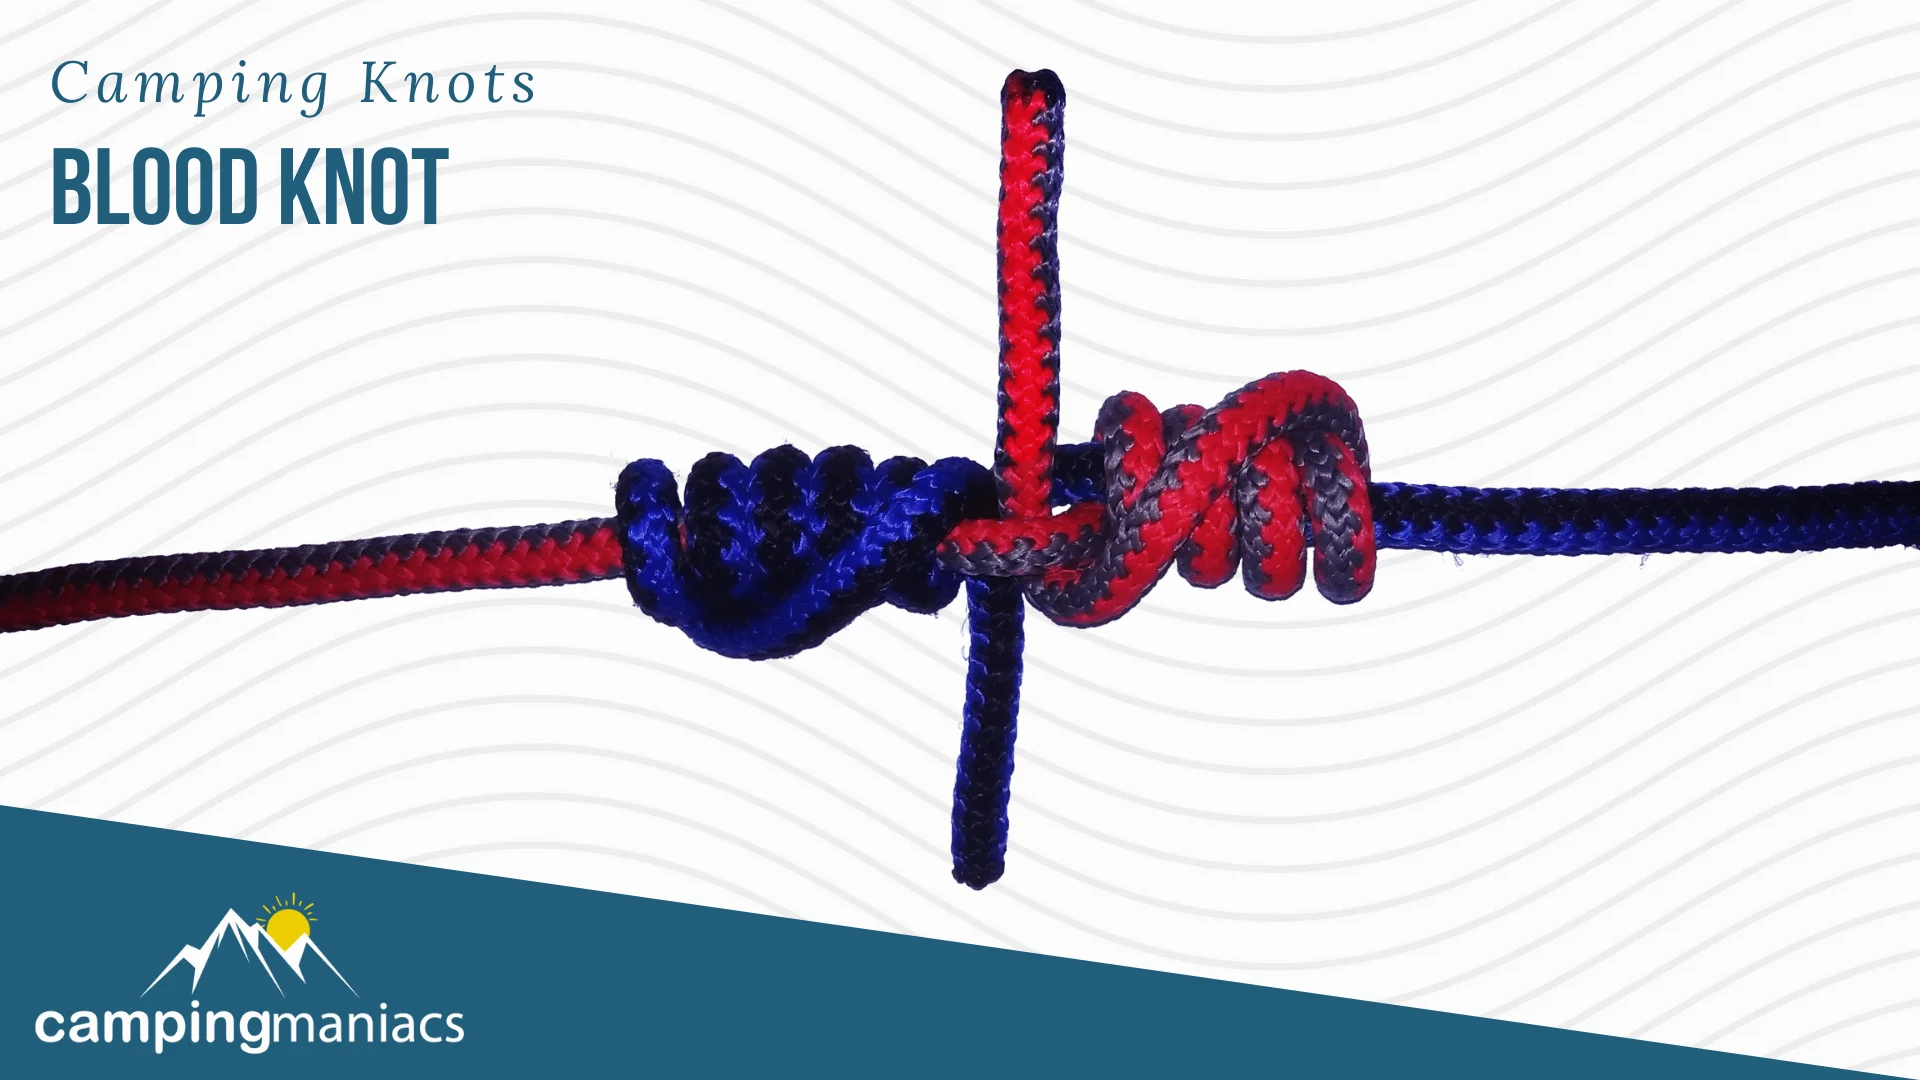
Also known as a barrel knot, this joiner knot is a favorite for most fishermen, sailors, campers, and outdoor survival enthusiasts. The Blood Knot works well with lines of almost equal diameters and features several wrapping turns that resemble multiple overhand knots.
The knot is versatile, highly resistant to breaking, compact, and secure. It might be a bit overkill for rope repairs during camping but will prove invaluable if you partake in fly fishing.
The most notable variations to the Blood Knot include the Improved Blood knot and Half Blood knot, which help connect lines of different diameters and attach tools to lines, respectively.
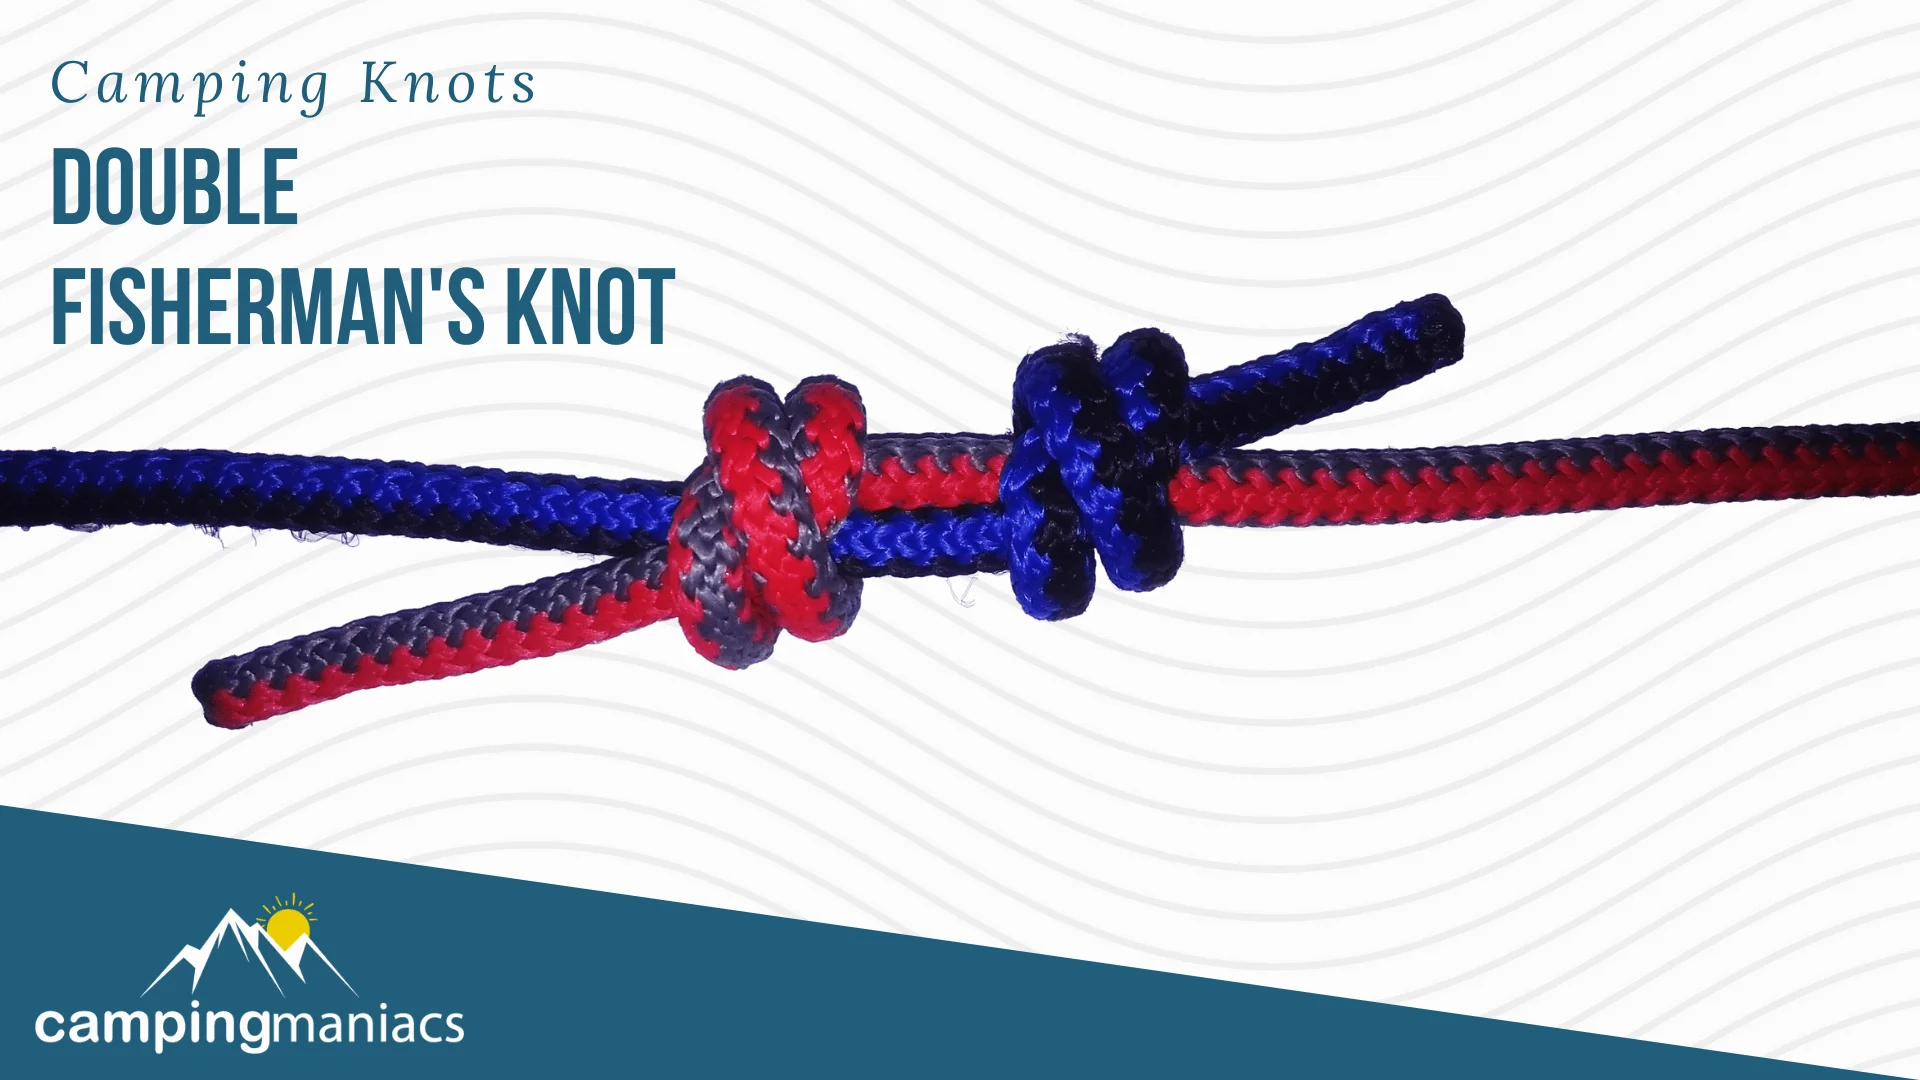
A variation of the classic fisherman’s knot, this bend is often associated with fishing but works equally well for other activities such as backpacking, hiking, and climbing. The knot is formed by tying two double overhand knots, each around the standing parts of the other.
The knot is especially effective with ropes of similar diameters but not those with large or medium diameters. Also known as the Grapevine Knot, the Double Fisherman’s Knot is one of the strongest joiner knots yet. However, it can be a bit bulky and challenging to tie or untie.
It can be used to tie just about anything with an eye hole to a line or secure two lines for a longer functional rope.
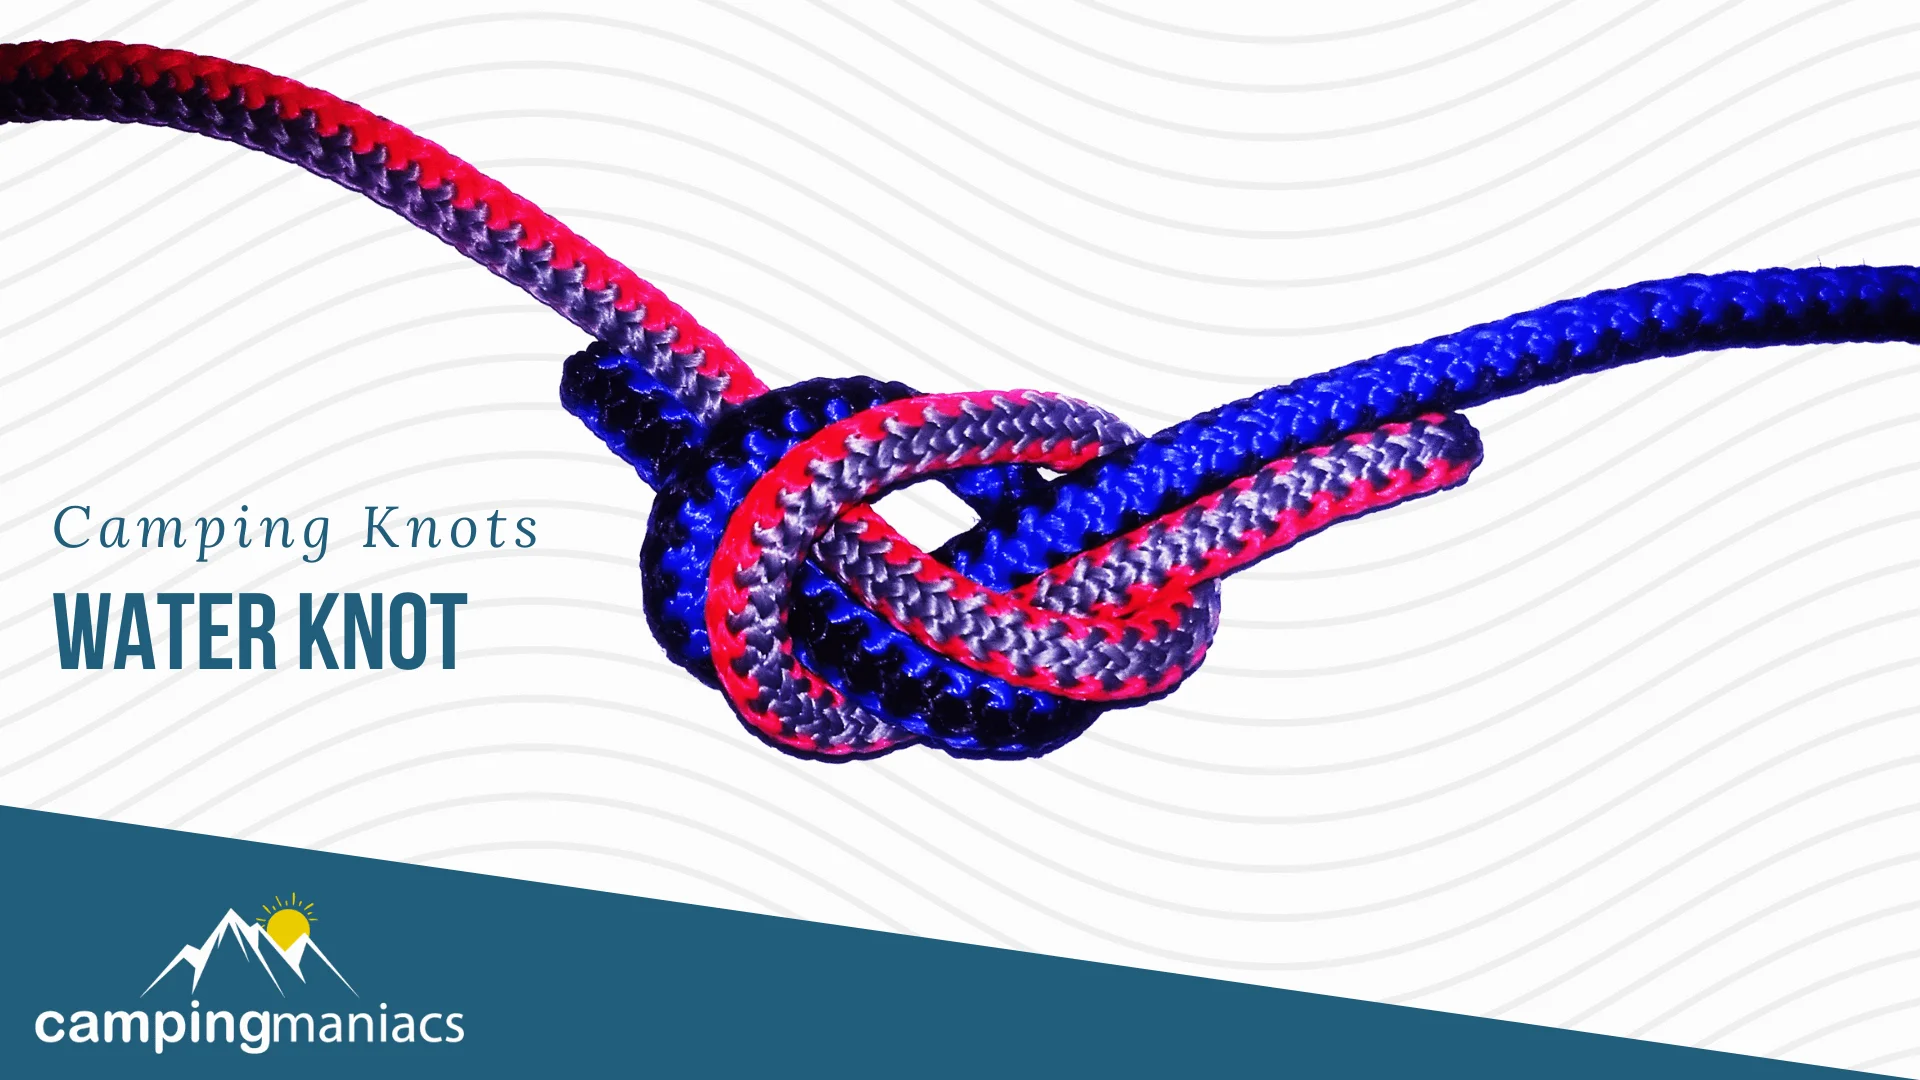
This bend, also known as a Ring Bend or Grass knot, is commonly used to join two webbing straps or flat belts together. If your camping gear has nylon straps then it should be your go-to joiner knot. That said, the Water Knot may be improvised for use with normal cordage by adding more overhand knots to its structure.
It is best used with cordage made of strong, durable materials. The major downside to this knot is that it can loosen over time and thus requires constant inspection and retying. Further, you want to secure it by leaving the tail ends long and tying stopper knots at the ends for extra safety.
The Water Knot is useful in rock climbing, securing hammocks to anchoring stakes, and search and rescue missions.
When you need to form a closed circle in a rope, loops are the way to go. They are mainly used as attachment points for various objects. You can use loop knots to hang a lantern, create a rescue throw rope, clip onto a carabiner, attach fishing gear, and so much more.
Loop knots are further divided into single loop knots, double loop knots, fixed loop knots, terminal loop knots, midline loops, and adjustable or sliding loop knots.
Double-loop knots offer more strength than single-loop knots while sliding knots can be easily adjusted as opposed to fixed loop knots. Terminal loop knots and midline loops are placed at the end of the line and middle of the line, respectively.
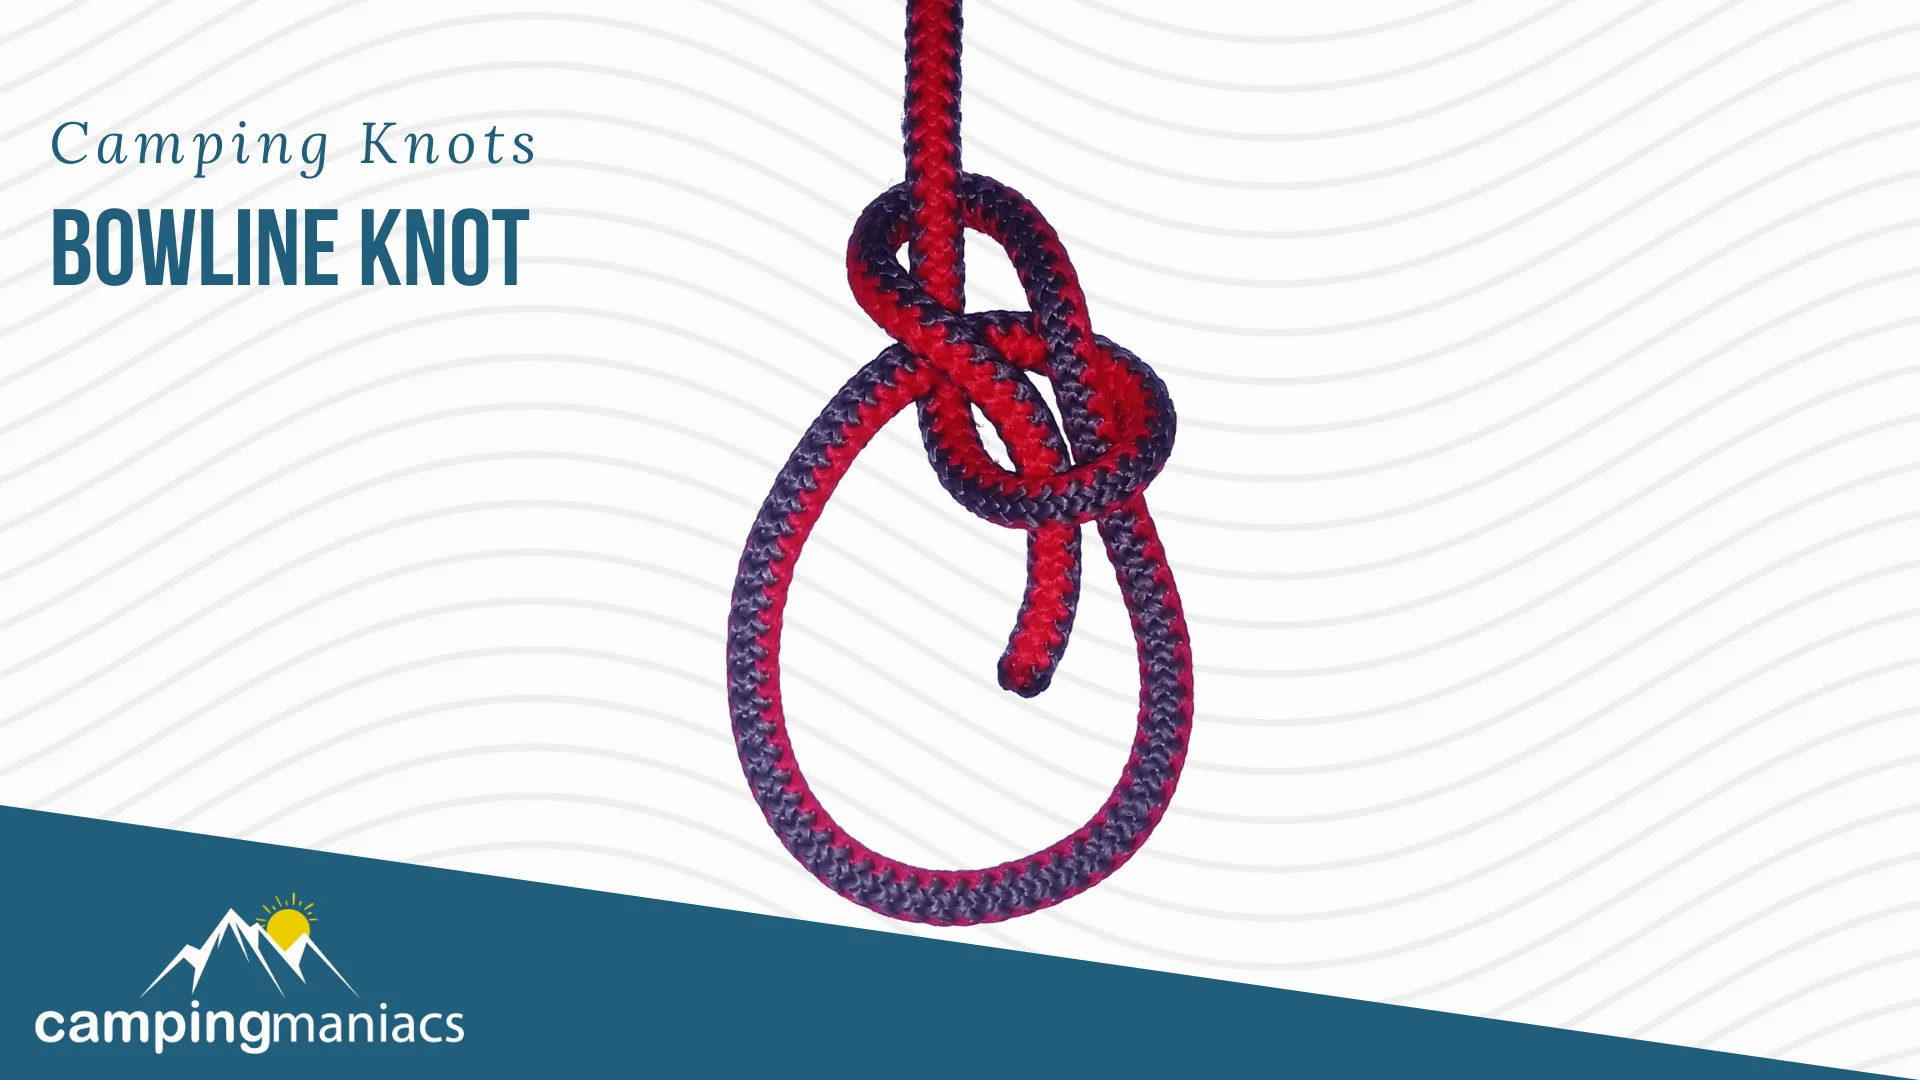
Off all the knots to learn, the Bowline is without a doubt the most popular, useful, and simplest to execute. It forms a non-slip fixed loop that’s resistant to jamming or coming undone over time. Further, given how easy the knot is to tie and untie, it’s no wonder it is used in so many applications.
You can use it to attach ropes to stakes, set up hammocks, hang portable showers, secure a rope to a tree, lift your bear bag off the ground, make guy lines for your tent or tarp, and even use them as foot or handholds for rescue situations. The uses of this simple loop knot around the campsite are pretty much limitless.
This loop knot ends up with the tail inside itself that can prove lifesaving as it won’t snag on anything. Additionally, you can tie the loop at the end of a line or on a bight without any compromises to its performance.
The only issue you might encounter with the Bowline loop is that it can be a bit challenging to untie when the line is bearing a load.
There are about seven types of Bowline knots including the Running bowline knot, French bowline knot, Double bowline knot, Spanish bowline knot, Yosemite bowline, Water bowline knot, and Bowline on a bight.
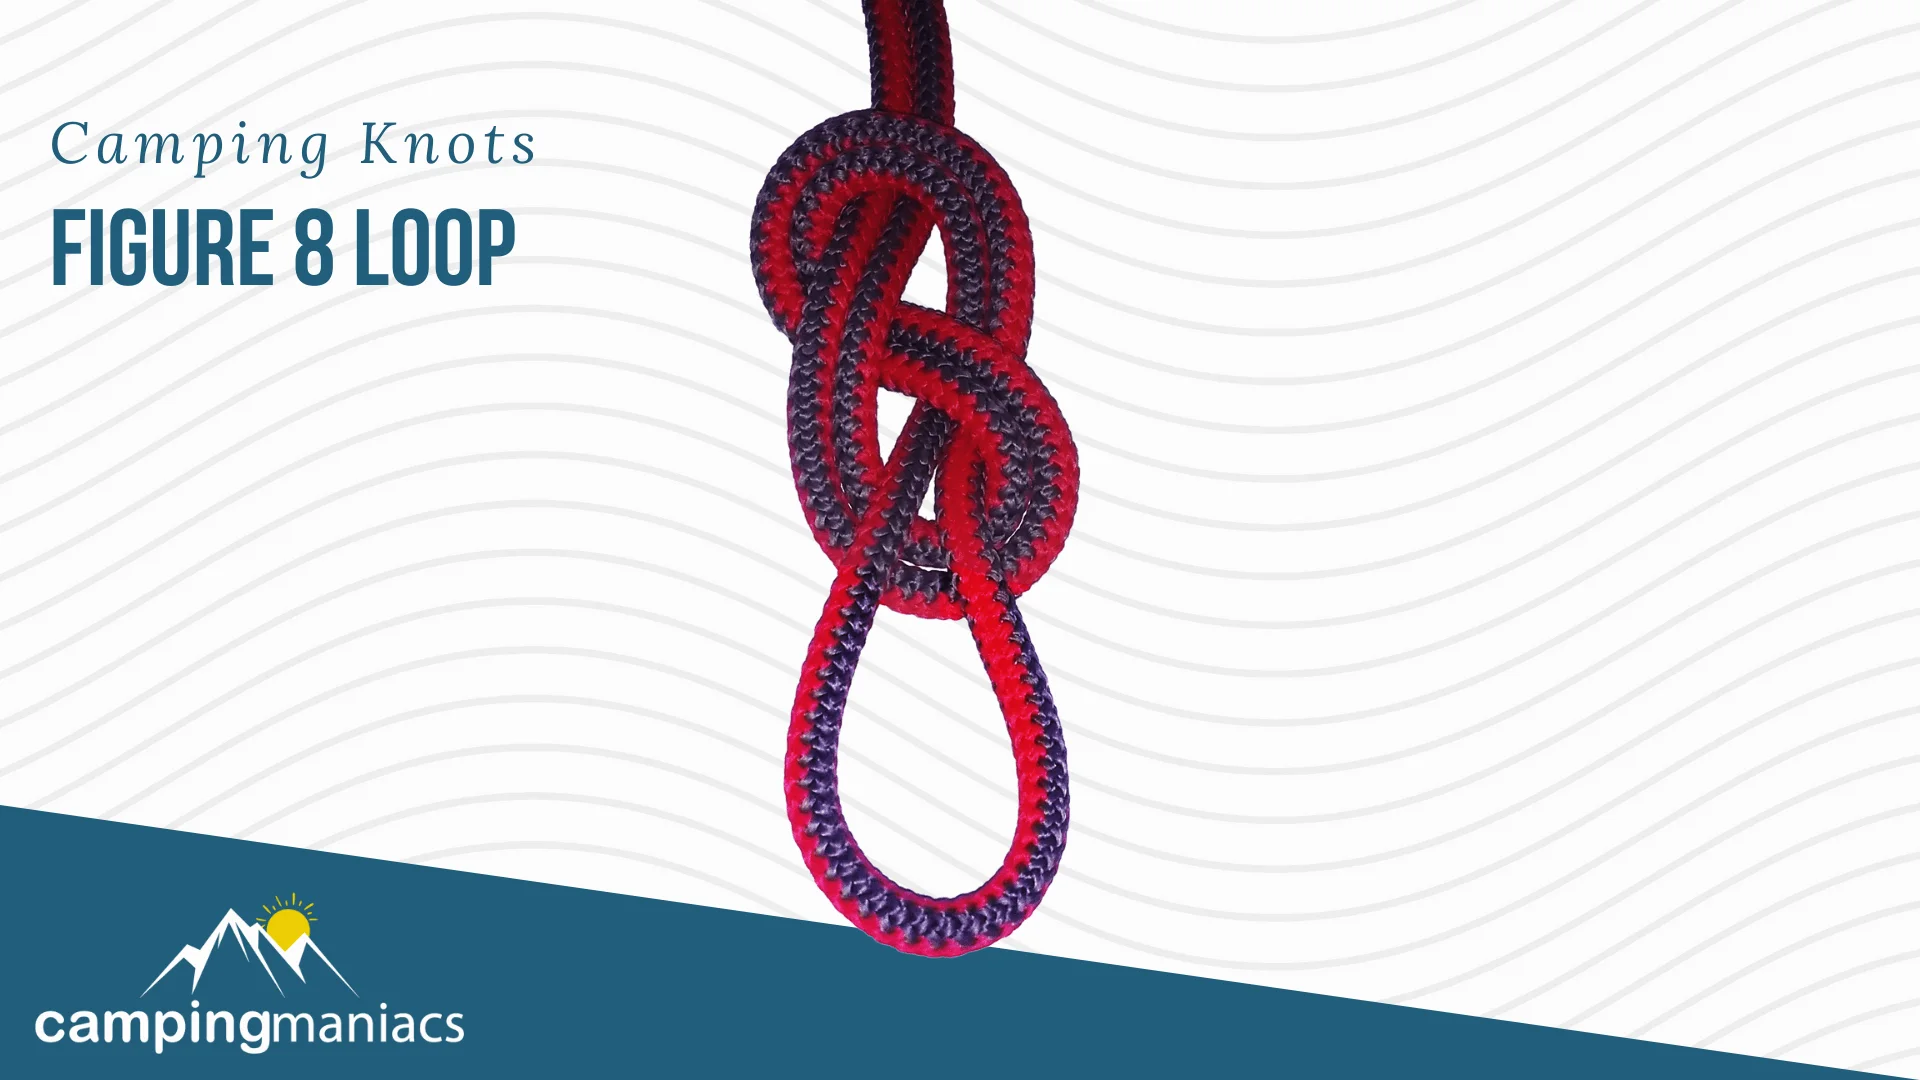
Also referred to as a Flemish loop or Figure-eight on a bight, this loop is secure, quick and simple to tie, and easy to inspect for errors. Some of its flaws include excessive jamming and difficulties while untying, especially after heavy loading. Additionally, the loop can be relatively difficult to adjust.
You may use the loop to hang lanterns or even tow your Overlanding truck out of the mud. Generally, the figure-eight loop can be used to pull or hold an object or even be placed around or over a given object.
You can tie this loop in two main ways namely on a bight or the follow-through method. The latter is done by first tying a figure-eight loop then retracing the loop with the tail end. We shall focus on tying the loop on a bight.
Consider including a half hitch around the standing part of the rope to make it even more secure.
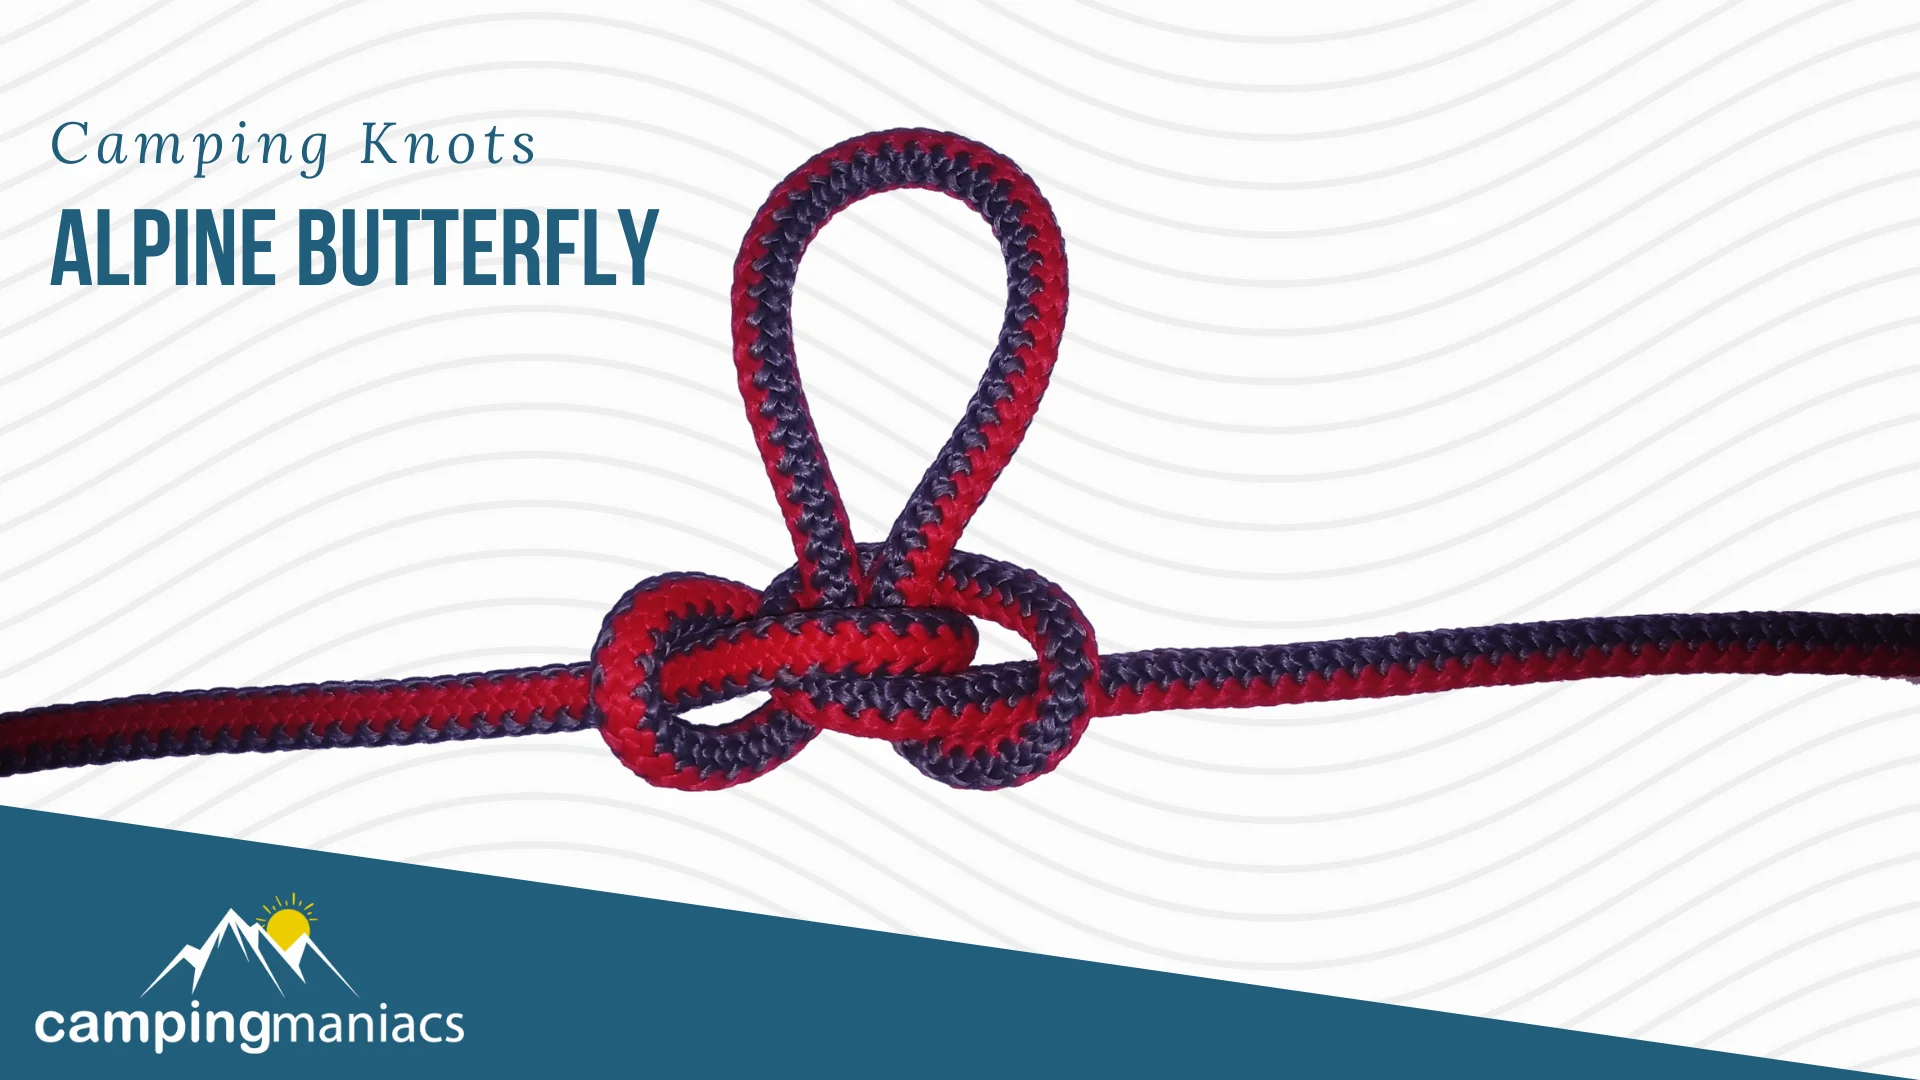
This fixed knot is suitable for tying down guy ropes on a tarp or a tent. The Alpine Butterfly knot allows for easy tension adjustments even in very windy conditions, all while maintaining the integrity of your outdoor shelter.
Some of the applications of this knot include making a fixed loop in the middle of the rope, isolating a damaged section of a line, shortening a line, or even making a temporary rope ladder. It comes a close second to the bowline knot in terms of usefulness, relative ease of operation, and strength.
However, the Alpine Butterfly Knot or Lineman’s loop can be slightly difficult to tie and it is most effective with softer ropes.
This category of knots is suited for securing, wrapping, or gripping a single or several loose objects together. Here, a rope is passed at least once around an object and kept together using a binding knot. Binding knots come in two main types namely knotted-end knots and friction knots.
Friction knots are secured by friction between the rope turns and windings while knotted-end knots are kept in place by tying knots at both ends of a given line.
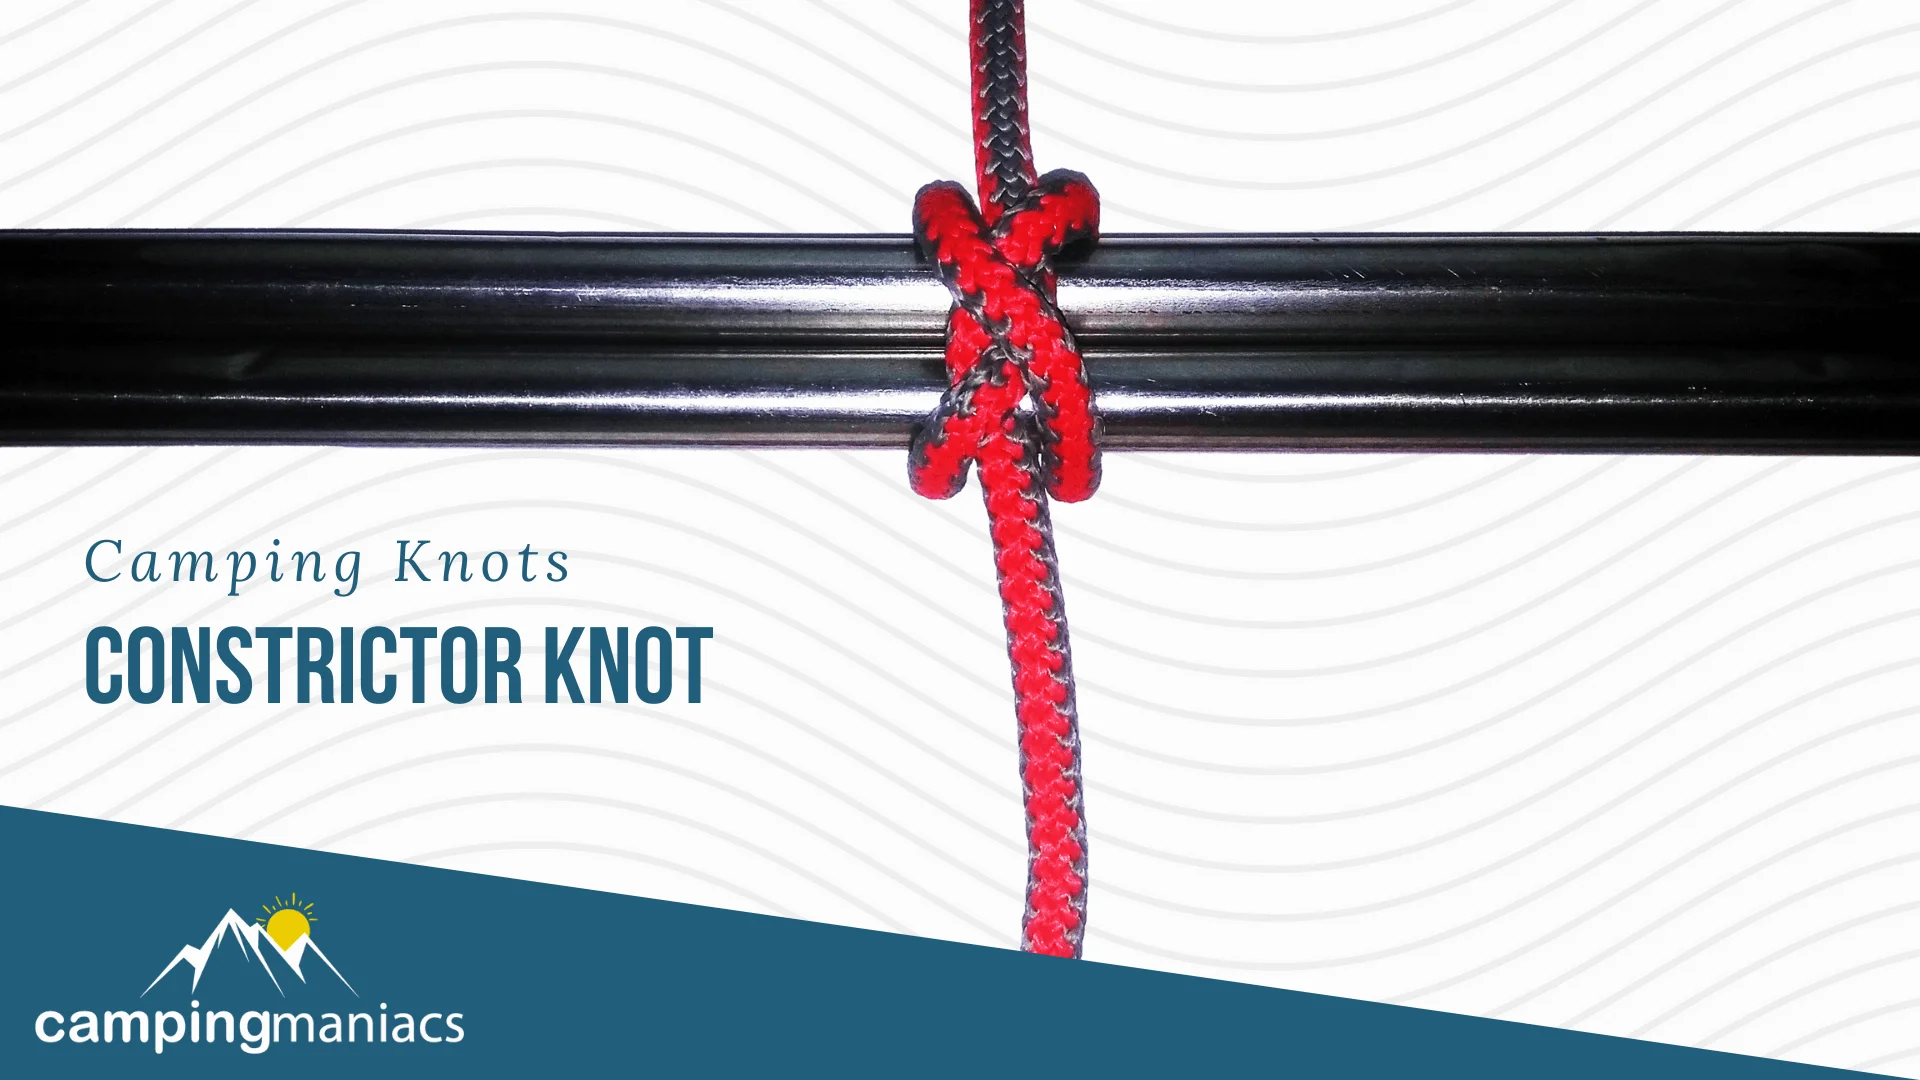
The Constrictor knot or Gunner’s knot is one of the most effective binding and whipping knots. Though it can be a pain to untie, its simplicity, strength, and secure grip are well worth the hassle. It is closely related to the Clove hitch but with a higher difficulty of untying.
In some cases, untying the knot might mean cutting the riding turn with your trusty pocket knife.
The knot can be used as whipping to prevent fraying at the ends of a rope, a temporary clamp for a bundle of objects, and for beginning a lashing. In addition, the constrictor may be used to tie off trash or laundry bags and tie logs for a fire reflector setup. The knot also comes in handy for bundling up your trekking poles and tent poles together to reduce rattling.
There are several ways of tying a constrictor knot including the twisting method, folding method, or using the end of a rope to wrap around the object. The steps outlined below focus on the latter:
The most notable variations to this knot include the Double constrictor knot and Slipped Constrictor knot.
The double constrictor knot is a more robust binding knot and is equally impossible to untie. It features one turn over the basic constrictor knot and is even more useful when using slippery lines. On the other hand, a slipped constrictor has a quick release loop added at the tail for easier untying.
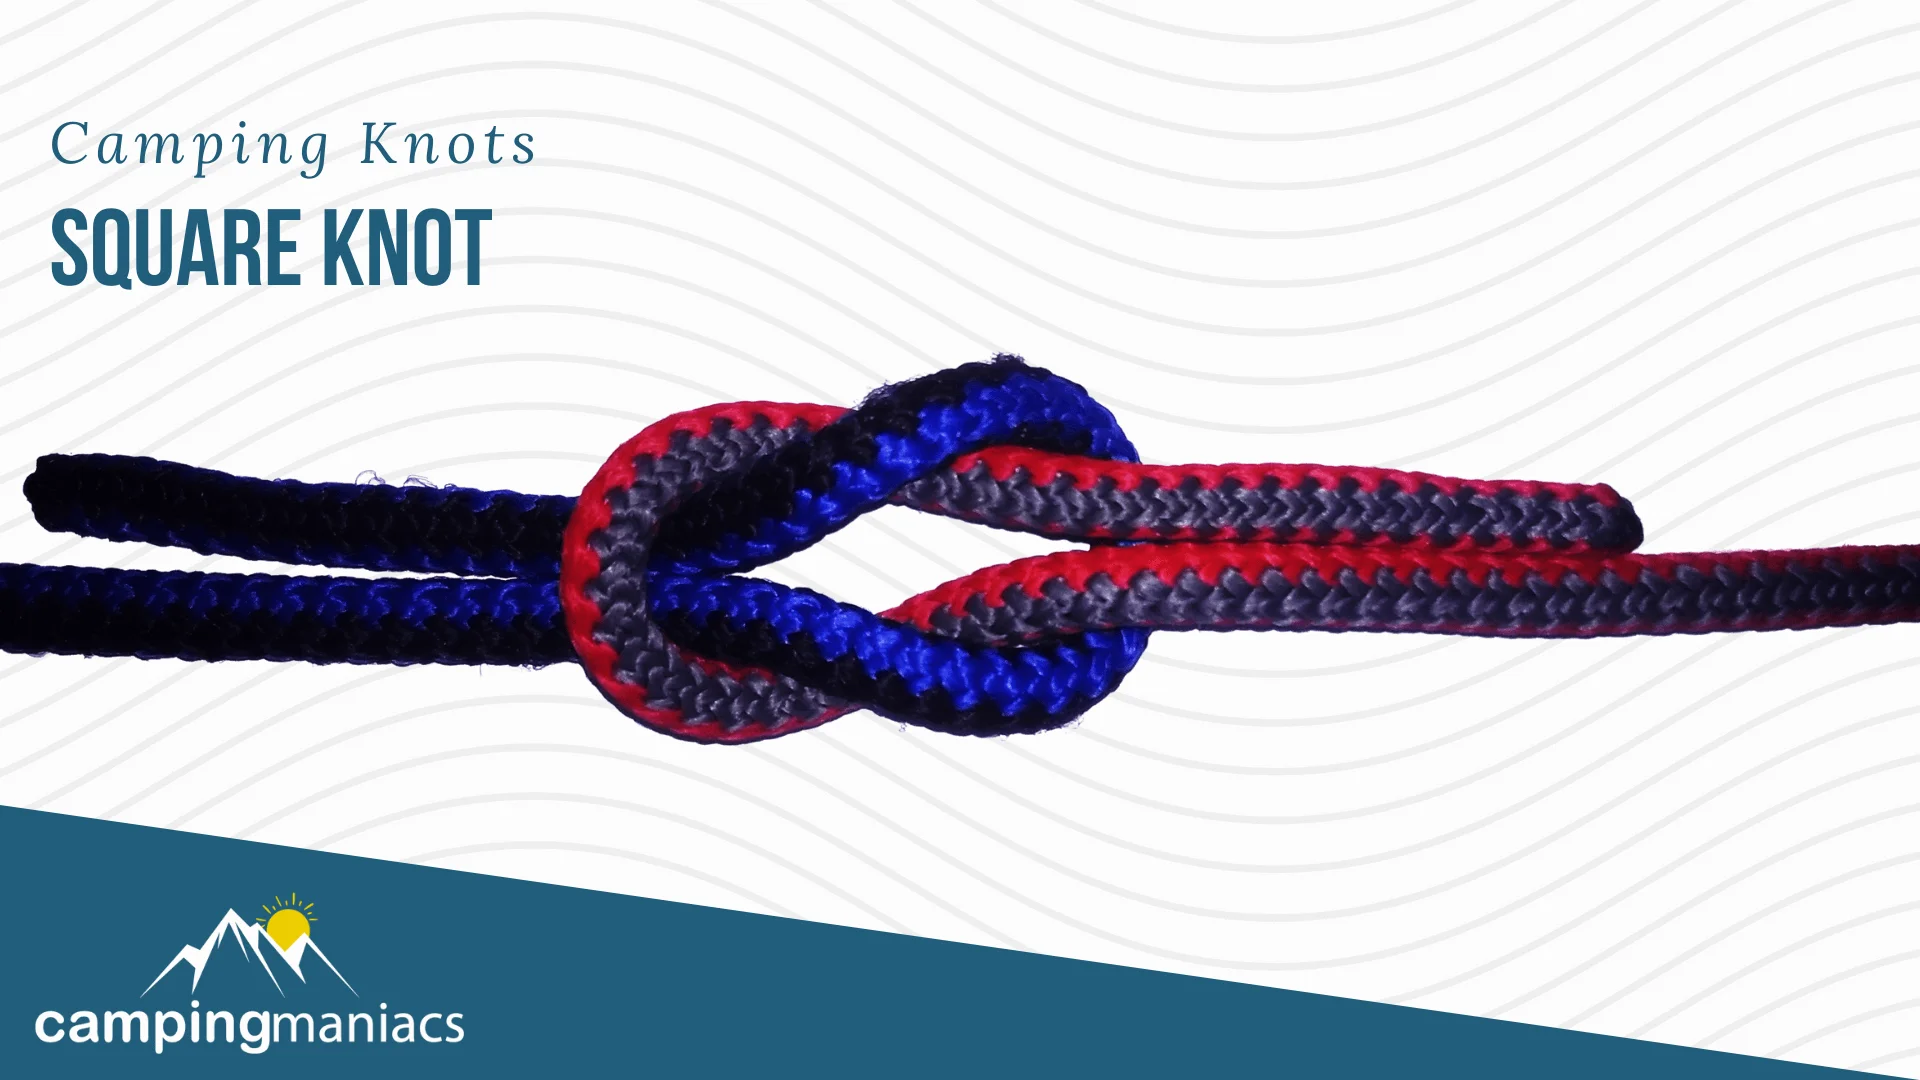
The reef knot, also known as the Hercules knot or Double knot, is a timeless, simple binding knot used for securing a line around an object. It is used to tie two ends of a line to wrap a set of objects.
Though some people mistakenly use it as a bend, the knot is not secure by any means and may not be ideal for supporting weight. The reef knot is bound to slip if put under too much strain but it is considered far much superior to its other variation, the granny knot.
Some of its uses around the campsite include tying a bundle of firewood, extending the clothesline, tying up bandages, and bundling light loads at the back of the truck for easier hauling.
The most common variations to the reef knot include the granny knot, surgeon’s knot, and thief knot.
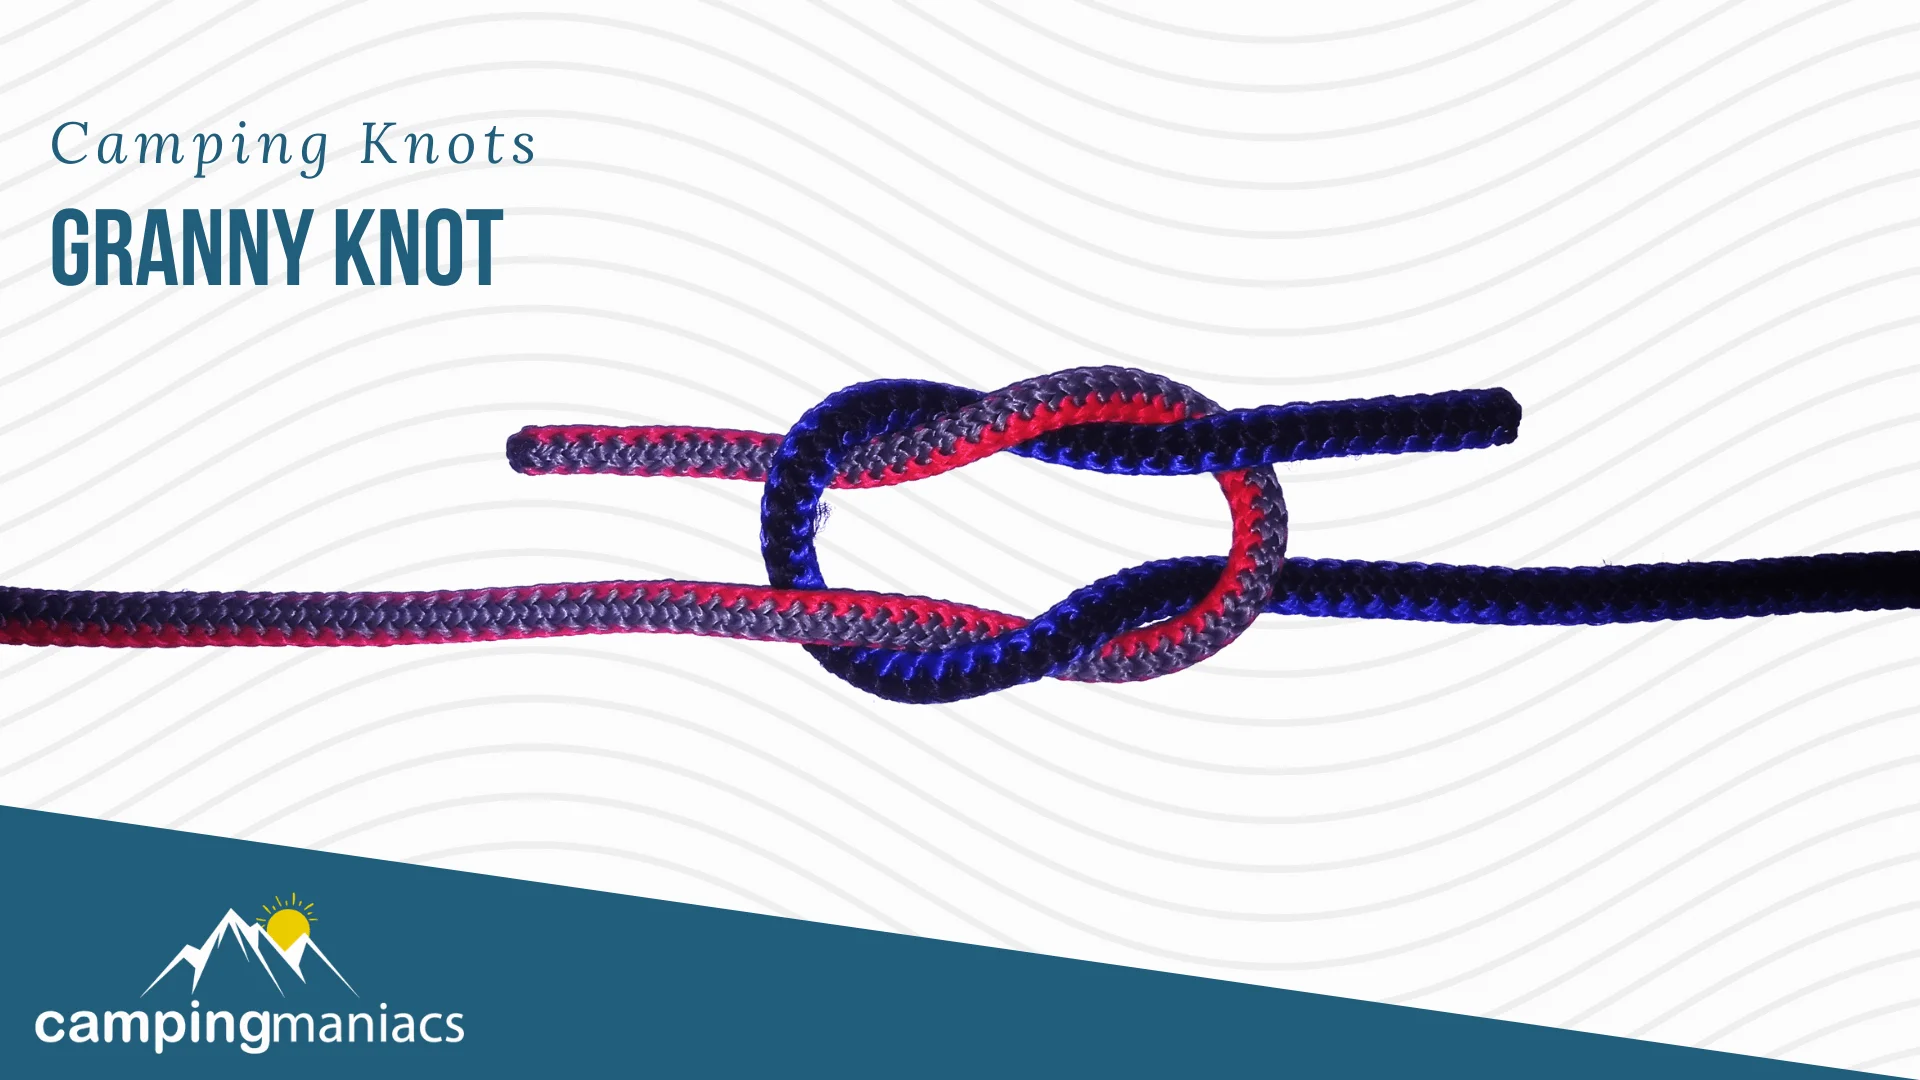
The Granny knot, also known as the false knot or booby knot, closely resembles the reef knot but with the tying sequence being the only differentiation.
Though not as effective as the reef knot, this binding knot may be used to secure a line around an object. Some of the potential issues with this knot include coming undone easily, poor balance, less secure binding, possible slippage when loaded heavily, and jamming upon excessive tightening.
That said, it is a good introductory knot to learn, binding items for gluing or stapling, and forms the basis of other more secure knots.
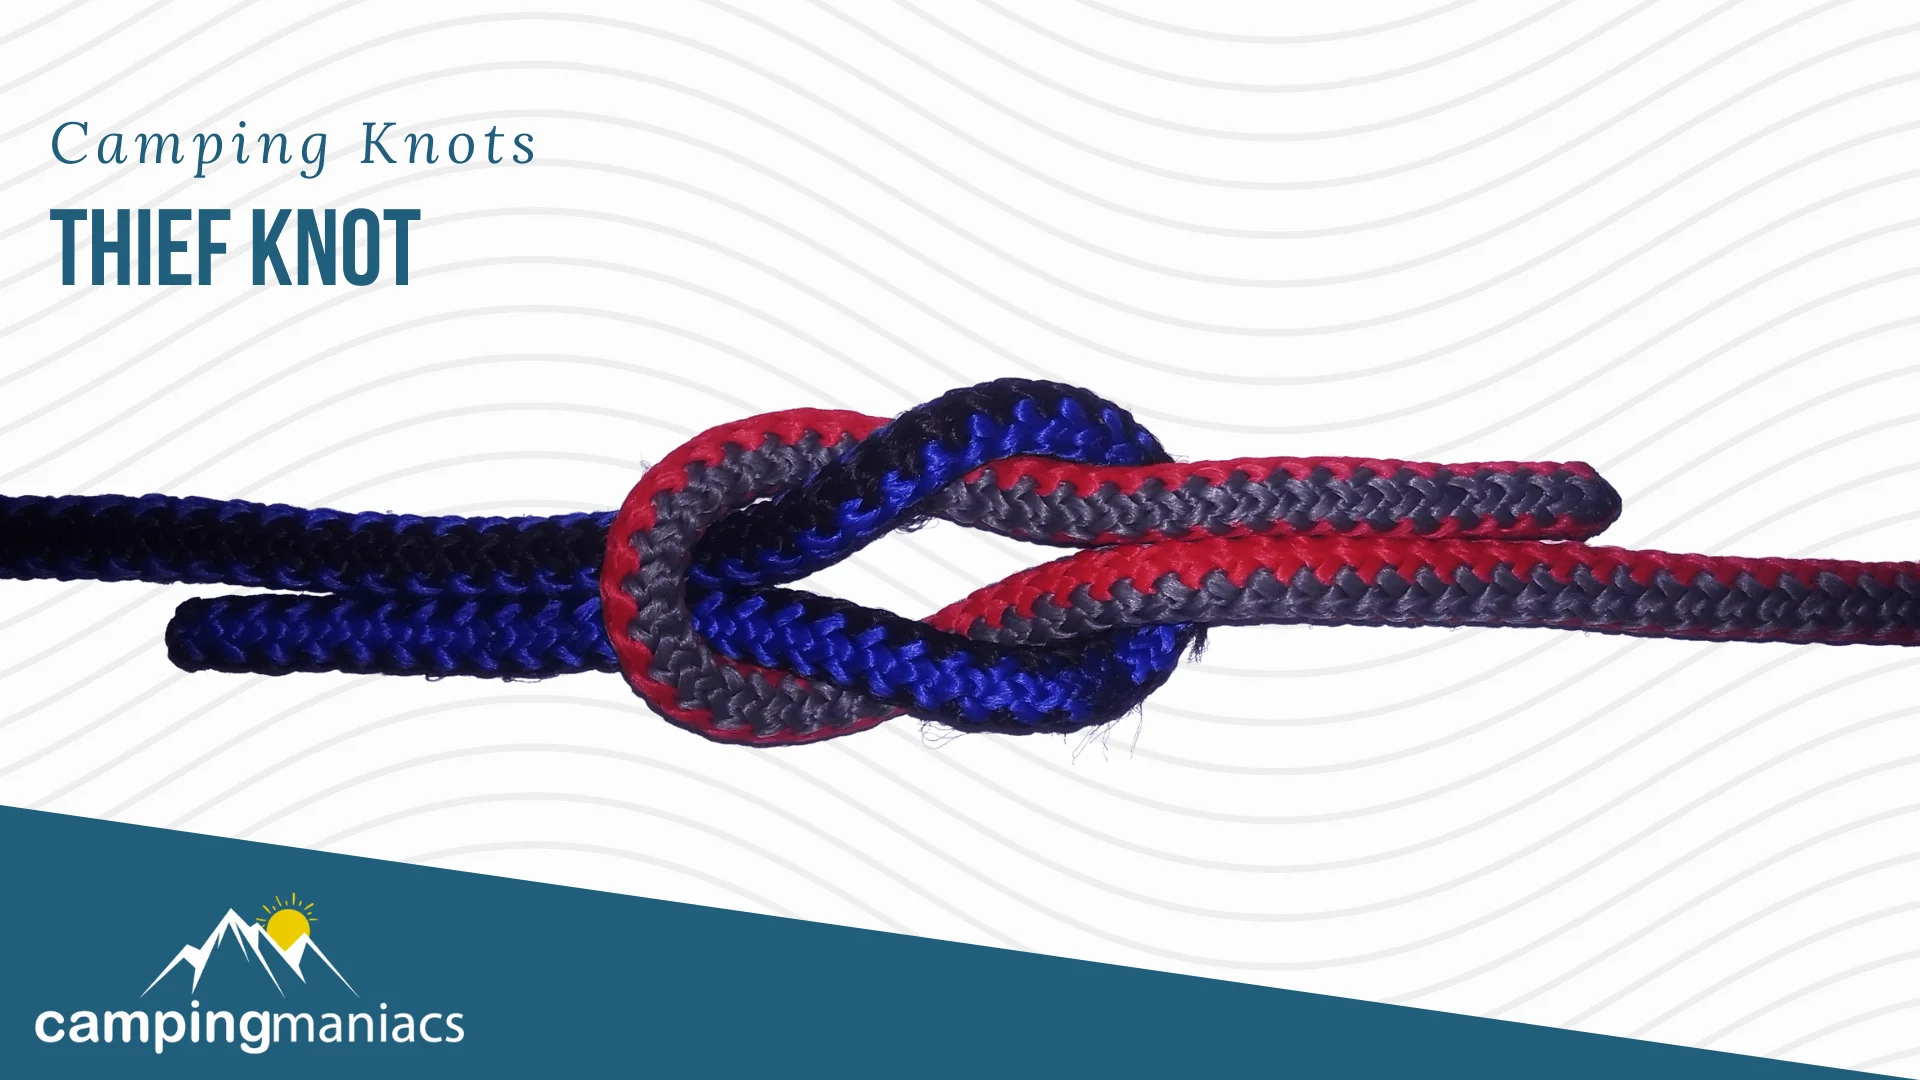
The main difference between the reef knot and the thief knot is that the latter has its running ends on opposite sides. Unbelievably, it was used by sailors to tell if the knot had been tampered with. The assumption was that thieves would mistakenly tie back a reef knot after lifting the sailor’s valuables.
The thief knot is far less secure than the reef knot and should be used for very light binding scenarios or decorative purposes. The knot jams and slips badly when loaded making it even less useful in most outdoor activities.
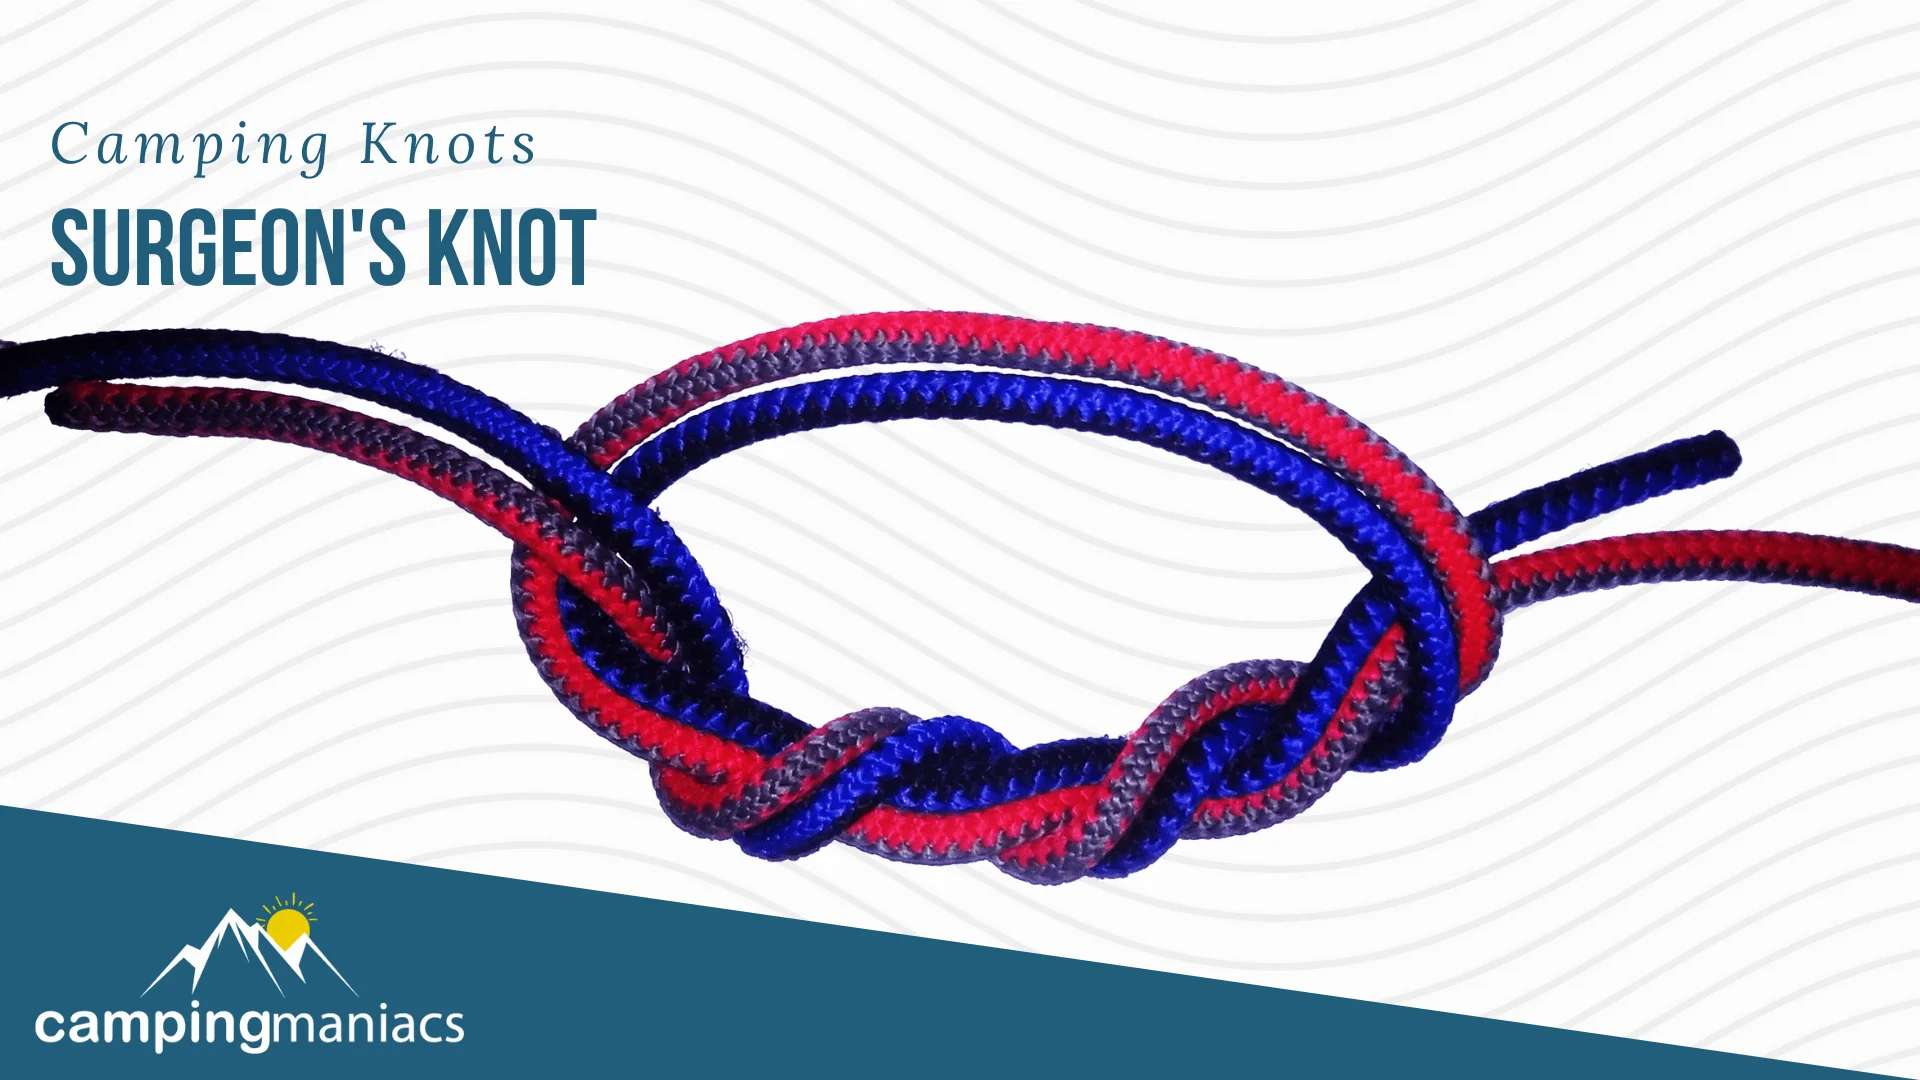
This simple binding knot is a slightly improved variant of the classic reef knot. The surgeon’s knot features a double overhand knot on one side to provide more friction and prevent the knot from loosening up over time.
Although it is more popularly used by surgeons, this knot can be used in fly-fishing, beading and jewelry, tying quilts, boating, and joining two lines of slightly unequal diameters. The surgeon’s knot is easy to tie, simple to inspect, and ideal as a joiner knot.
However, this knot is prone to slipping just like the reef knot and can be a bit bulkier than other more reliable knots.
Lashings are your best bet if you ever want to tie your teepee-shelter poles, build a tripod for your cooking pots and dishes, or even make a raft for outdoor pastime activities. They are used to tie multiple objects together in a seemingly rigid manner.
Some of the most popular lashings include shear lashing, diagonal lashing, square lashing, and tripod lashing. As you can imagine, each of the lashing types is suitable for a given purpose so be sure to choose wisely. Whichever lashing style you pick, ensure all the turns are correctly tensioned without any slack, or else you risk compromising the strength of the knot.
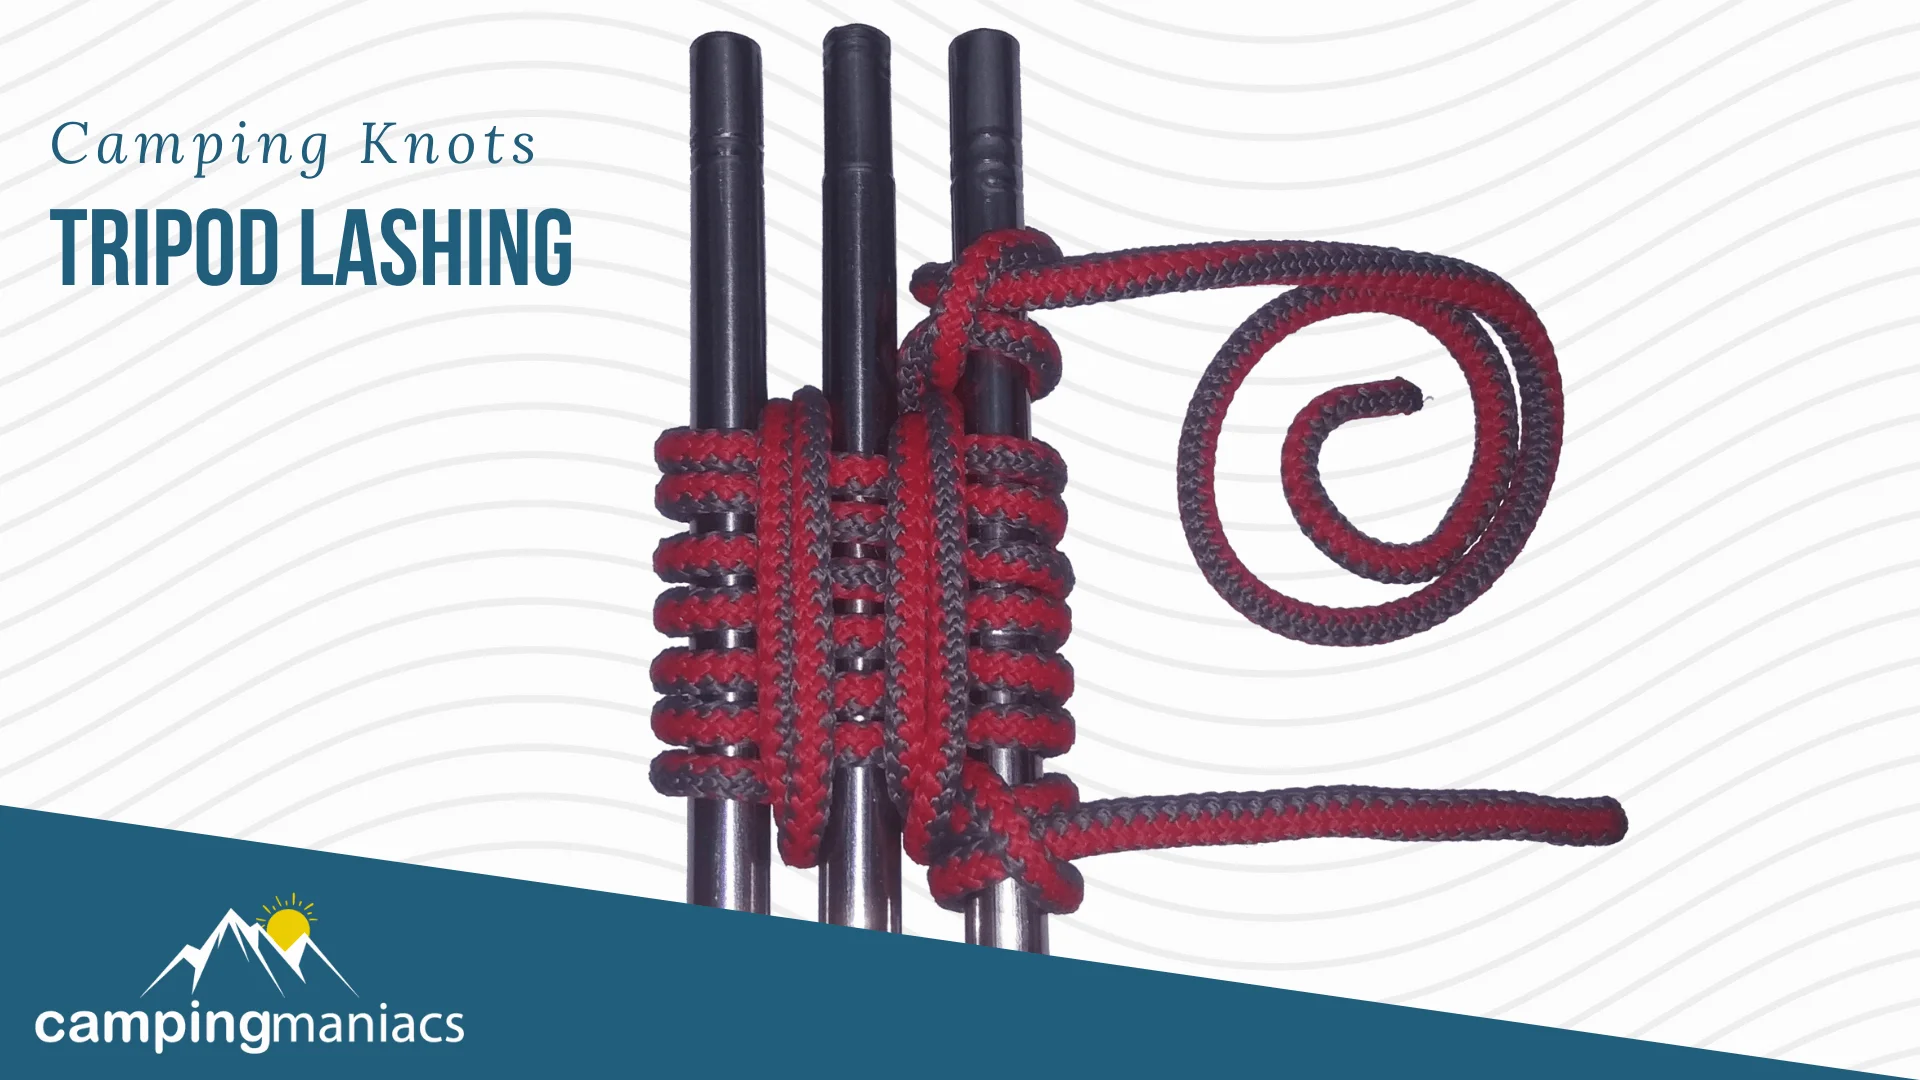
The tripod lashing is perhaps the most practical lashing for the everyday camper. This type of lashing helps bind three poles together to make a tripod.
Further, the lashing can be used to hang lanterns, suspend cookware over campfires, set up washbasins for outdoor wash stations, and even make towel racks. It also forms the basis for raft construction and some hammock setups.
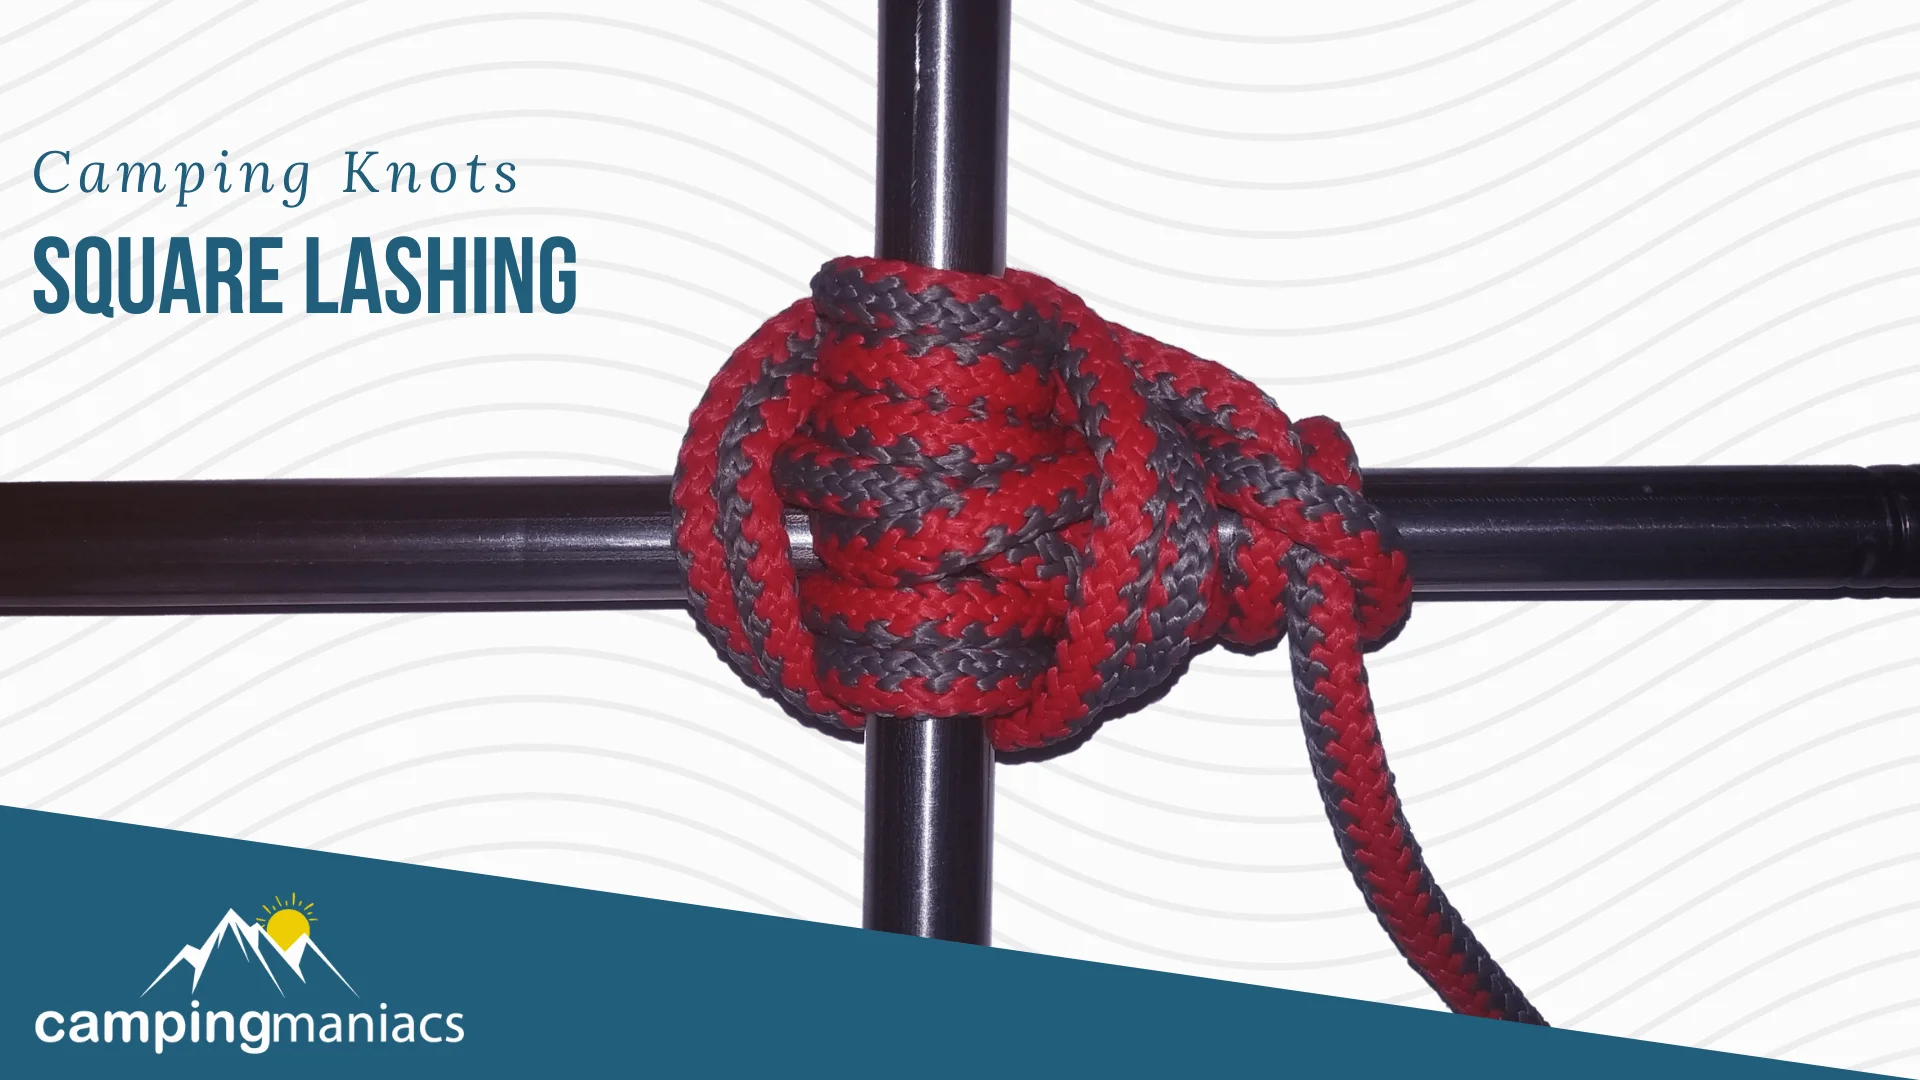
For hardcore outdoor enthusiasts, the square lashing can be used to bind poles at right angles for emergency stretchers, ladders, beds, chairs, or even a makeshift bridge. This type of lashing handles load-bearing situations without breaking a sweat.
Additionally, the lashing is very strong, easy to tie and adjust, and as long-lasting as your ropes allow. It can be used interchangeably with the Diagonal lashing depending on the intended application.
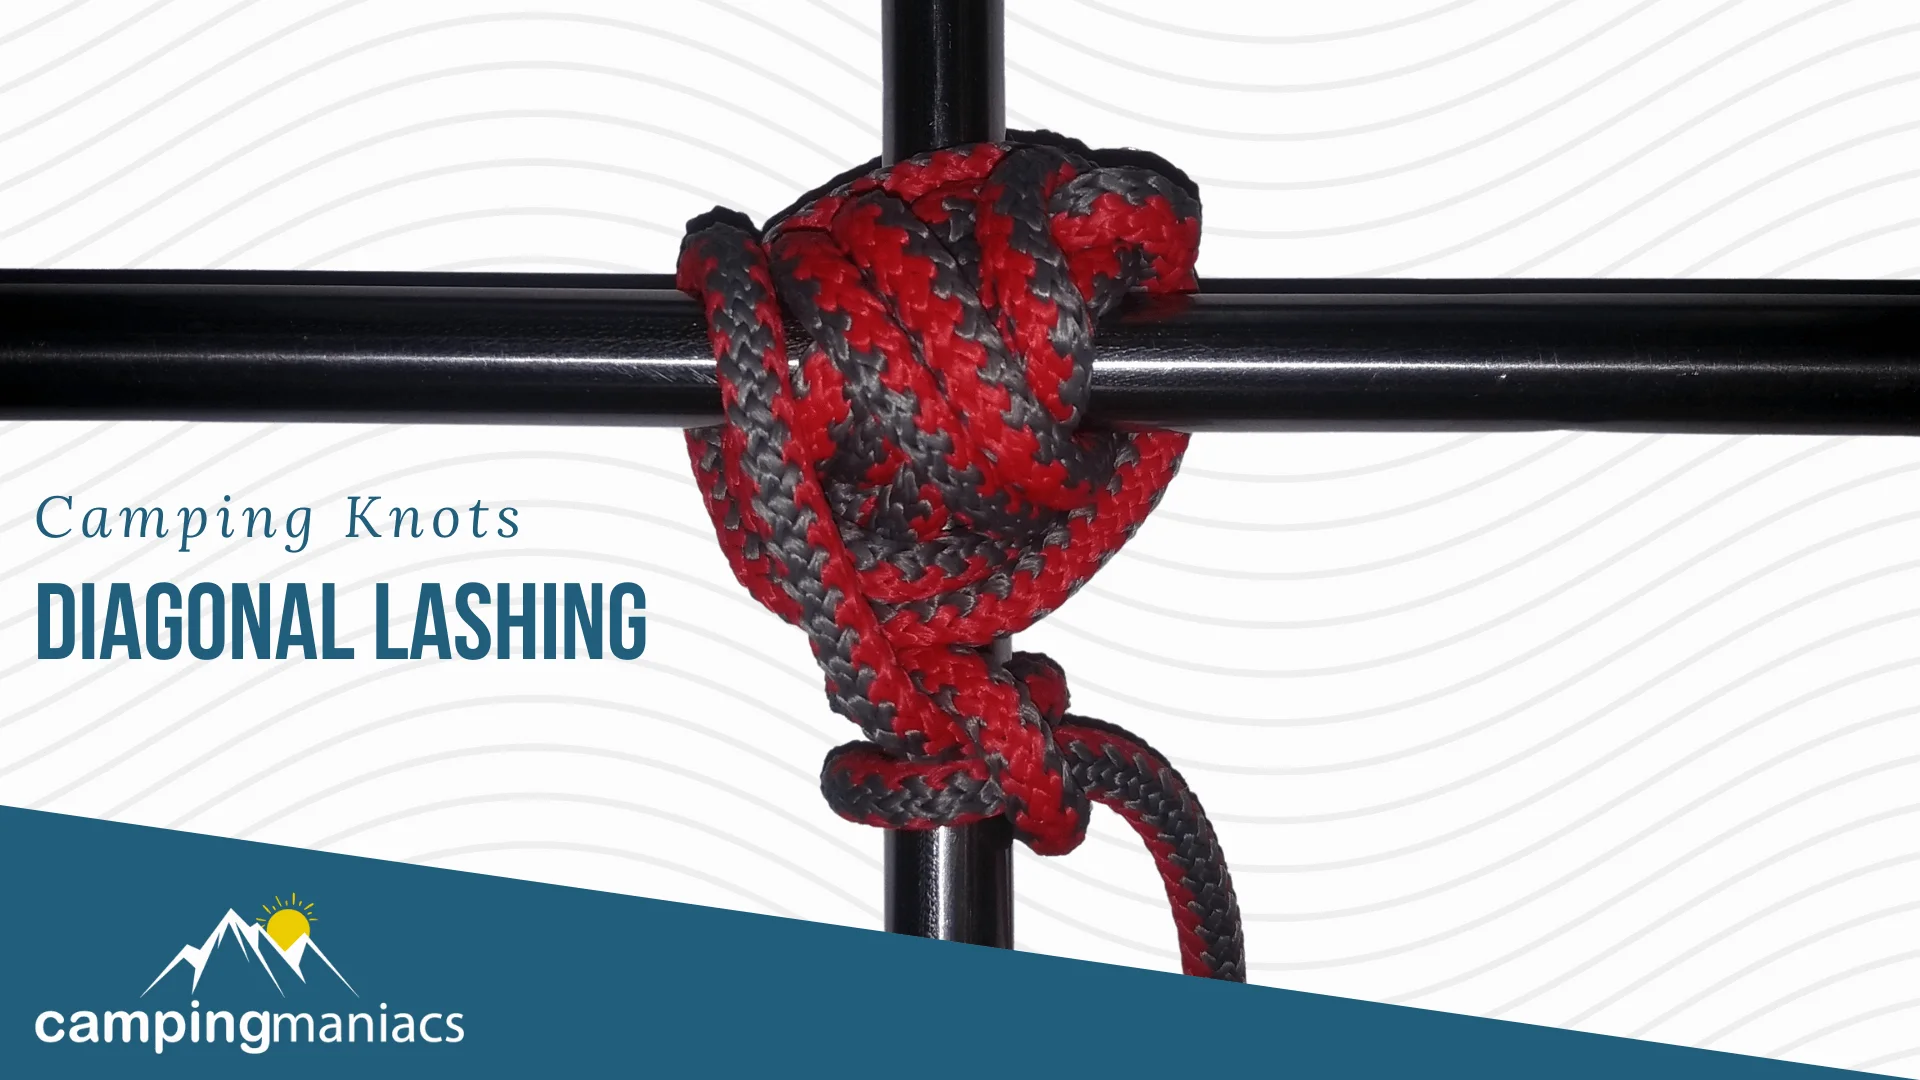
Unlike the Tripod and Shear lashings, the diagonal lashing is the go-to option when you don’t want gaps between the poles. Further, this type of lashing is used to bind two poles together diagonally (at angles of between 45 to 90 degrees) and eliminate racking. Racking refers to when poles rotate or twist while bound in their lashings.
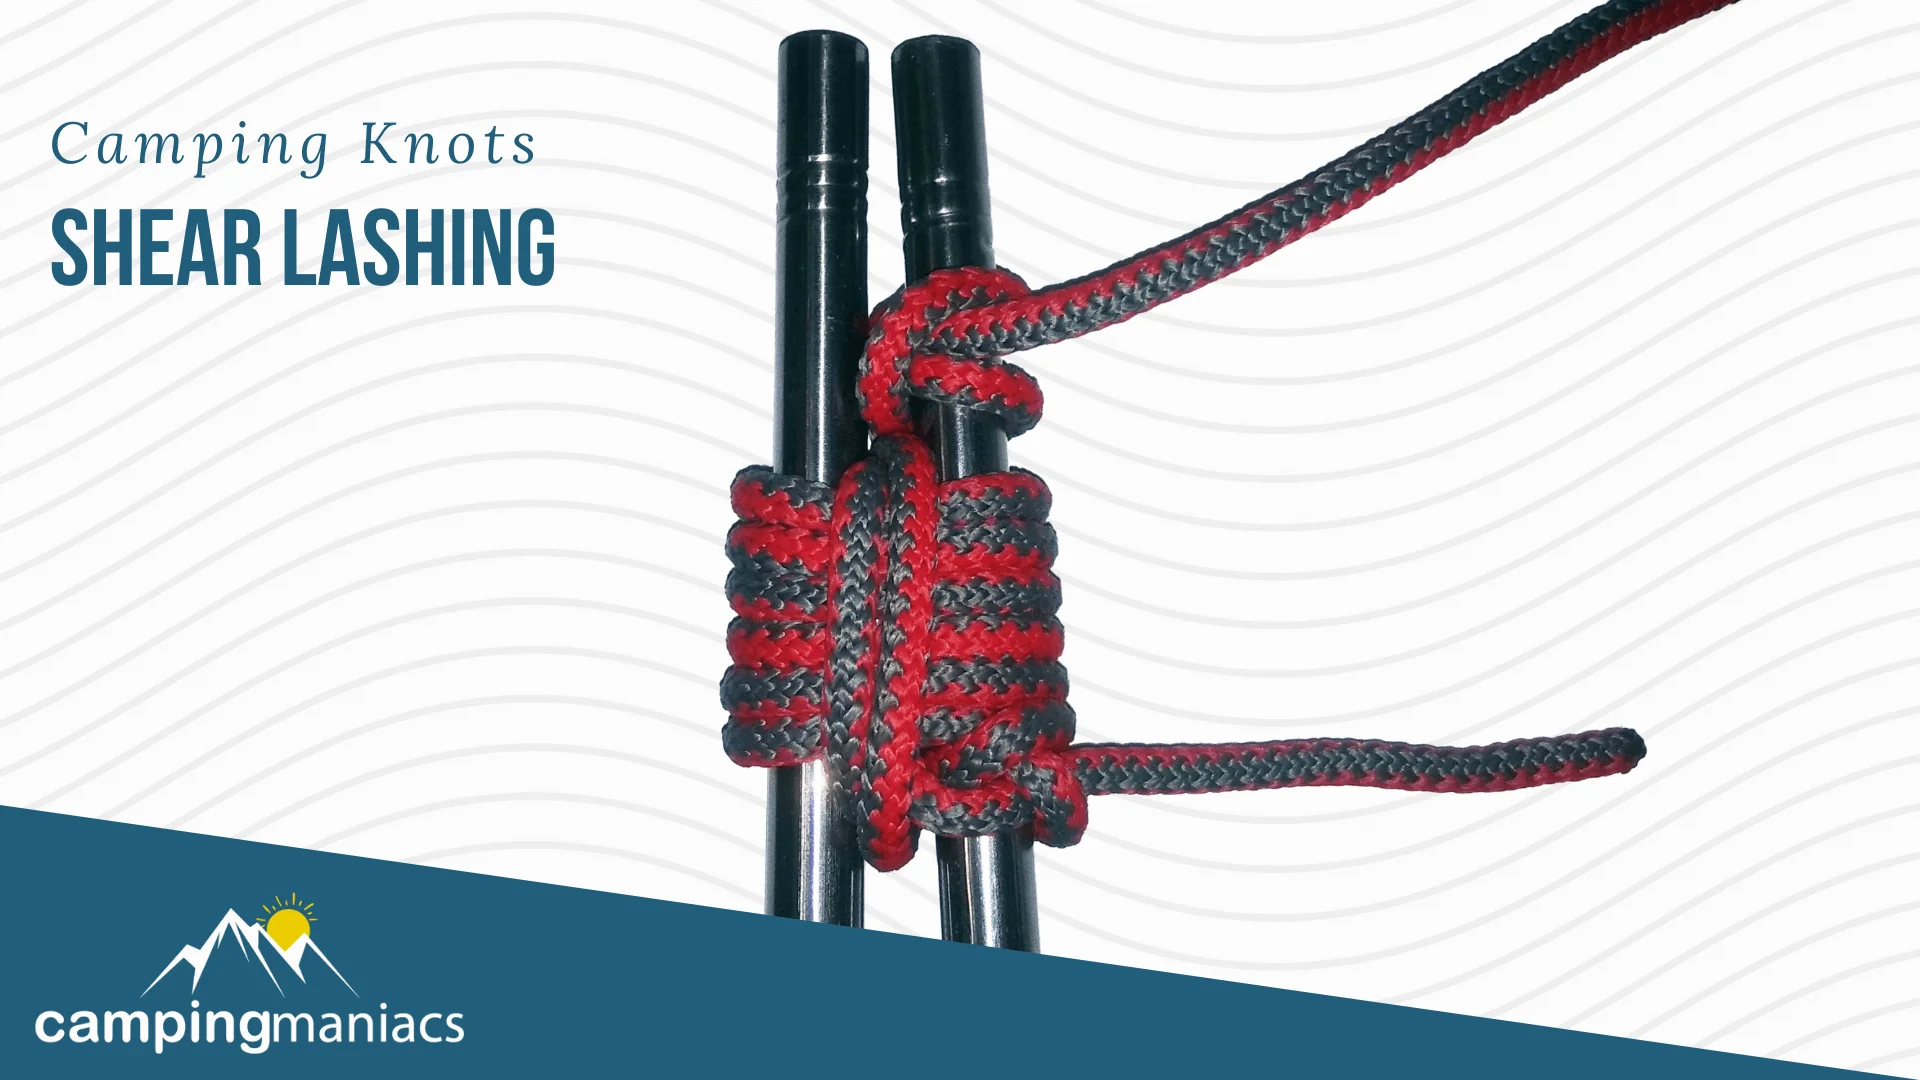
This type of lashing is used to bind two poles together and may prove useful for reinforcing or repairing broken poles. Shear lashing may also be used to form an A-frame by splaying the poles apart after having completed the knot. The resulting shear legs are used to support weight much like a base foundation.
Admittedly, our write-up might not come close to the knotting reference guides of the earlier years such as The Ashley Book Of Knots by Clifford Warren Ashley or Notes on Knots Manuscripts by Henry North Grant Bushby. However, we hope you’ve learned the camping side of this craft and with any luck, you will master a few knots for other outdoor recreational activities.
Tying a knot is by far the easiest and most practical solution to solving the many challenges nature will throw at you while outdoors. So, do not be afraid to channel your inner scout with either of the above essential camping knots!
Charlie Leone
Website Owner/Editor
Welcome to CampingManiacs