- Camping Tips
- Hiking Tips
- RV Camping
- Destinations
- Blog
- Gear Reviews
Backpacking for the first time is the true definition of baptism by fire. Think of the storage space constraints, the pack digging into your back and even worse, having forgotten essentials such as bug repellents.
Learning how to pack a backpack efficiently is a very crucial step to enjoying incredible outdoor experiences.
We have learned a lot from many experts and through personal experiences on the best practices when it comes to packing a backpack and we are glad to share them with you. Whether you’re a beginner or have backpacked for years, consider this your Backpacking 101.
Contents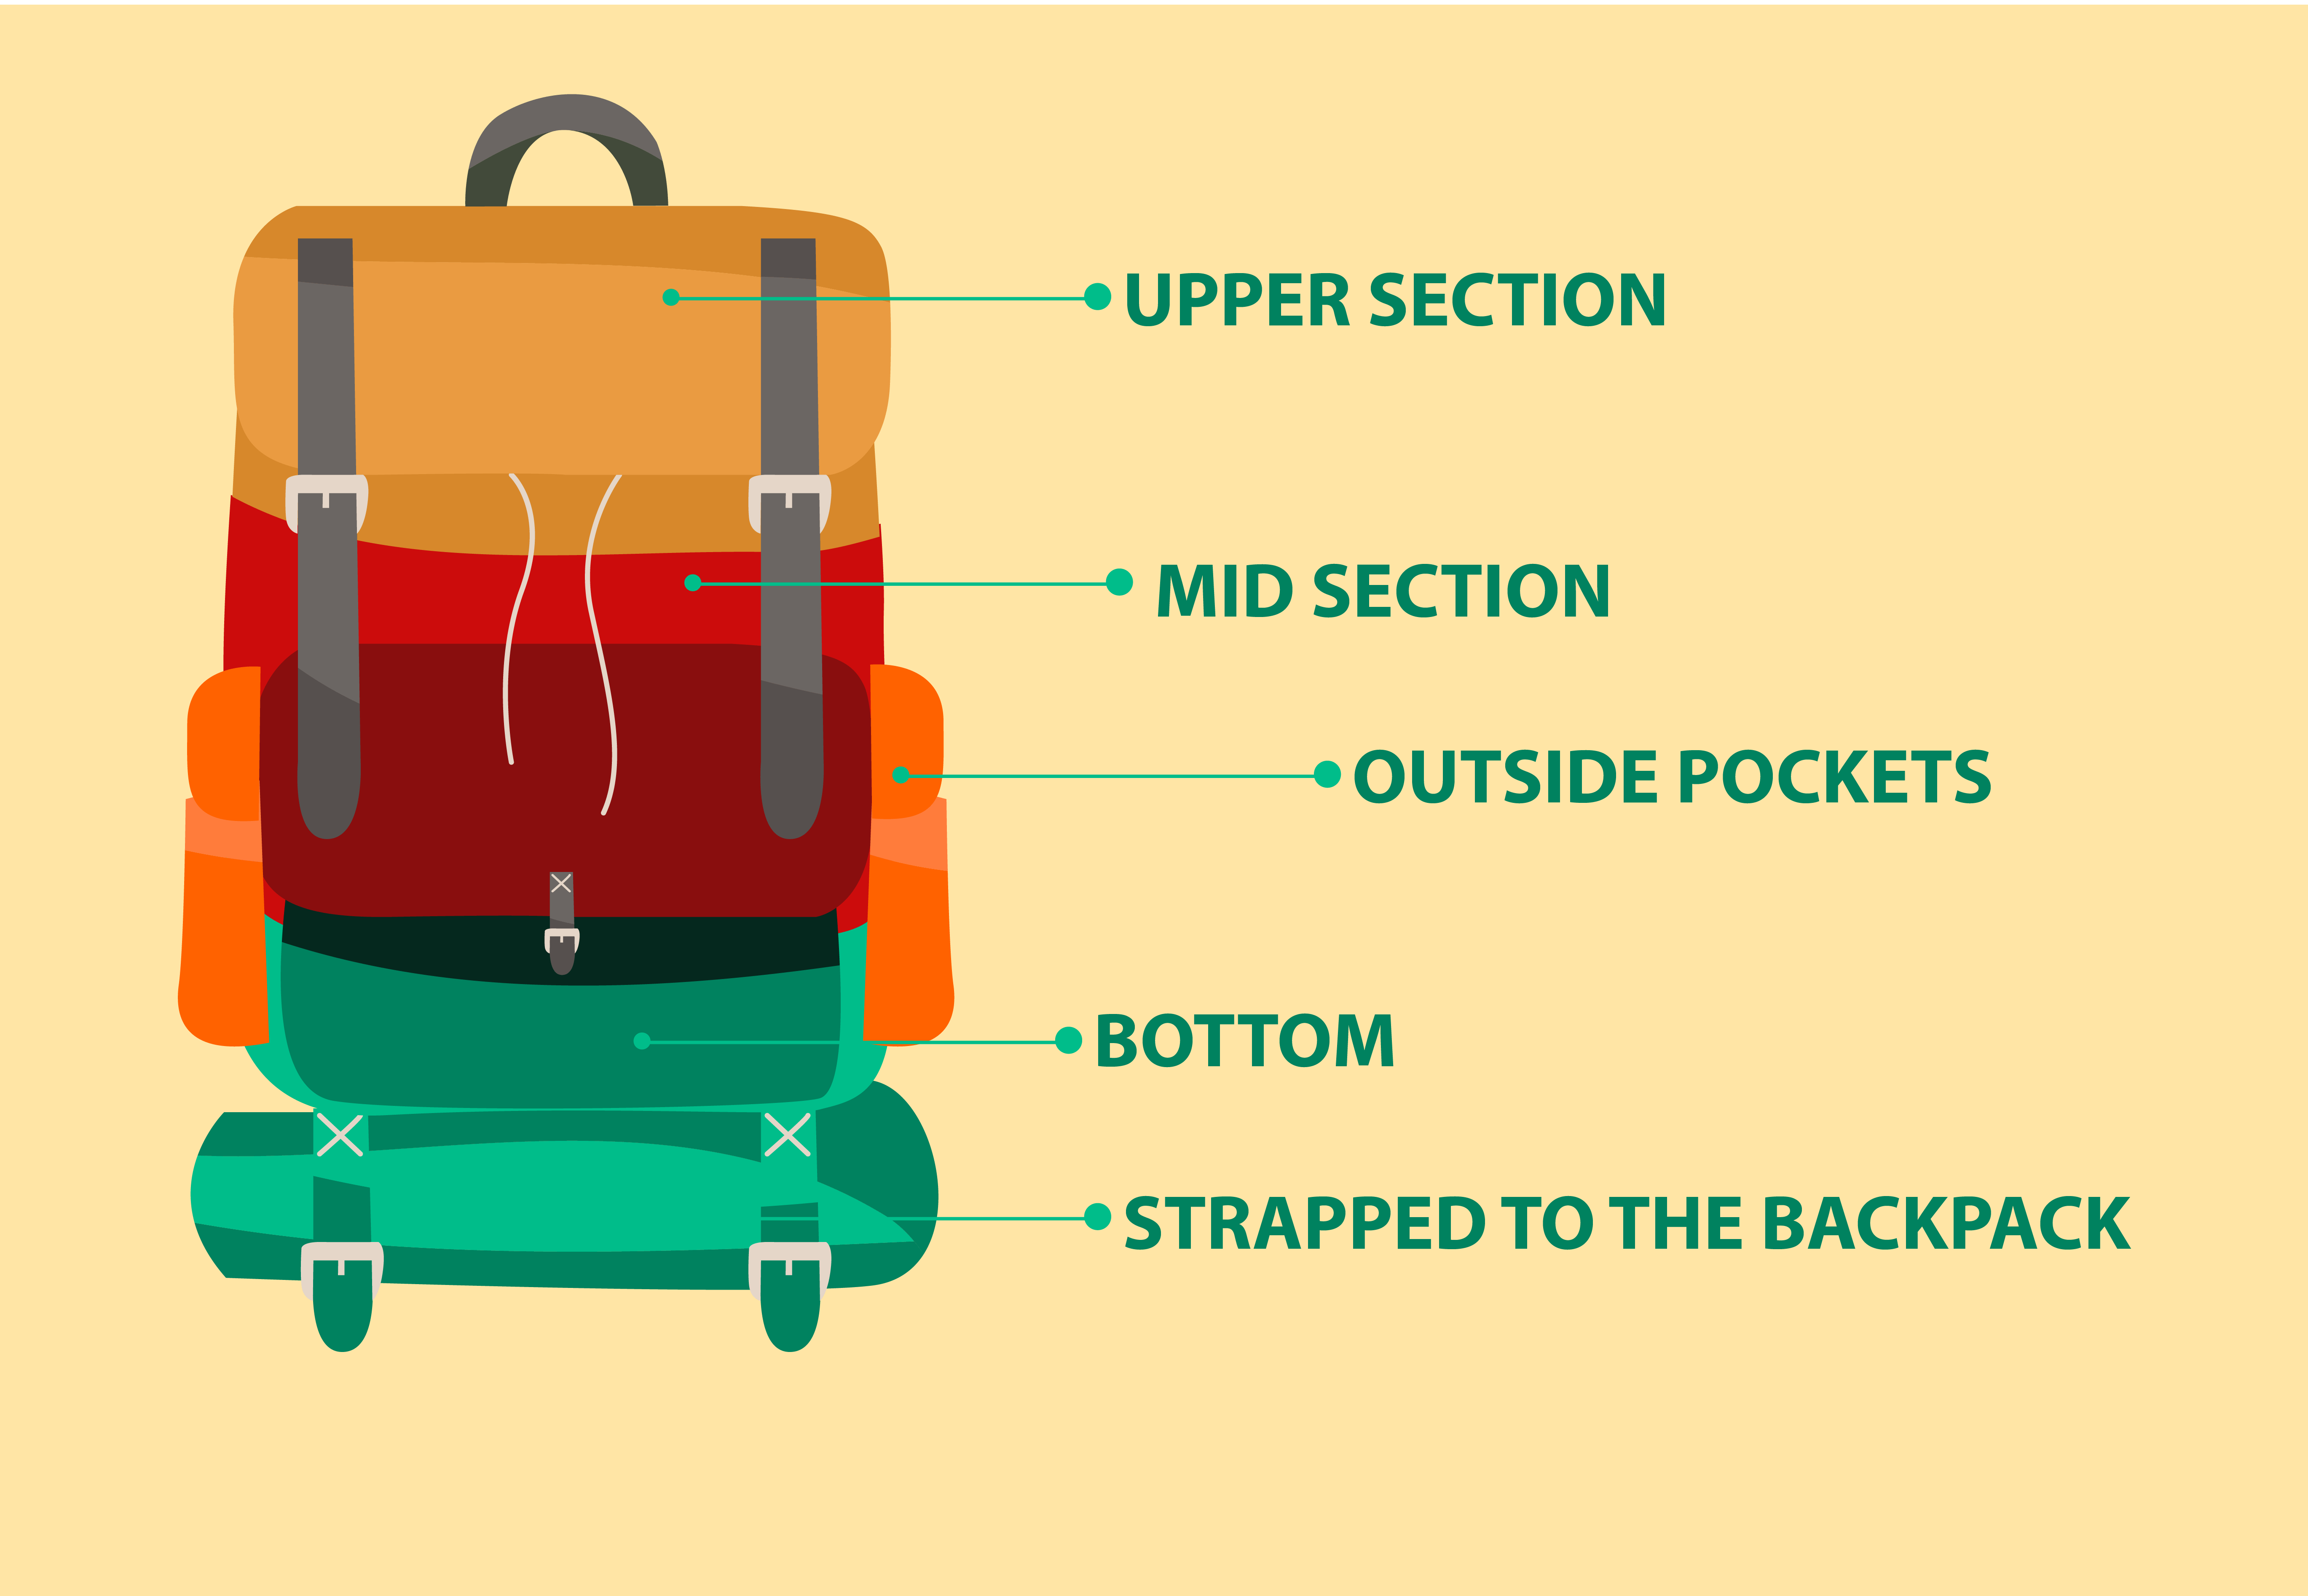
Essentially, your backpack should work as an extension of your body and thus it should fit well and be very forgiving to your back.
Depending on the specific activities you seek to partake, be it trail running, mountain biking or hiking, your ideal backpack will be well adapted. Some avid campers swear by the rule that you should always carry no more than 20% of your body weight, but this can be fairly subjective.
Aside from that, you will want a backpack that fits right.
The overall weight of a loaded backpack should fall in the hip region and not on your shoulders. The rationale behind this is that your legs are much stronger to withstand any extra load as created by a loaded backpack.
So, to ensure your backpack fits right, experts rely on the torso or back length for guidance. Luckily, some smart people have already done the math on what torso length matches what backpack so you don’t have to.
Measure your torso length and lookup matching backpacks from your favorite manufacturers.
The torso length refers to the length from your iliac crest to your 7th cervical vertebra (C7) along the spine. Simply put, this is the length from your lower back (the level of the point where you normally rest your hands on the waist) to the base of your neck (the most prominent vertebra).
A good quality backpack will also include shoulder straps, a waist belt, load-lifter straps, and sternum straps for a more custom fitting.
Next, let’s get acquainted with the main sections of your backpack namely:
Light and least-used items go here to form a balanced and solid base for the rest of the pack. The accessories such as hydration pouch and ice axe loops form part of this lower section.
This is where the heaviest items should go. It is close to the middle of your back, which is your center of gravity. This section includes side pockets and hip pouches.
All mid-weight items, emergency kits, and frequently-used items go to the top of the pack.
Ideally, the backpack shouldn’t feel top-heavy or bottom-heavy. Instead, the load will be packed near the center of your back allowing for a balanced and natural feel. Such a packing system will also prioritize comfort, stability, agility, and convenience.
Ultimately, packing for balance will be determined by the backpack’s weight distribution as well as the internal versus external frame construction. The weight distribution falls under the above-explained principles i.e. let the pack be middle-heavy as opposed to top/bottom-heavy. On the other hand, frames provide a more rigid and organized structure to your pack.
Most modern backpacks will have internal frames, which allow for better stability due to their compact design. Older models will have external frames that were long-famed for their efficient transfer of weight to the hips and support for an upright walking posture at the expense of quick agility.
Packs with external frames will be heavier in general as compared to those with internal frames that may even have a range of options from ultra-light to heavy ones.
While you should pack your backpack in a way that’s convenient to you, we’ve found that most camping enthusiasts agree on some general guidelines.
Related: The Best Hiking Backpacks (Handpicked By Real Hikers).
Below are five easy-to-follow steps to packing your backpack like Bear Grylls, or, you know... like a pro!
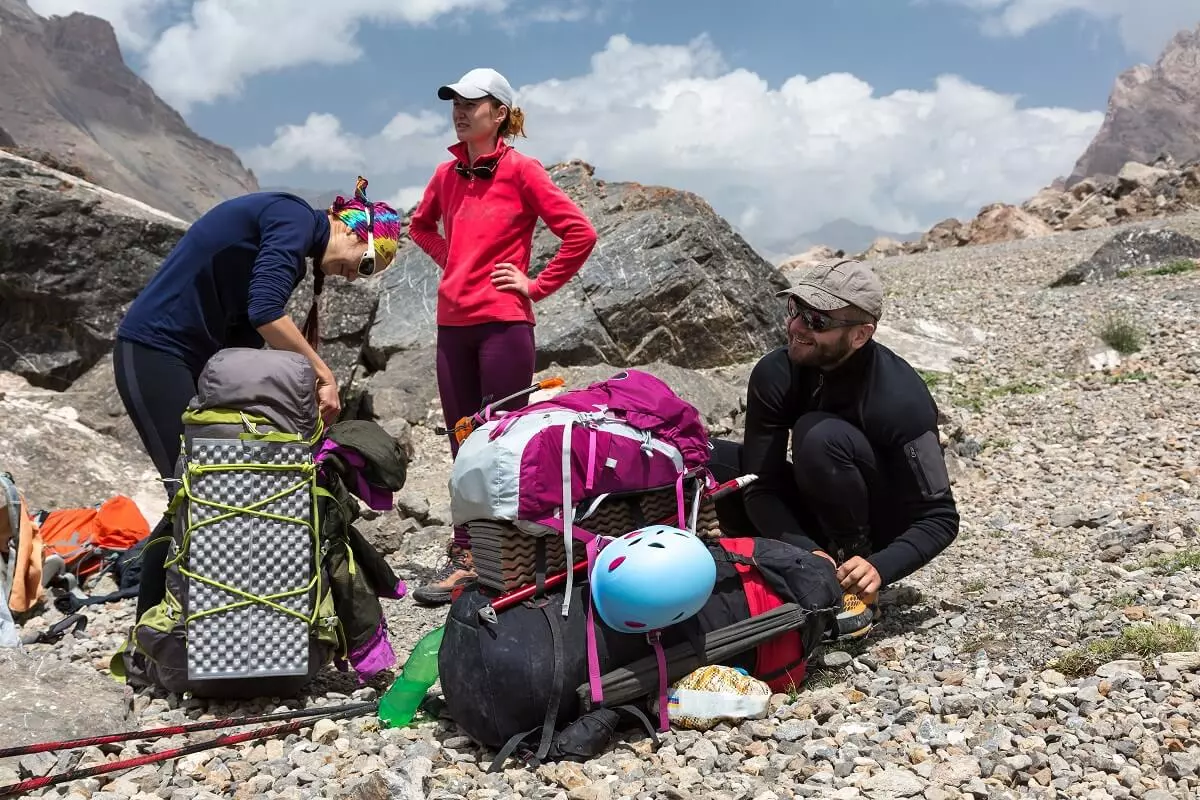
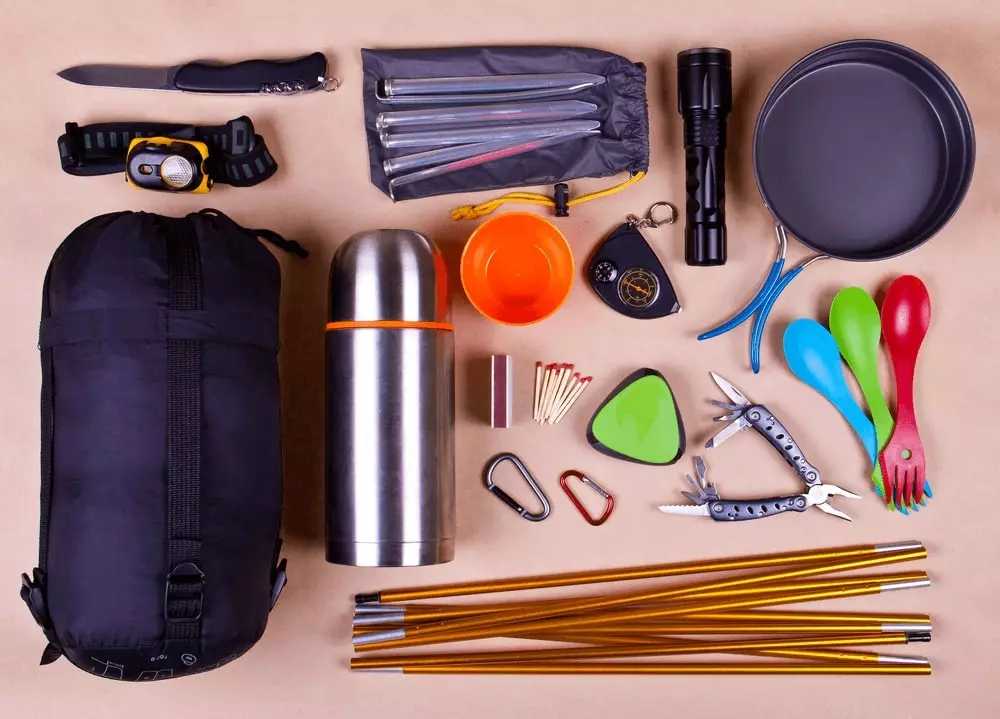
The first thing you want to do is check if you have all the essentials needed for the backpacking trip. Laying them out on the ground and ticking off a checklist is a good way to make sure you’re not forgetting anything. Use our checklist of camping essentials if in doubt on whether you have everything factored in.
Overall, you will need navigation tools, a headlamp, a first aid kit, shelter, sun protection, gear repair kit, knife, fire making tools, food, water and clothes.
The navigation system can compose of maps, a compass, a GPS device, an altimeter, a PLB – personal locator beacon (or a satellite messenger). The fire kit will have your fire starter of choice, tinder and a stove while headlamp and lighting gear should come with extra batteries.
Importantly, your first aid kit should include insect repellent, an EpiPen (if necessary), other personal medication and other safety items.
To protect you from the sun’s harmful UV (ultraviolet) rays, ensure that you pack sunglasses capable of blocking all UVA and UVB rays, sunscreen with a sun protection factor (SPF) of over 15 and some sun-protection clothing.
Your shelter system should at least have a tarp, a tent, Bivy sack, and a sleeping bag. These bare minimums will help you face harsh weather conditions and other elements. Other add-ons include stuff sacks, a camera, pack cover, trekking poles, communication device, bear safety gear, and binoculars among others.
Always remember; pack extra clothes, extra food, and extra water for those unforeseen emergencies!
However, make sure to remain lean and mean when it comes to packing your backpack. Always go for lightweight gear wherever possible as thanks to technology even ultra-light gear is just as efficient and as durable as traditional camping gear.
Compression sacks can help in maximizing storage space by eliminating excess air from the load, organizing gear by kind and protecting gear from the water. A backpack rain cover (or lining the backpack with a trash compactor bag) can be a good solution to protecting your backpack and gear in it from the rain.
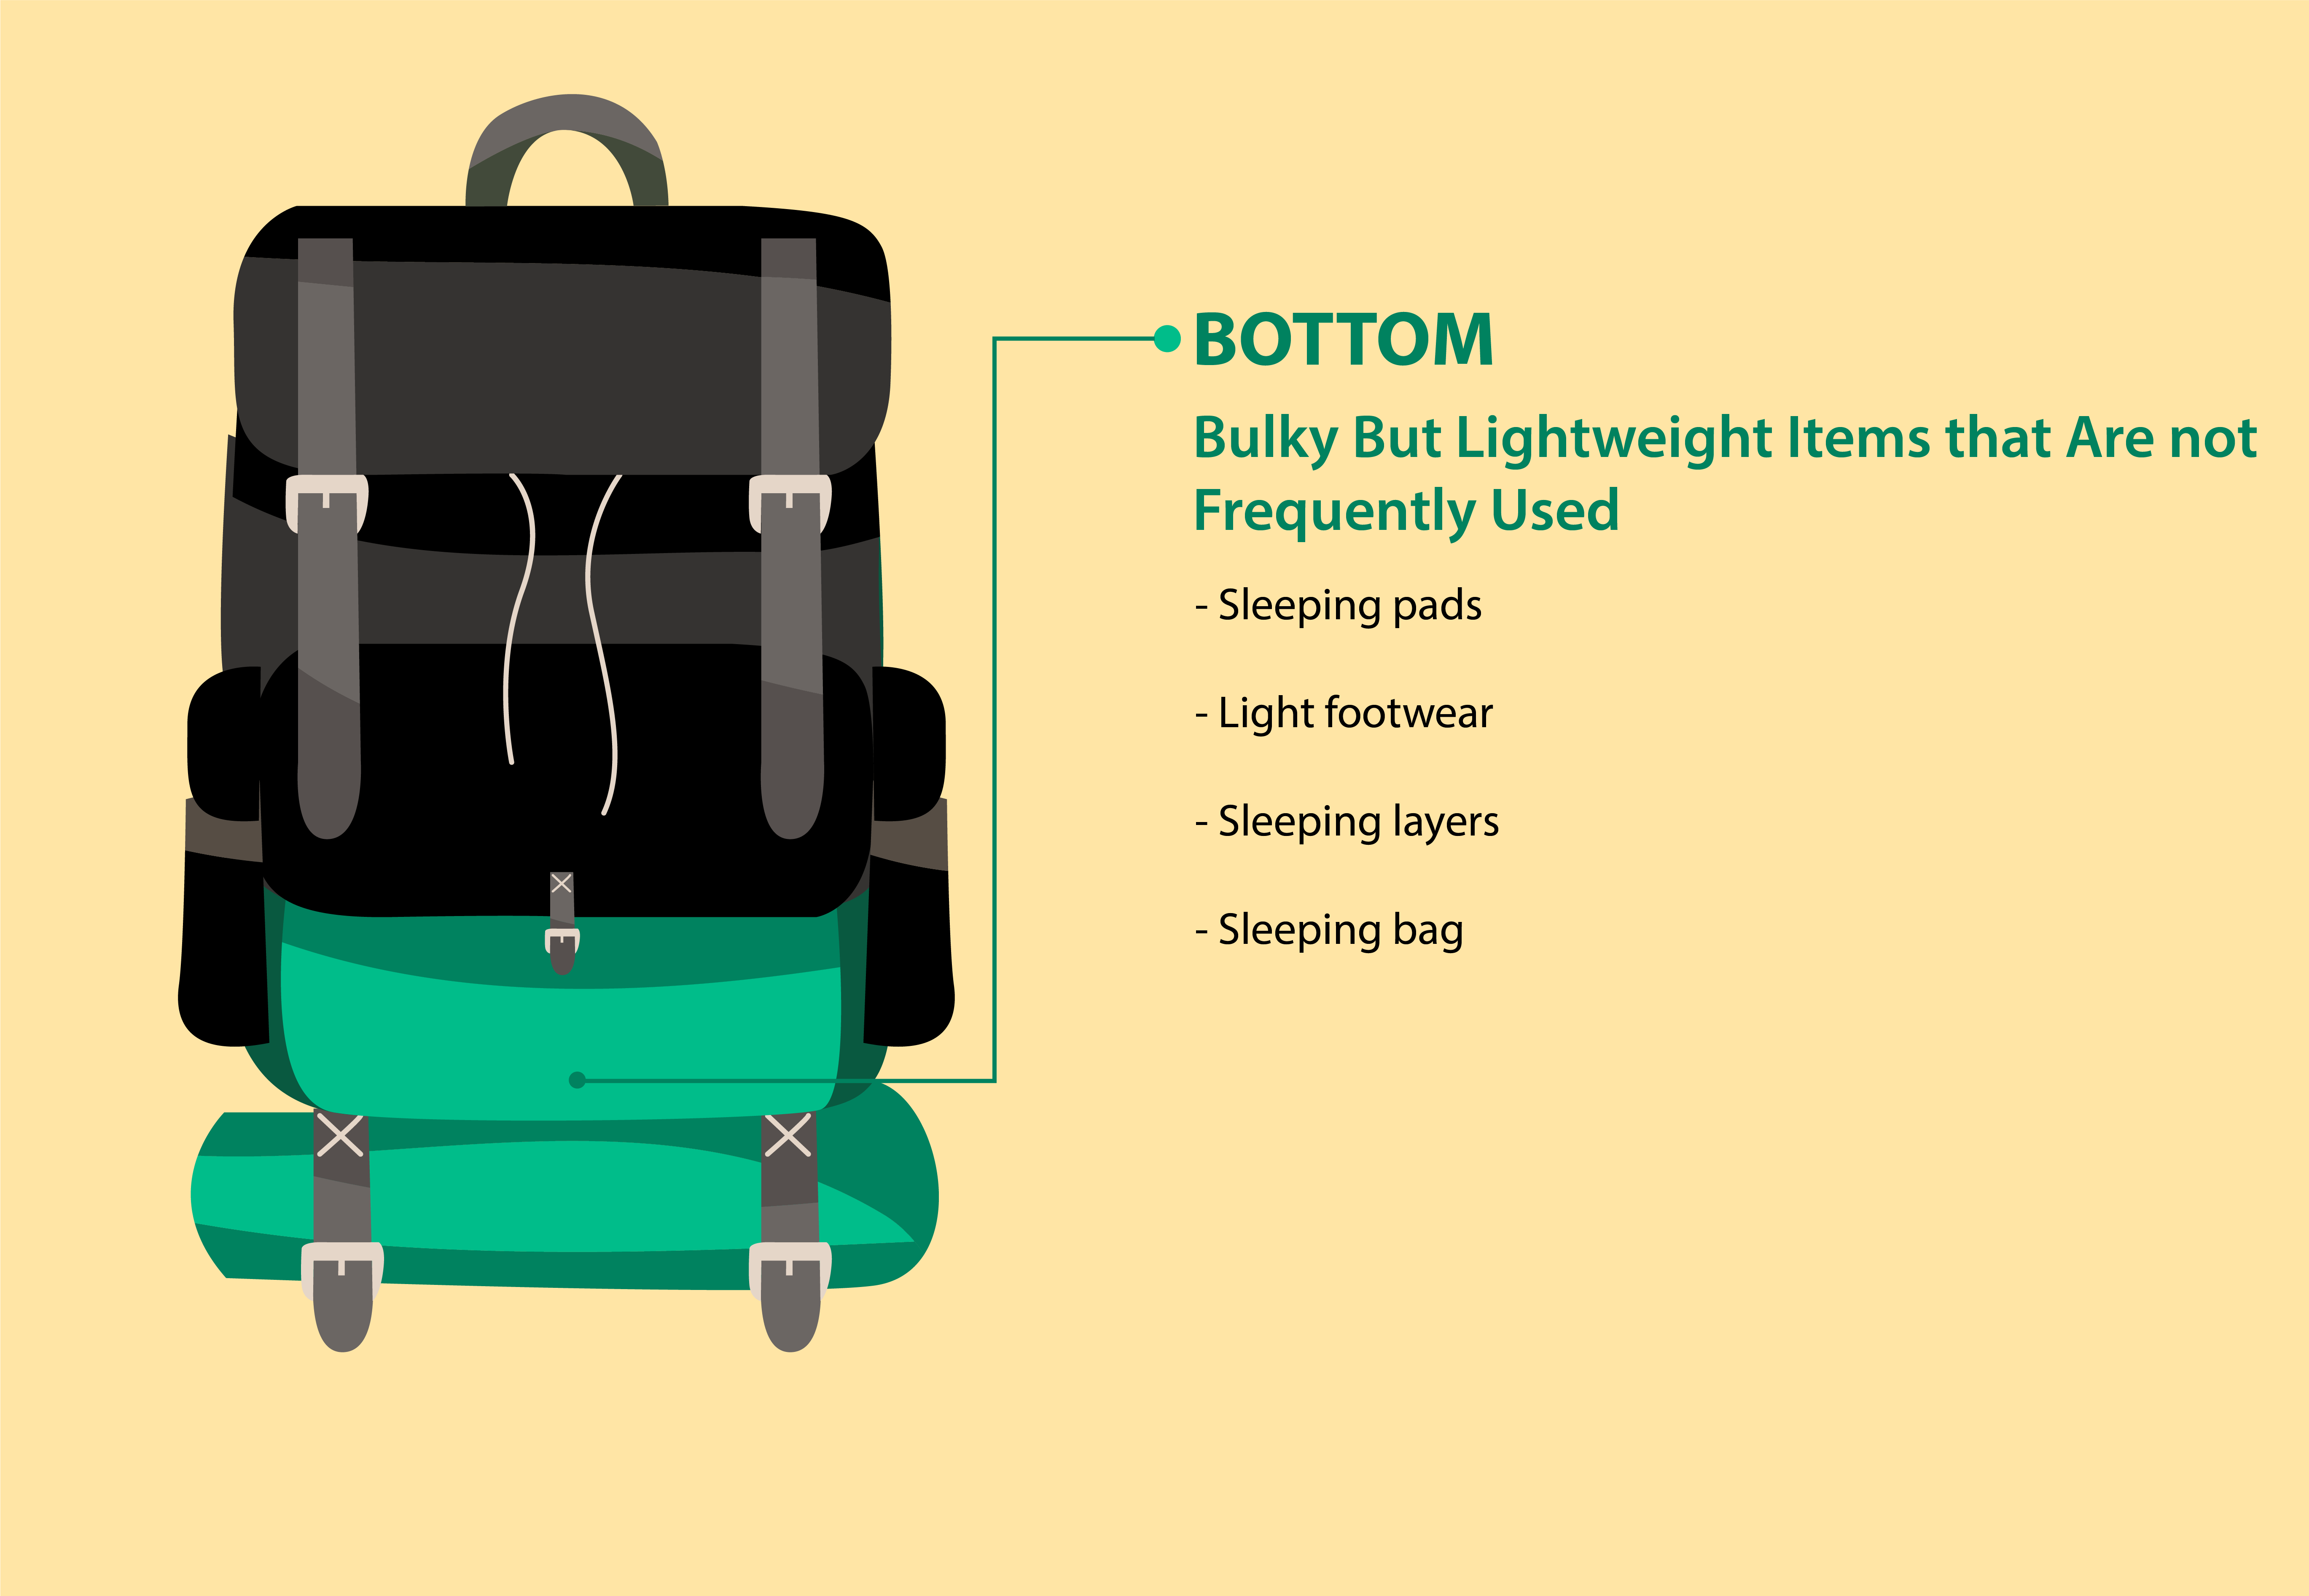
At this lower compartment, you need to pack bulky items that are not frequently used such as; sleeping pads, sleeping bags, light footwear (camp shoes and down booties), and extra sleeping layers. Some backpacks will have a separate pouch at the bottom for the sleeping bag which can be a lifesaver.
Having these soft, light, fluffier items at the bottom also offers slight lumbar support and acts as a shock absorption system for your backpack and back. In addition to packing your whole sleeping system, you may also add your extra water reservoir here.
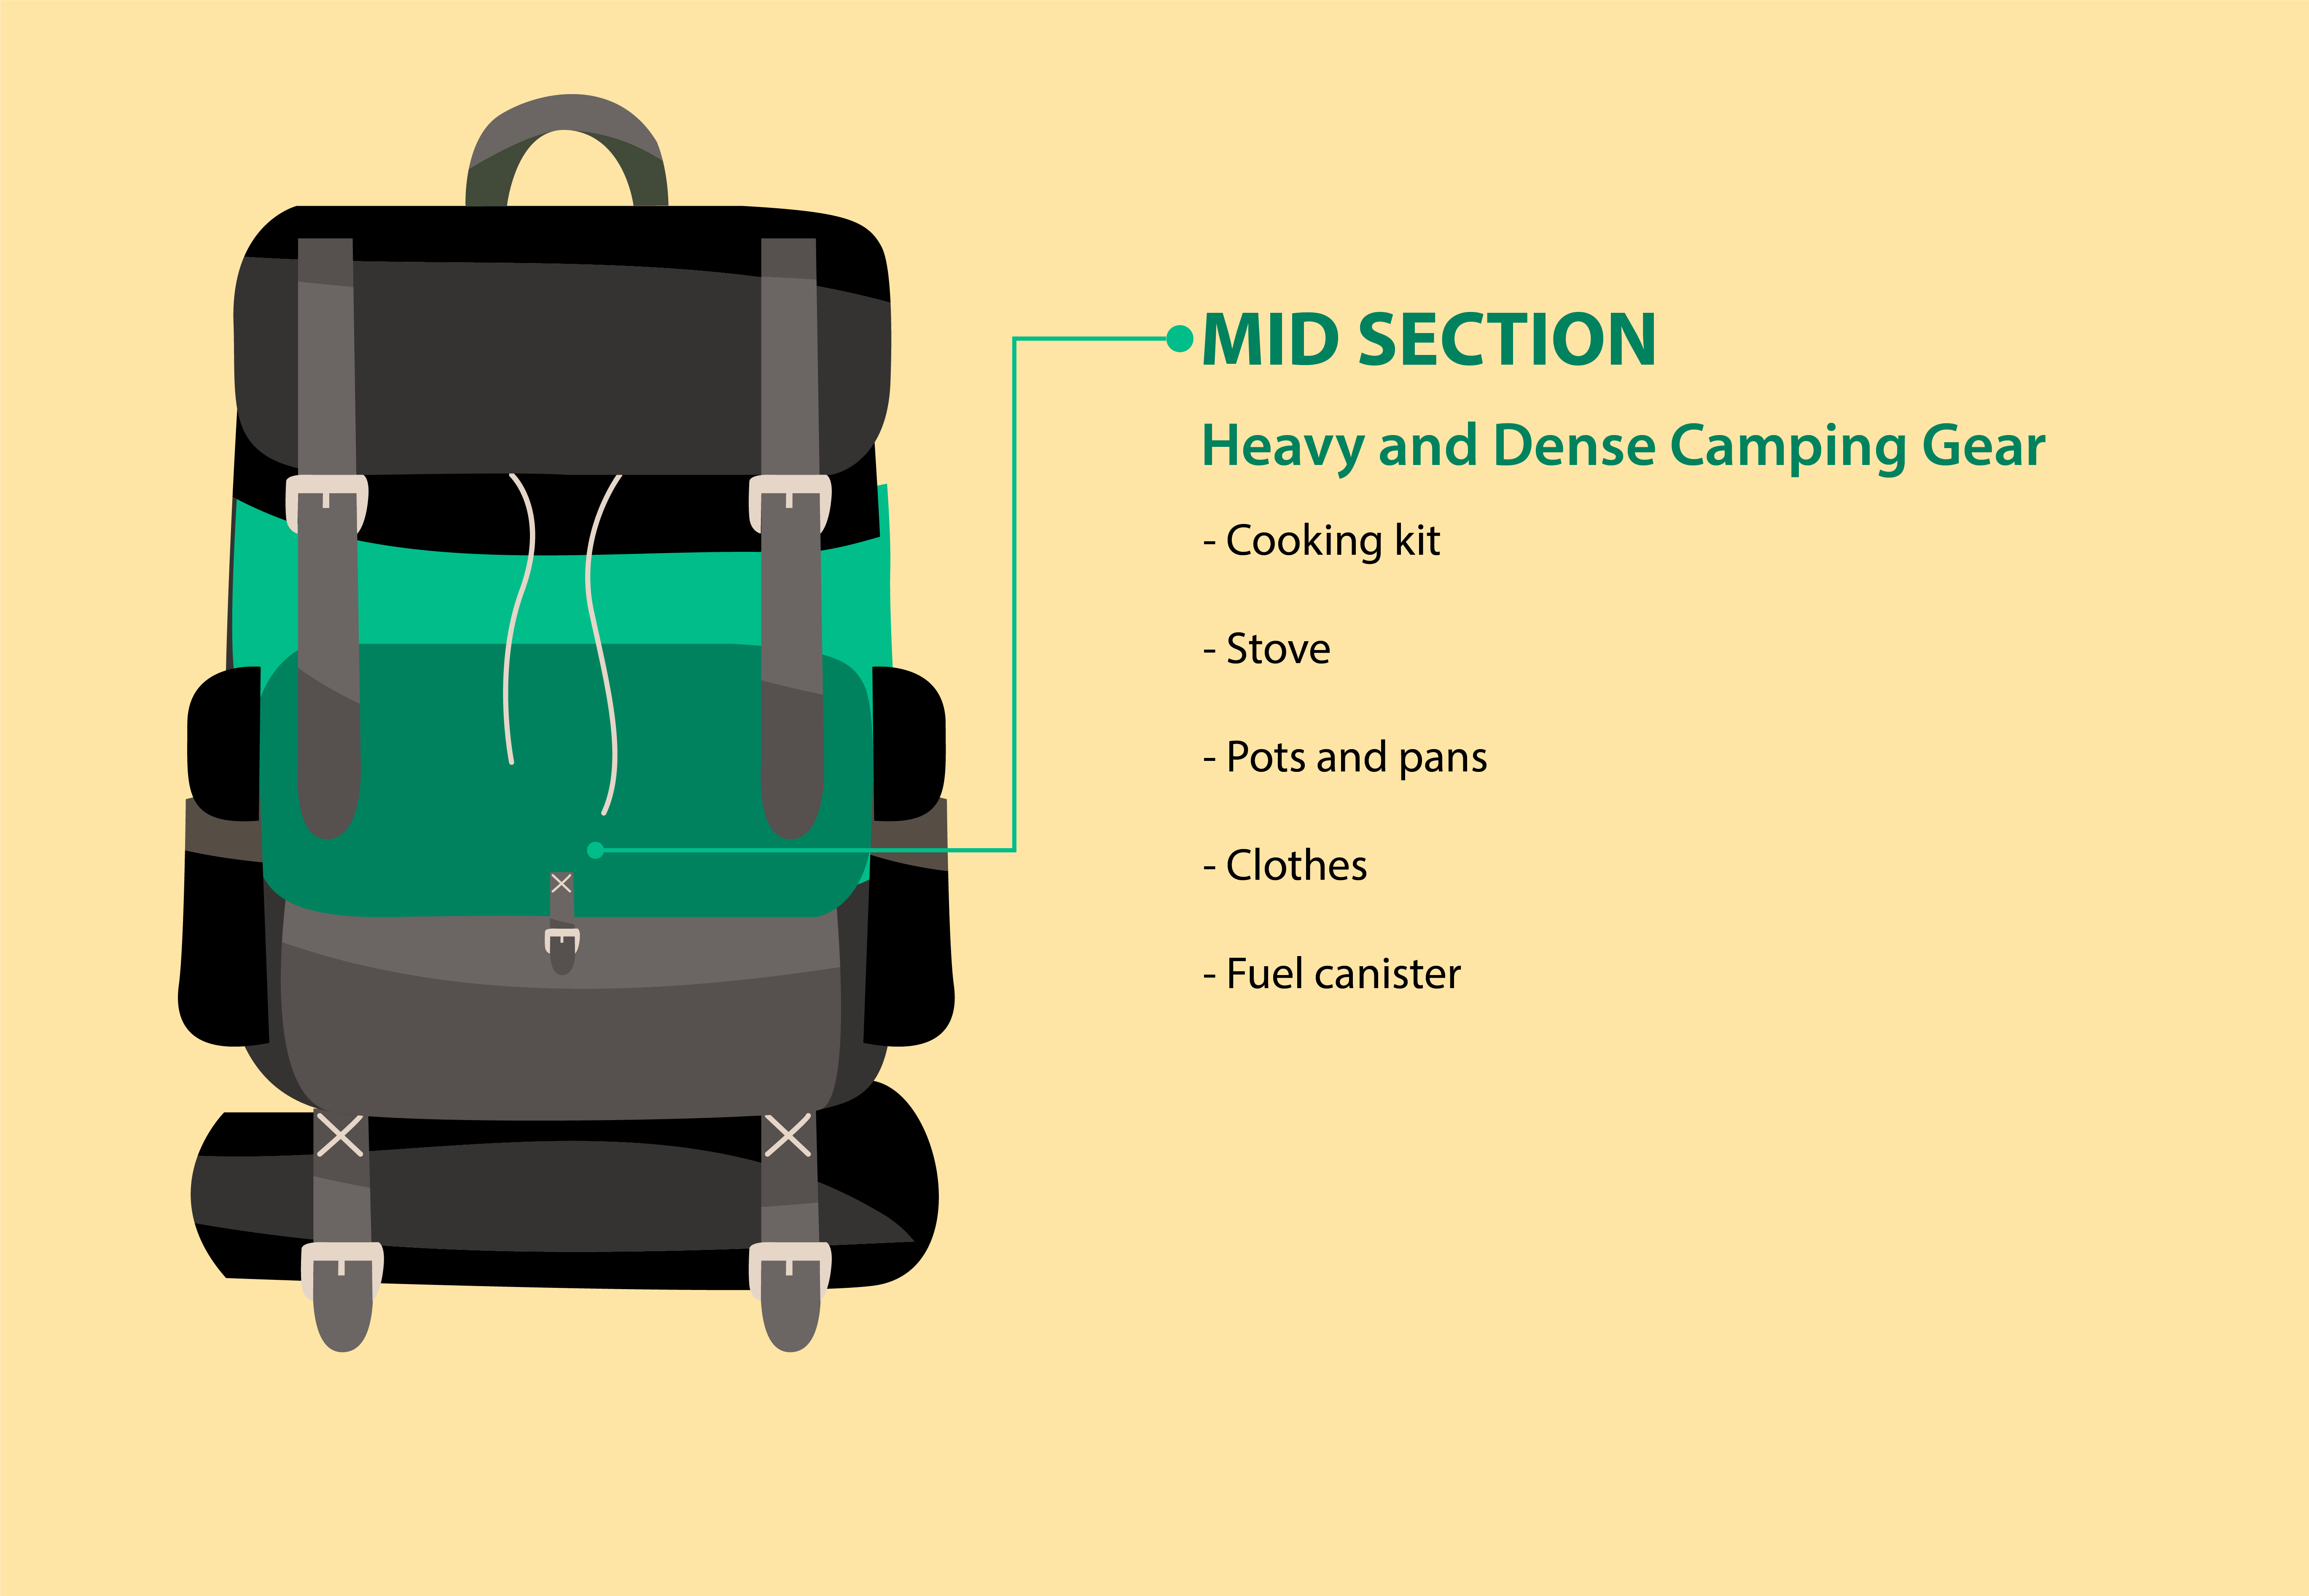
To uphold your center of gravity in the middle of your back, layer up the heavy and dense camping gear at the middle section of your pack. Items that you don’t need access to while you hike should also go here.
Such items include the cooking kit, food stash, hydration bladder, water purifier system, stove, pot, and clothes to be used at the campground.
Pro Tip: Avoid canned foods to reduce adding weight and instead repack the foods in Ziploc bags and plastic containers.
Always ensure that you do not pack heavier items on one side. Instead, you should evenly distribute them for a better balance and stability. If you’ll be carrying liquid fuel, ensure that the fuel-bottle cap is securely tightened. Place the bottle upright and well separated from your food.
It’s also advisable to wrap soft items around bulky gear to limit weight shifting as you travel. You don’t want your irregularly shaped wood burning stove poking you through the pack, so pad the sides with clothing.
Soft items such as extra clothing, the tent body, the tent footprint, and the rainfly can be used to create buffers between bulky items. Pack the middle section as if you’re building a brick wall. You will want to use hard, heavy items to form the bricks while using clothing and other such materials as your mortar.
If you’re using a water reservoir, make sure to fill it and put it in first before placing any other heavy items into your pack. Importantly, make sure the reservoir is leak-proof because you don’t want all your gear, not to mention your back, to get soaked in water.
The best approach to packing away clothes entails rolling them up tight (also known as the Ranger Roll) and carefully wedging them into the backpack. Yes, you may get some wrinkles on your clothes but then again, the method is a proven space-saver even by the US Army’s standards.
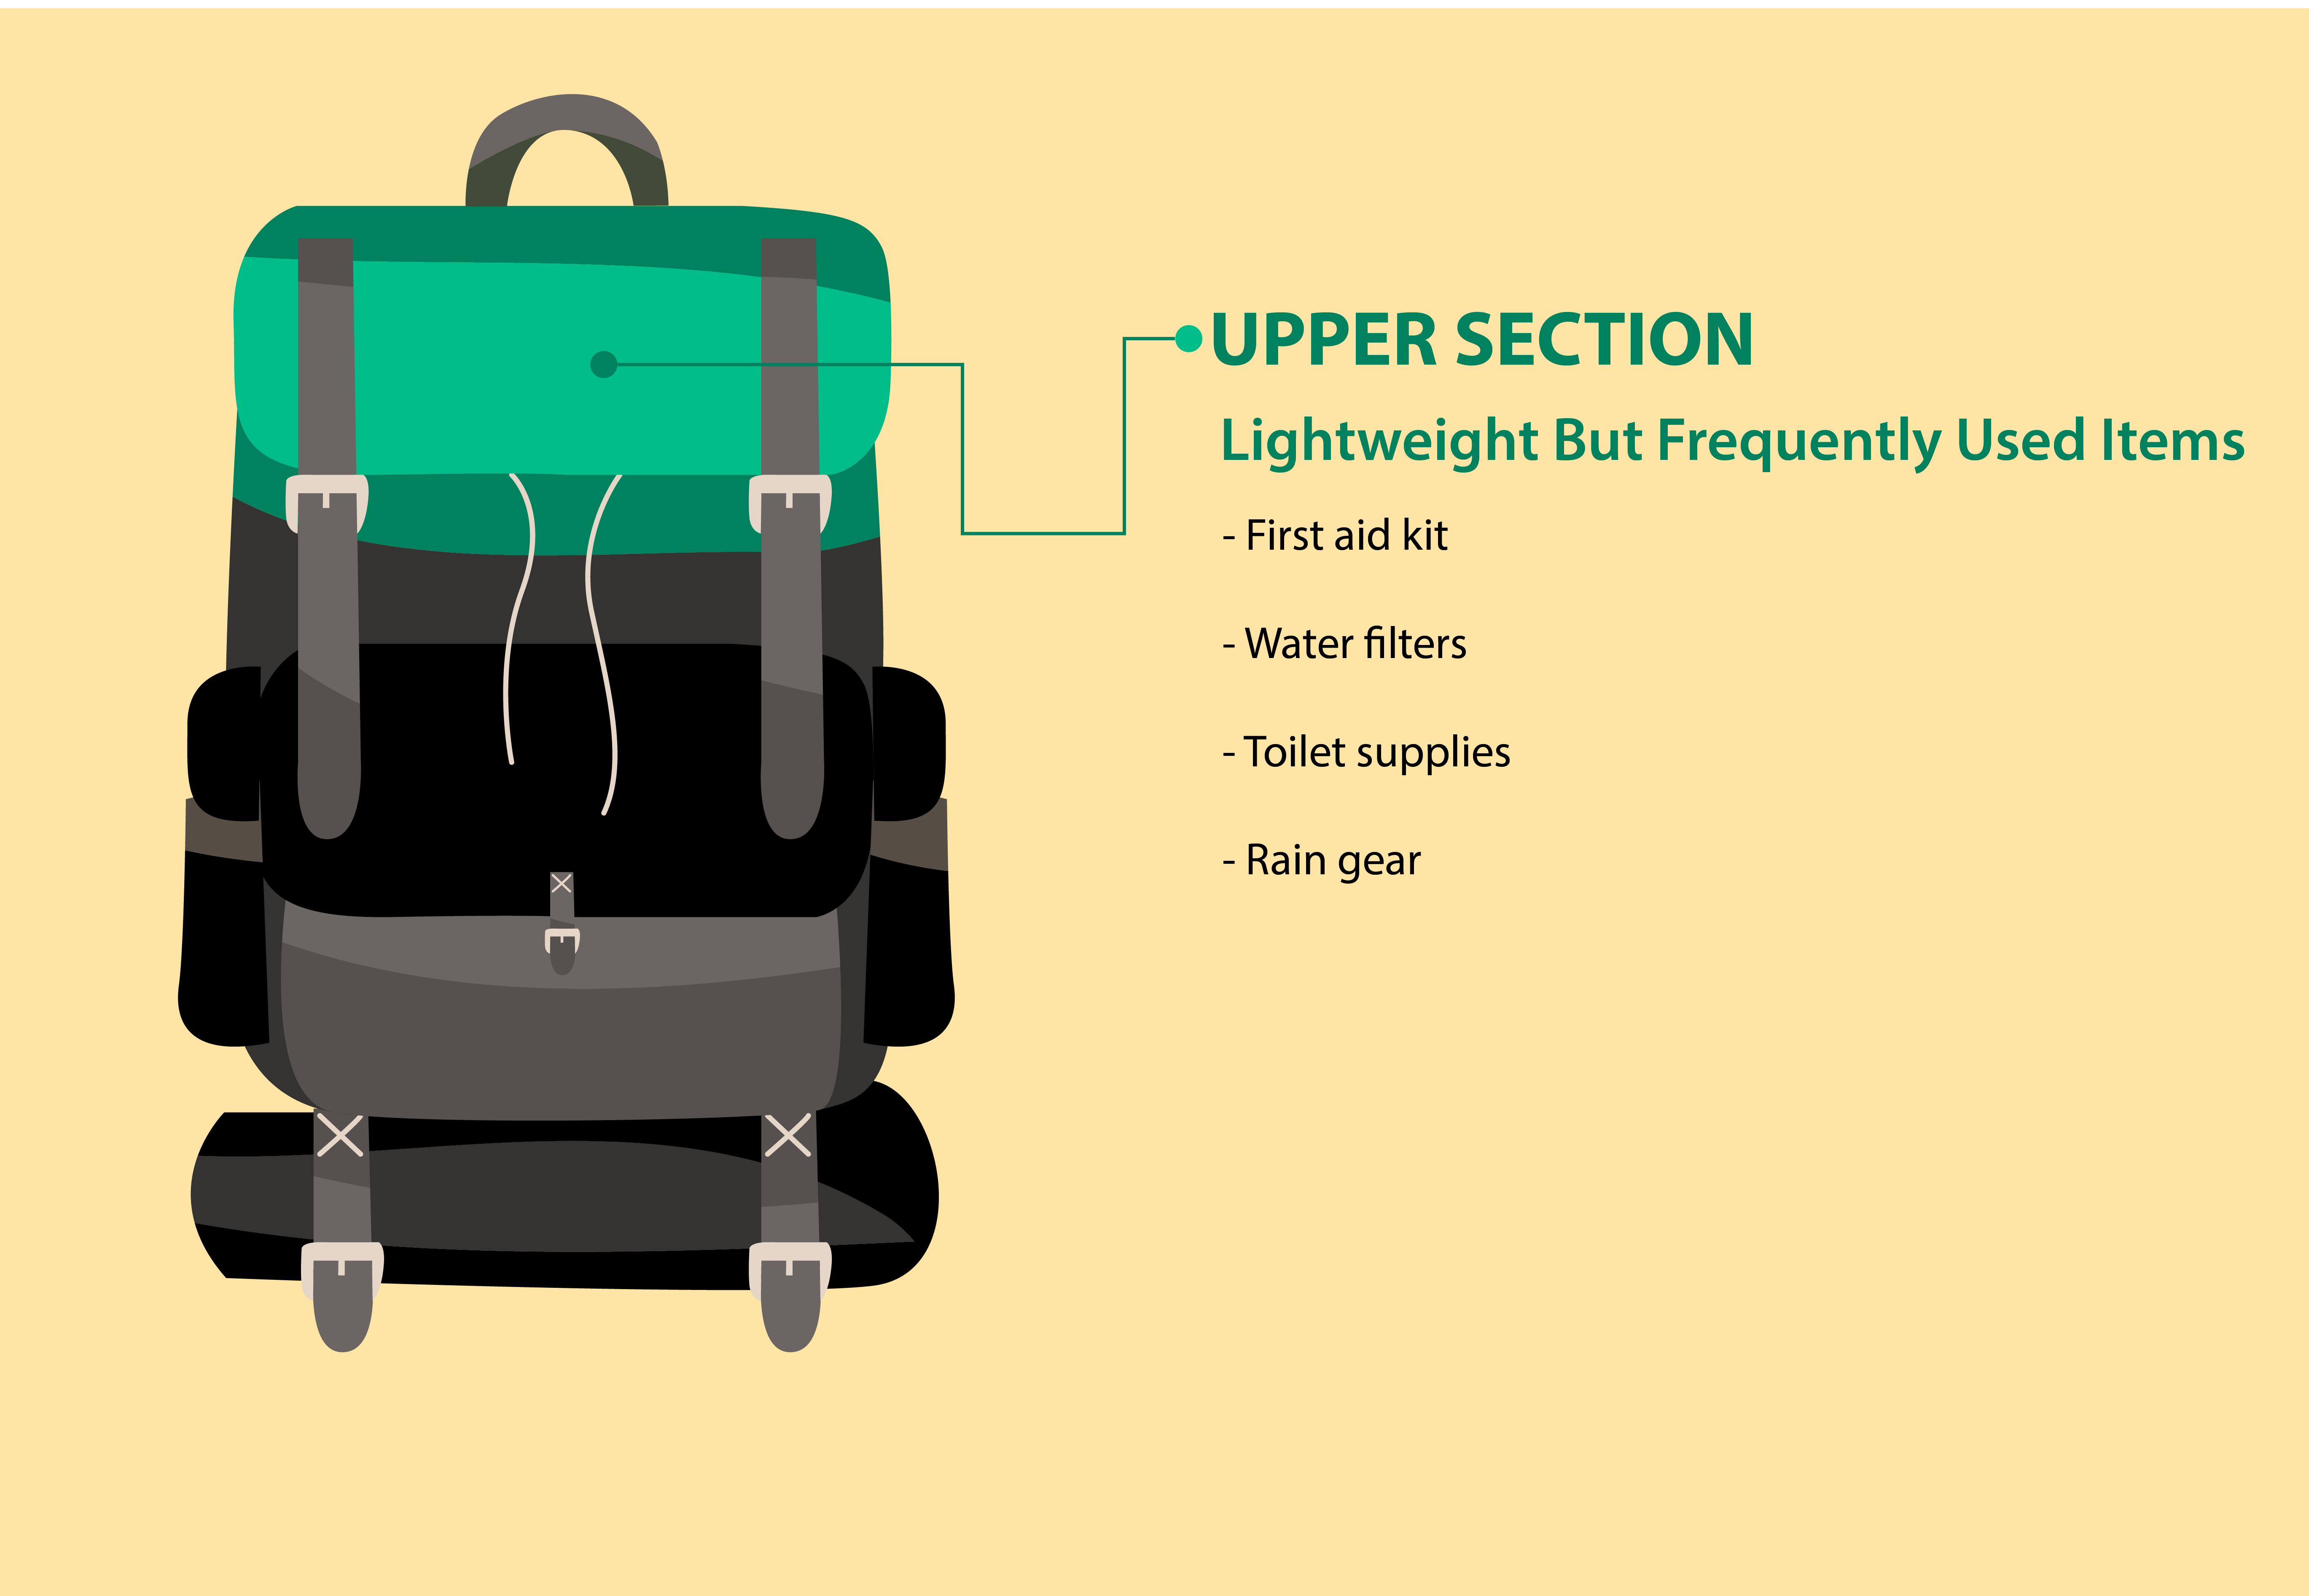
The upper compartment is the perfect space for items that need to be accessed quickly. For instance, if you get a cut from brambles, splinters or branches, the first aid kit is at arm’s reach.
Camping essentials that would be best packed here include; first aid kit, water filters, toilet supplies and rain gear (rain jacket, fleece jacket and pants, rain ponchos, and insulated jacket).
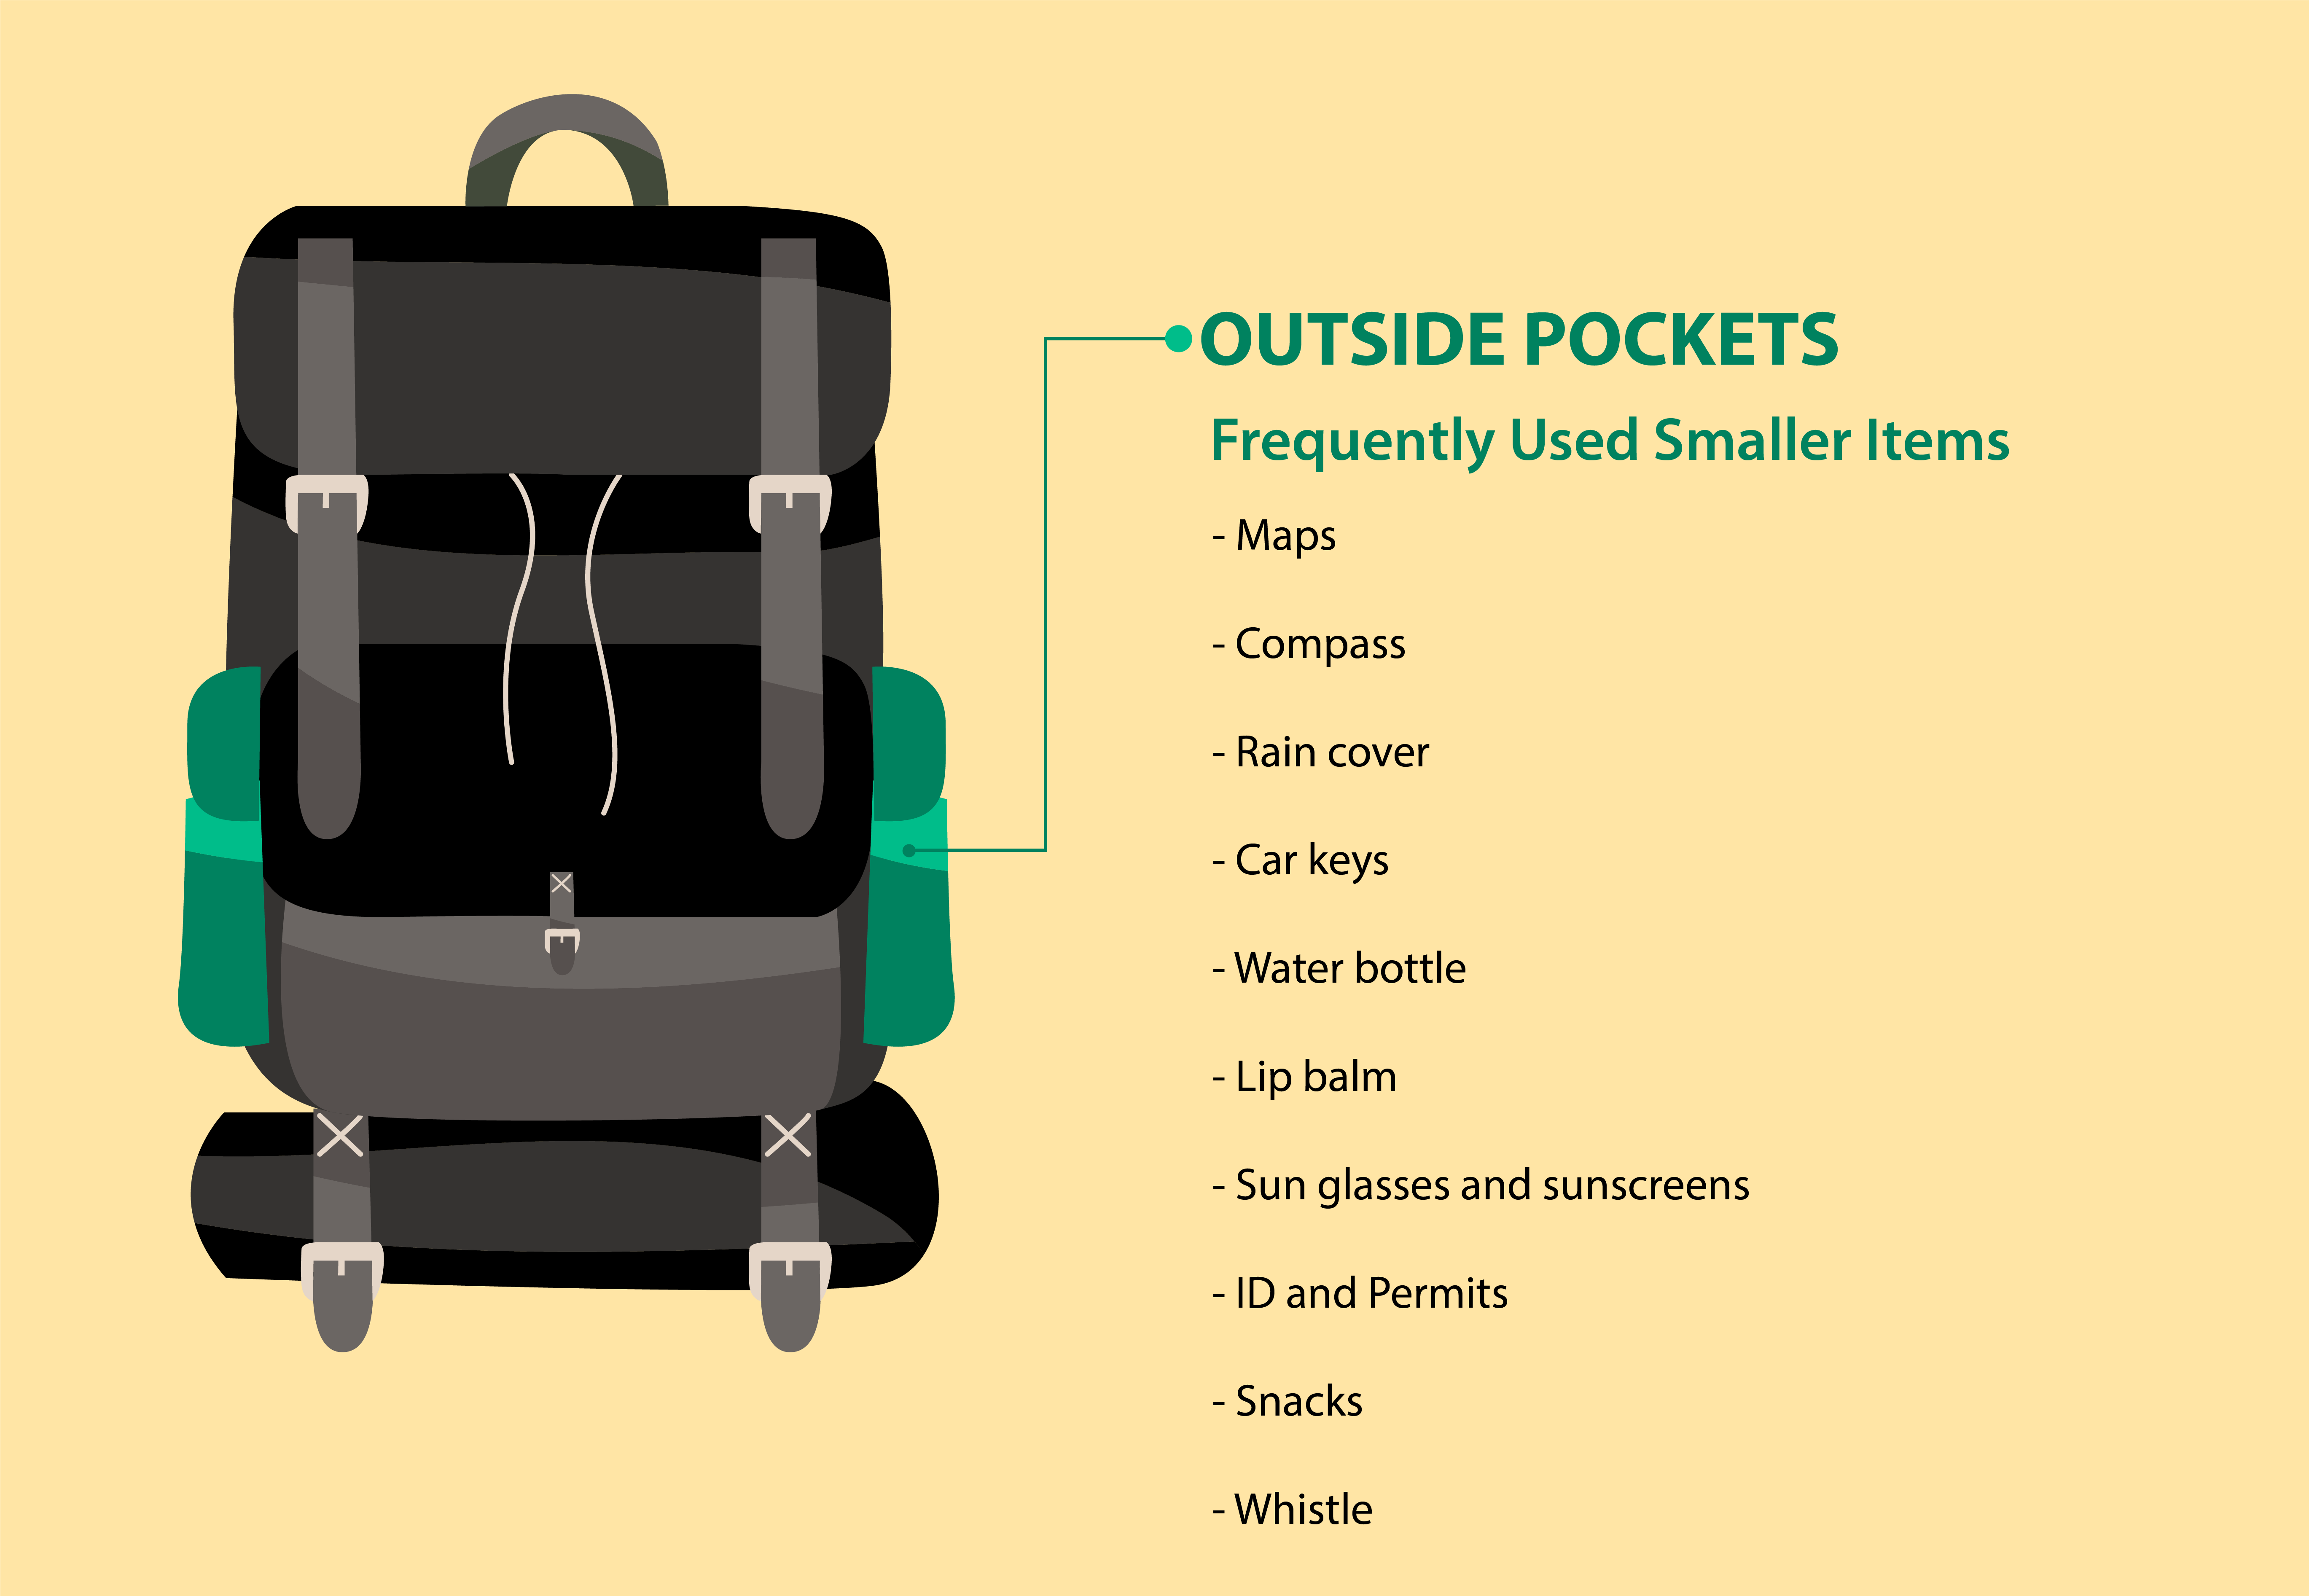
Most packs will have accessory pockets on the outside to help you better organize your smaller items.
These outside pockets should pack frequently used items and other handy stuff that you may need such as maps, compass, rain cover, car keys, water bottle, headlamp/flashlight, bug spray, bear spray, ID, cash, permits, snacks, lip balm, sunglasses (use clip on sunglasses if you wear spectacles), whistle and so on.
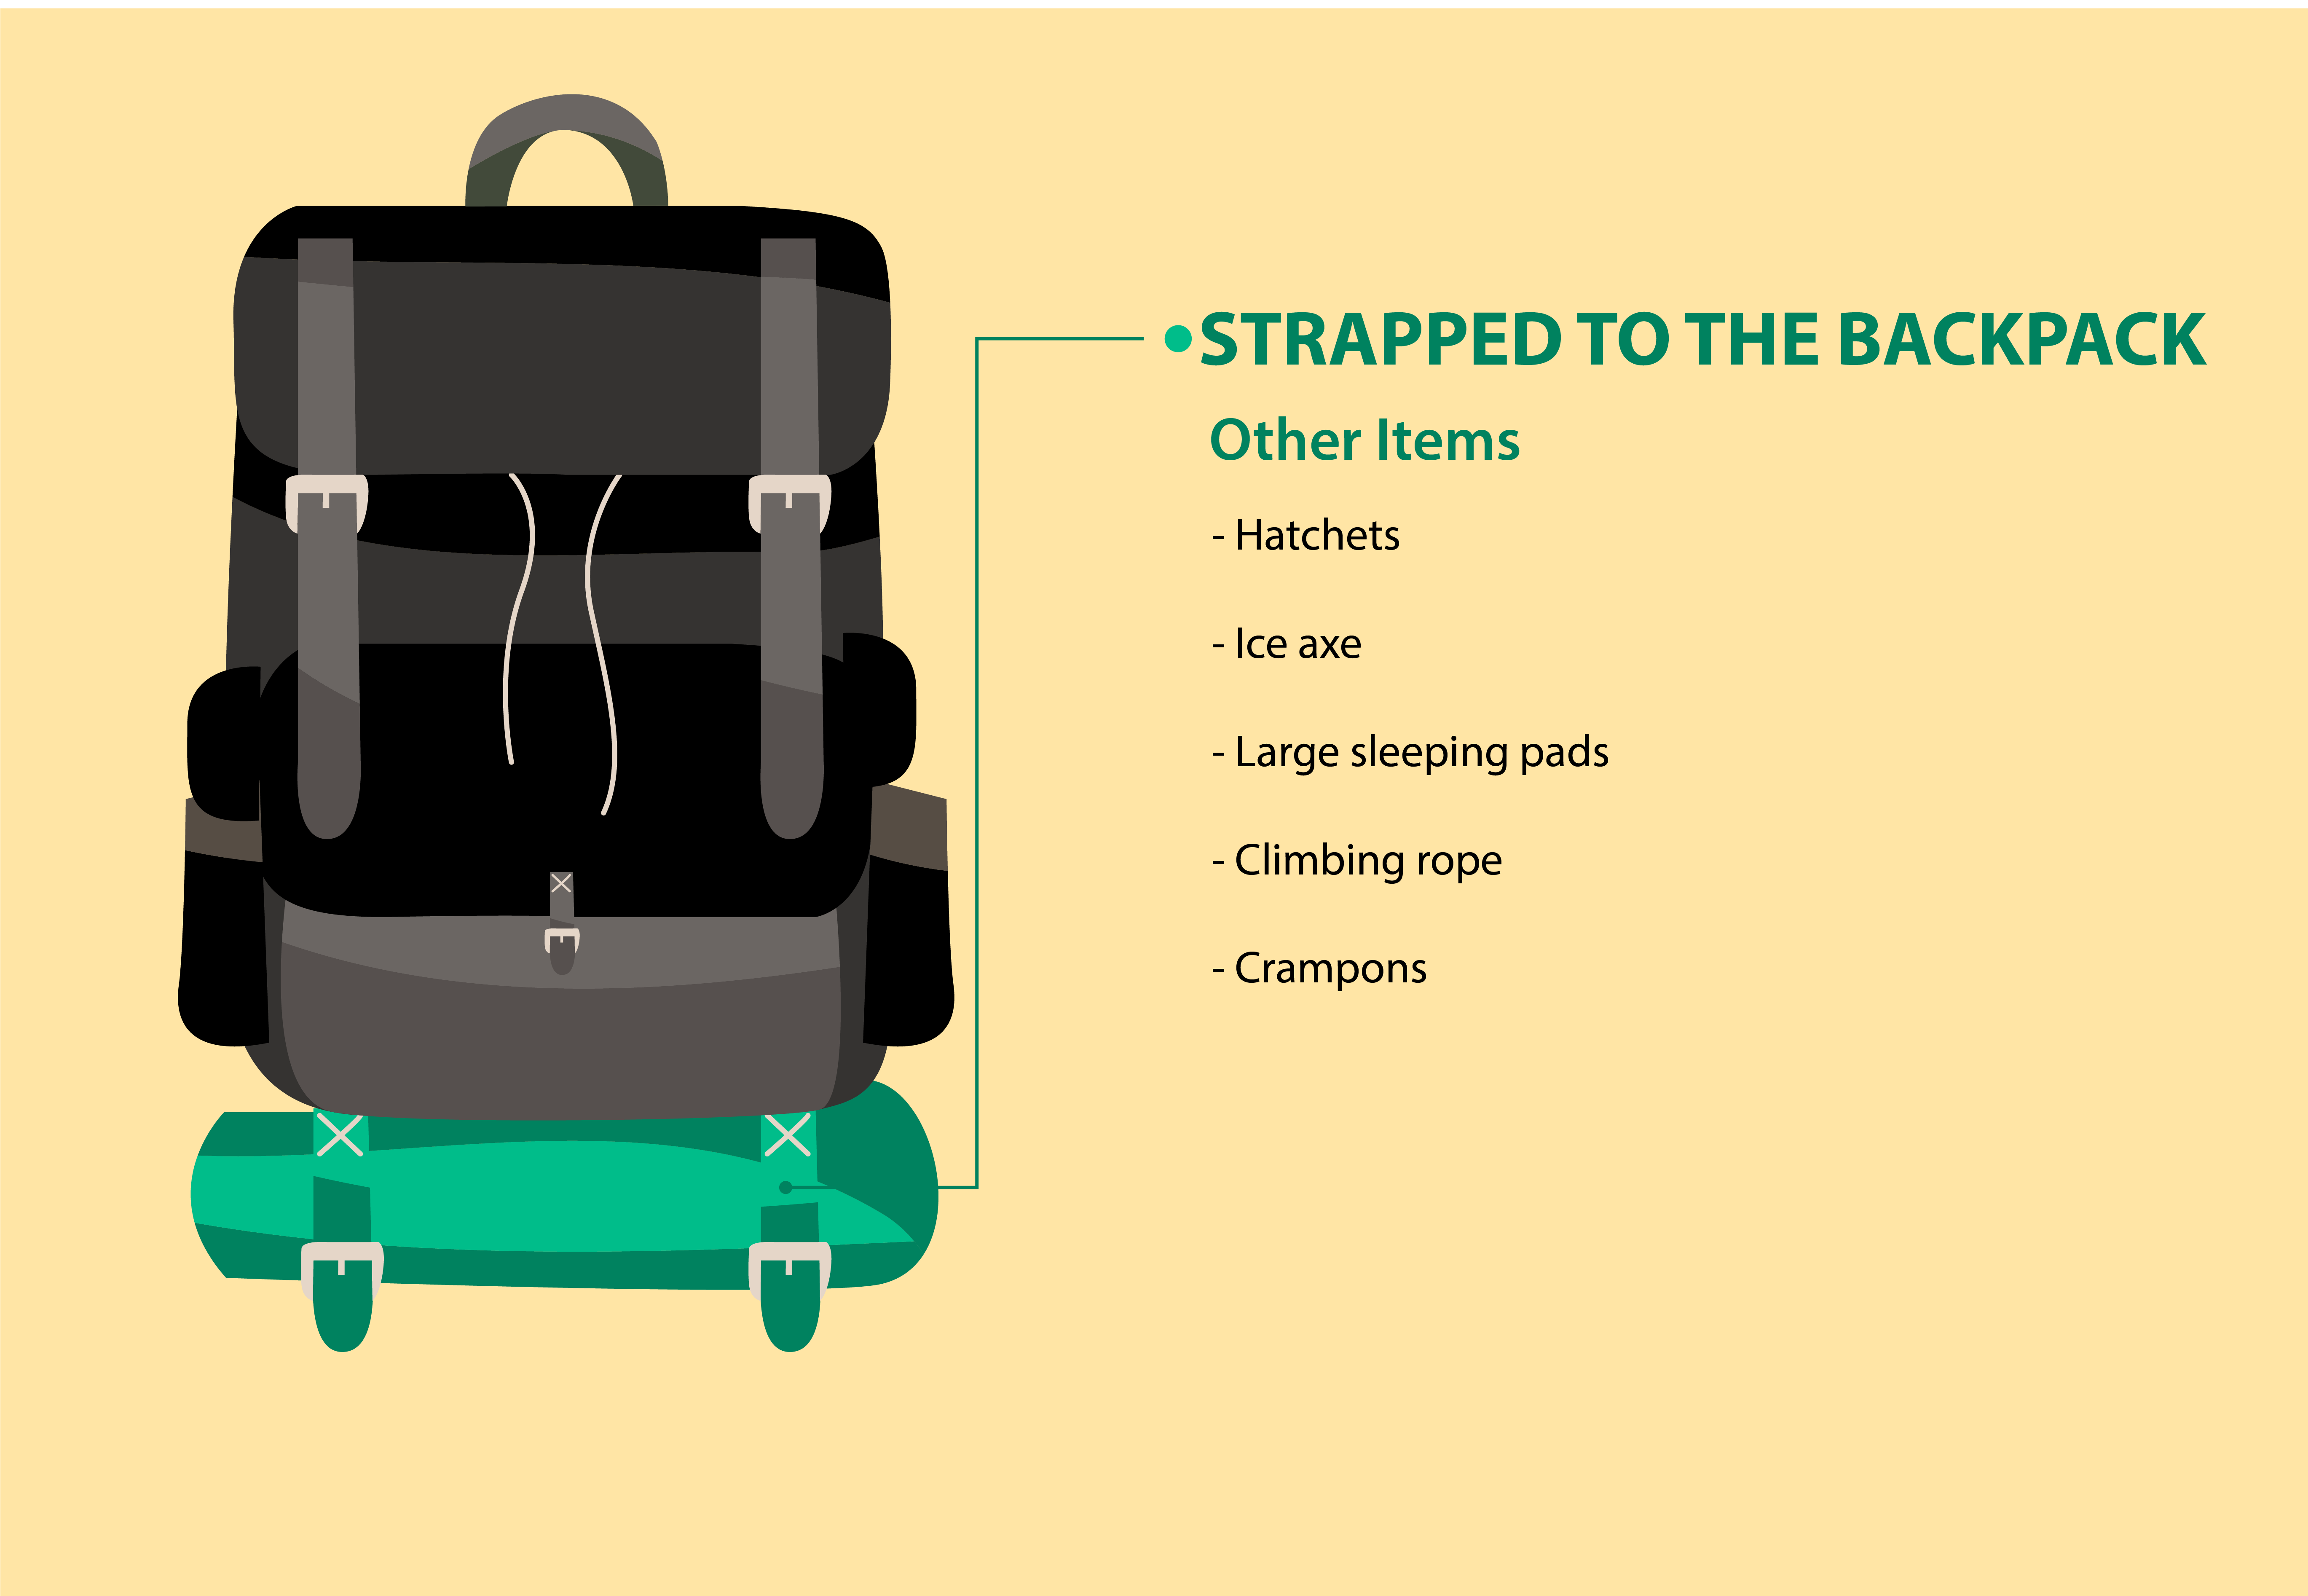
A good quality backpack will sport some tool loops, daisy chains, fasteners, compression straps and lash-on points for more storage and convenience.
Trekking poles, ice axe, hatchets and axes, tent poles, large sleeping pad, camp stool, climbing rope, and crampons, backapacking camp cots, are some of the common gear that can be easily strapped on the outside of your backpack. However, to avoid snagging on rocks and branches, minimize the items you carry outside the pack.
| Duration | Backpack Capacity (Liters) |
| Overnight (1 - 2 nights) | 20 - 30 |
| Weekend Trip (2 - 3 nights) | 30 - 50 |
| Days (3 - 5 nights) | 50 - 60 |
| Extended Trip (5 nights or more) | 60 + |
The most common way to hoist a backpack is the old “grab the haul loop and swing or lift onto your back”. Unsurprisingly, this is not only counterintuitive but may also lead to injuries to your hips, back, shoulders or arms.
You can always adjust your straps for a custom fit so don’t try to wiggle your back into a pre-adjusted backpack. Make such adjustments when the pack is firmly and safely on your back.
Let’s not get ahead of ourselves just yet, here’s how to properly hoist your backpack:
Feel free to readjust the tightness of the straps as you go about your trail to relieve your hips and shoulders from fatigue. Further, to avoid injuries and load shifting, always make sure to fasten all cinches and straps.
If possible, you may remove and re-hoist your backpack at rest stops along your trail and stretch out fatigued muscles for a better hiking experience and pumped finish.
Comfort, stability and convenience must be your guiding light when it comes to packing a backpack efficiently.
Objectively, the lighter items should be further away from the center of your back and heavier items should be closer. The items that are frequently used should be at the top compartment or outside pockets and vice versa. Those that are not used often may be placed at the bottom compartment of the pack.
Doing some practice packing before the main trip will be a good way to assess and improve yourself. Plus, there’s no shame in repacking your backpack!
Charlie Leone
Website Owner/Editor
Welcome to CampingManiacs